

A condenser microphone turns sound into electrical signals by sensing tiny changes in a charged, vibrating capacitor.
Understanding how condenser microphones work helps you choose the right mic, place it well, and get cleaner recordings. The design may look simple, but it combines acoustics, electronics, and careful mechanical engineering. This guide explains each stage in plain English, from sound waves reaching the capsule to phantom power and the final audio signal.
What Is a Condenser Microphone?
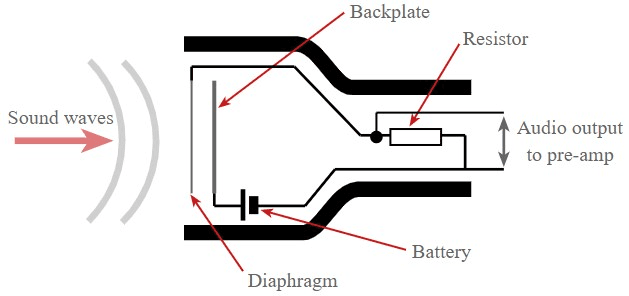
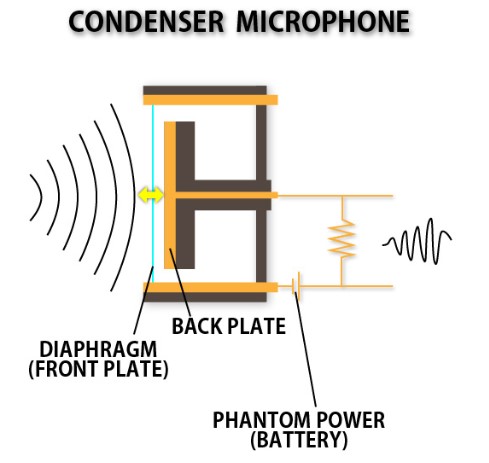
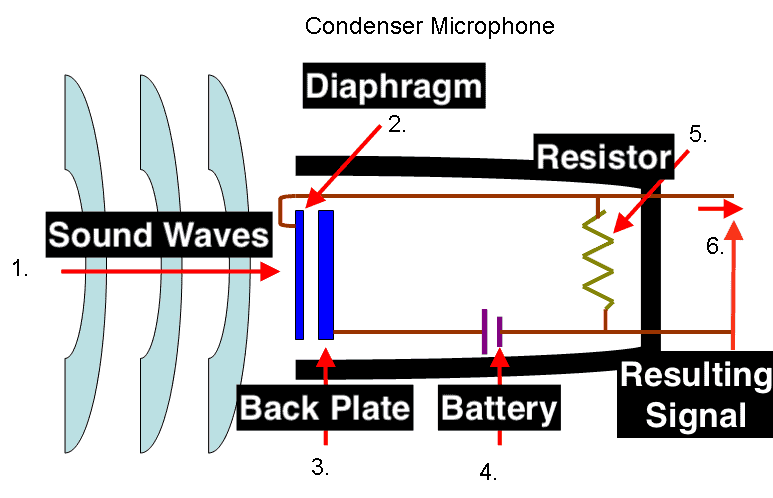
A condenser microphone is a microphone that uses a capacitor to convert sound into an electrical signal. A capacitor stores electrical energy between two conductive surfaces. In a microphone capsule, one surface moves while the other stays fixed.
The moving surface is called the diaphragm. It is often made from a very thin, metal-coated plastic film. When sound waves hit it, the diaphragm moves back and forth.
That movement changes the distance between the diaphragm and a fixed plate. As the distance changes, the capacitance changes too. The microphone’s circuit then turns those changes into an audio signal.
This is the basic answer to how condenser microphones work: sound moves a diaphragm, the diaphragm changes capacitance, and the electronics convert that change into voltage.
Condenser microphones are common in:
• Vocal studios
• Podcast rooms
• Film and video production
• Acoustic instrument recording
• Voice-over booths
• Measurement and laboratory work
Unlike a dynamic microphone, a condenser microphone usually needs power. That power may come from 48-volt phantom power, a battery, or a built-in USB circuit.

How Do Condenser Microphones Work Step by Step?
The easiest way to understand how condenser microphones work is to follow the signal from the sound source to the recording device.
1. Sound Waves Reach the Diaphragm
A singer, speaker, guitar, or other source creates pressure changes in the air. These pressure changes travel as sound waves.
When the waves reach the microphone, they push and pull on the diaphragm. The diaphragm follows the pattern of the sound. A louder sound creates larger movement, while a quiet sound creates smaller movement.
The diaphragm must be light enough to respond quickly. This helps the microphone capture fast details, such as consonants in speech, pick noise on a guitar, or the sharp edge of a snare drum.
2. The Diaphragm Changes the Capacitor
The diaphragm and backplate form the two plates of a capacitor. A small air gap separates them.
When the diaphragm moves closer to the backplate, capacitance increases. When it moves away, capacitance decreases. These changes happen in the same pattern as the original sound wave.
A useful formula is:
C = εA/d
Here, C is capacitance, ε represents the electrical properties of the space between the plates, A is the plate area, and d is the distance between them. Since the distance changes as the diaphragm moves, the capacitance changes as well.
3. The Capsule Needs Electrical Energy
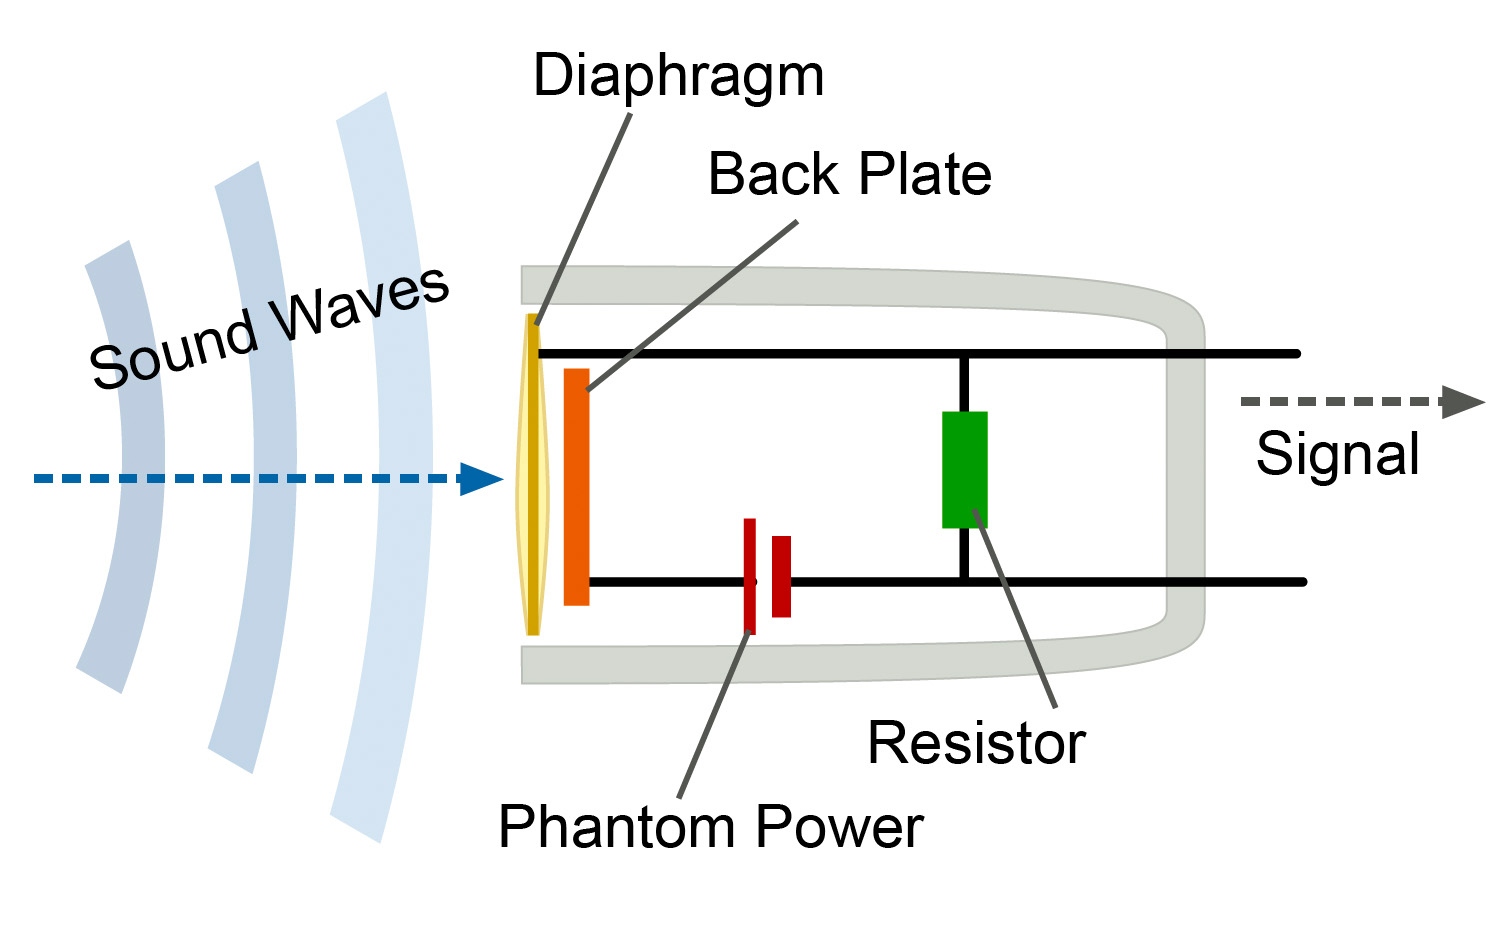
A condenser capsule must hold an electrical charge so its capacitance changes can be measured. This is why condenser microphones need power.
Traditional studio microphones often use 48-volt phantom power. USB condenser microphones draw power from the USB connection. Some small microphones use batteries or a special bias voltage supplied by the microphone circuit.
Phantom power does not make the microphone louder by itself. It powers the capsule and the internal electronics that prepare the very small signal for recording.
4. The Electronics Create a Usable Signal
The capsule produces a very small, high-impedance signal. Most audio equipment cannot use that signal directly.
A small internal preamplifier, often built around a field-effect transistor, or FET, converts the signal into a stronger and lower-impedance output. This makes it easier to send the signal through a cable without major loss or added noise.
The microphone output then travels to an audio interface, mixer, camera, recorder, or USB converter.
5. The Recording Device Captures the Audio
In an analog setup, the interface sends the microphone signal to a preamp and then to an analog-to-digital converter. The converter changes the continuous electrical waveform into digital samples.
In a USB microphone, the preamp and converter are built inside the microphone body. The USB cable carries digital audio to the computer.
This full process explains how condenser microphones work in a modern recording system. The capsule senses sound, the circuit conditions the signal, and the recording device stores or processes it.
The Main Parts of a Condenser Microphone
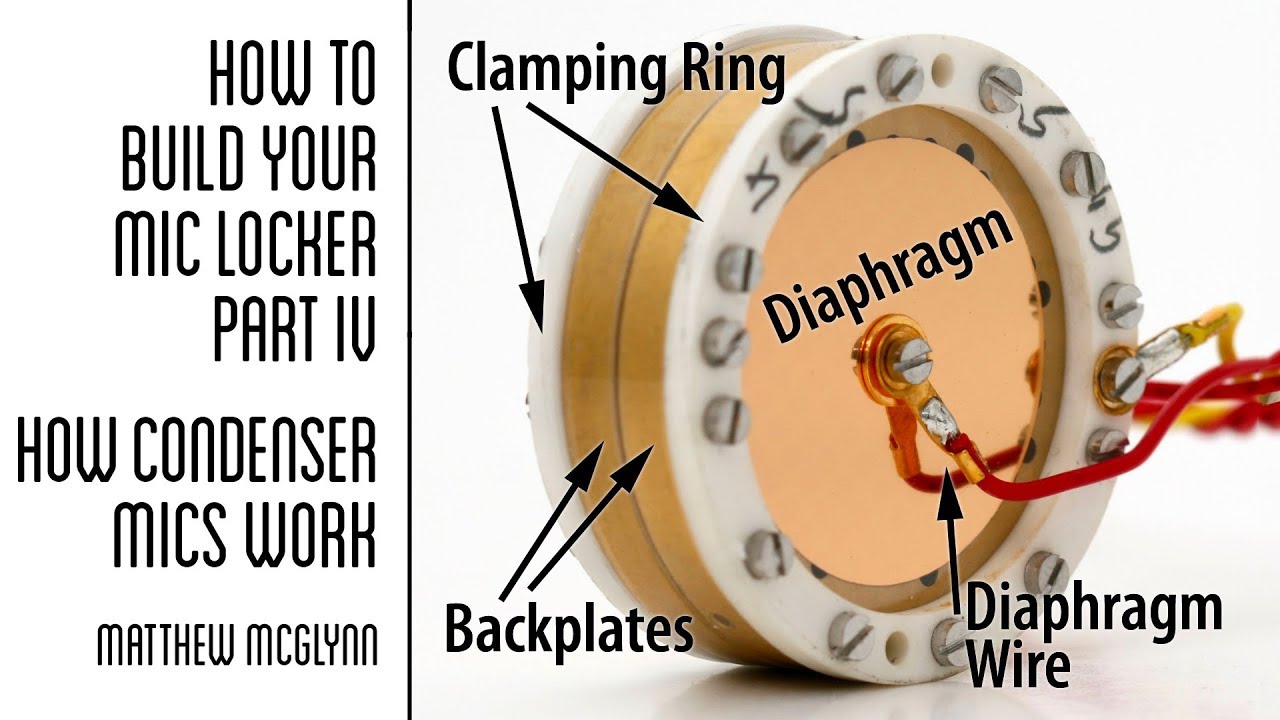
Knowing the main parts makes the design easier to understand. Each part has a clear job.
Diaphragm
The diaphragm is the thin membrane that reacts to sound pressure. Its mass, tension, size, and coating affect the microphone’s sound.
A small diaphragm often captures sound with consistent detail across a wide range of frequencies. A large diaphragm can provide a strong sense of depth and may produce a smooth, flattering vocal tone.
Backplate
The backplate sits behind the diaphragm. Together, the diaphragm and backplate create the variable capacitor.
Many backplates contain carefully sized holes. These holes help control air movement and damp the diaphragm. Their design affects sensitivity, frequency response, and transient detail.
Capsule
The capsule includes the diaphragm, backplate, spacer, and related parts. It is the heart of the microphone.
Some capsules are fixed cardioid designs. Others use two diaphragms to create multiple polar patterns, such as cardioid, omnidirectional, and figure-eight.
Internal Preamplifier
The capsule’s output is delicate and high in impedance. The internal preamplifier makes the signal easier to send through a cable.
A good circuit keeps noise low and preserves the natural character of the capsule. Poor electronics can add hiss, distortion, or unwanted coloration.
Output Connector
Professional XLR condenser microphones usually use a three-pin XLR connector. USB microphones use a USB connection and often include a headphone output, gain control, and monitor mix control.
The connector type does not define sound quality by itself. Capsule design, circuit quality, room acoustics, and placement all matter.
Why Condenser Microphones Need Phantom Power
Phantom power is a DC voltage sent through balanced microphone cables. The standard studio voltage is 48 volts, although some equipment uses lower voltages.
The power travels along the same conductors that carry the audio signal. Because the voltage is applied equally to the two signal conductors, a balanced microphone input can receive phantom power without placing the same voltage across the audio input circuit.
This arrangement is called “phantom” because the power shares the cable with the audio signal without using a separate power lead.
Before using phantom power, follow these habits:
• Connect the microphone before turning phantom power on when possible.
• Turn monitor speakers down to avoid loud pops.
• Check that older ribbon microphones and unusual equipment can safely handle phantom power.
• Use a working balanced XLR cable.
• Turn phantom power off before disconnecting sensitive equipment.
Most modern active ribbon microphones tolerate phantom power, but some passive ribbon microphones can be damaged by faulty cables or incorrect connections. When unsure, check the manufacturer’s manual.
A USB condenser microphone receives its power from the computer or device. It still uses the same basic capsule principle, but its preamp and digital converter are inside the microphone.
Condenser Microphones vs. Dynamic Microphones
The difference between condenser and dynamic microphones comes down to their transducer design.
A dynamic microphone uses a moving coil attached to a diaphragm. The coil moves inside a magnetic field and generates a voltage. A condenser microphone changes capacitance as its diaphragm moves.
Neither design is always better. Each suits different jobs.
Strengths of Condenser Microphones
• High sensitivity, which helps capture quiet details
• Wide frequency response
• Fast response to transients
• Strong performance for vocals, acoustic instruments, and studio work
• Many options for selectable polar patterns
Limitations of Condenser Microphones
• They need power in most designs
• They can capture more room noise
• They may overload when placed too close to very loud sources
• Their thin diaphragms need careful handling
• Poor rooms can sound more obvious in the recording
Strengths of Dynamic Microphones
• Strong resistance to rough handling
• Good performance with loud sources
• Less sensitivity to distant room noise
• No phantom power needed for most models
• Often useful for live stages and untreated rooms
A practical rule is simple: use a condenser microphone when you want detail and have a controlled space. Use a dynamic microphone when you need durability, rejection, or strong performance in a noisy room.
Polar Patterns and Sound Pickup
A polar pattern shows how well a microphone hears sound from different directions. It is a key part of how condenser microphones work in real recording situations because direction affects room sound and unwanted noise.
Cardioid
A cardioid microphone hears the front most strongly and rejects much of the sound from the rear. It is a common choice for vocals, podcasts, voice-over work, and home recording.
Point the front of the microphone toward the source. Keep loud speakers and reflective surfaces behind the microphone when possible.
Omnidirectional
An omnidirectional microphone hears sound from nearly all directions. It can produce a natural, open sound, but it also captures more room tone.
This pattern works well for room recording, measurement, group sound, and situations where a natural response matters more than isolation.
Figure-Eight
A figure-eight microphone hears the front and rear while rejecting the sides. It is useful for two-person recordings, mid-side techniques, and some vocal or instrument blends.
A multi-pattern condenser microphone often creates these patterns by combining the signals from two diaphragms.
Supercardioid and Hypercardioid
These patterns focus more tightly on the front than cardioid models. They can reduce side noise, but they usually have a small rear pickup area.
Always check the pattern diagram. Turning the microphone slightly can change the balance between direct sound and room sound.

What Makes a Condenser Microphone Sound Different?
The phrase “condenser sound” often refers to detail, clarity, and a quick response. However, no single sound describes every condenser microphone.
The capsule size, diaphragm material, circuit, transformer, polar pattern, and frequency tuning all affect the result. A bright condenser may emphasize upper frequencies. A darker model may sound smoother on sharp voices.
Room acoustics also play a major role. A detailed microphone in a hard, empty room can capture reflections that make speech sound harsh or distant. In a treated room, the same microphone may sound clear and polished.
The microphone’s frequency response is not the same as its quality. A flat microphone may be useful for accurate recording. A colored microphone may help a voice or instrument fit a mix.
Manufacturers measure microphones in controlled conditions, but published graphs do not tell the whole story. Placement, source distance, room reflections, and the recording chain shape the final sound.
A useful test is to record the same source with two microphones at the same distance and level. Match the volume before listening. A louder sample often seems better even when it is not.

How to Use a Condenser Microphone Correctly
Good technique often matters more than buying a more expensive microphone. These steps explain how condenser microphones work best in everyday recording.
Place the microphone at a stable height. Keep it close enough for a strong direct signal, but not so close that bass becomes excessive.
Use a pop filter for speech and vocals. It reduces bursts of air from sounds such as “P” and “B.”
Aim the microphone toward the intended sound source. Small angle changes can reduce harshness or control room reflections.
Set the input gain carefully. Leave headroom for sudden loud sounds. Recording too close to 0 dBFS can cause permanent digital clipping.
Monitor with headphones. Listen for hum, hiss, room noise, mouth clicks, and plosive bursts.
Treat the room when possible. Curtains, rugs, bookshelves, and acoustic panels can reduce strong reflections, though thin foam alone may not solve low-frequency problems.
Keep the microphone away from fans, air conditioners, computer noise, and hard reflective walls.
In many home studios, a distance of about 6 to 12 inches works well for vocals. This is only a starting point. A deep voice may need more distance, while a quiet source may benefit from closer placement.
The proximity effect increases low frequencies when using directional microphones at close range. If a vocal sounds boomy, move back slightly or angle the microphone off-axis.
Common Problems and Mistakes to Avoid
Even when you understand how condenser microphones work, small setup mistakes can reduce sound quality.
No Signal
Check phantom power, the XLR cable, interface input selection, and gain control. USB models may need the correct computer input and permission settings.
Hiss
Hiss can come from a noisy preamp, a very low source level, a poor cable, or excessive gain added later. Move the microphone closer to the source and use enough input level without clipping.
Hum or Buzz
Hum often points to grounding, power, lighting, or cable problems. Test a different outlet, move cables away from power adapters, and remove one device at a time to find the cause.
Harsh Vocals
A bright microphone, close distance, untreated reflections, or strong “S” sounds may cause harshness. Try a slight off-axis angle, more distance, or a different microphone.
Boomy Low End
This often comes from proximity effect or room modes. Move the microphone away from the source or wall, and compare several positions.
Distortion
Distortion may occur in the capsule, internal circuit, interface preamp, or digital converter. Lower the input gain and move the microphone farther away from loud sources.
A practical lesson from studio work is to fix the source and placement before reaching for plug-ins. Equalization can shape a good recording, but it cannot fully repair clipping or severe room reflections.
How to Maintain a Condenser Microphone
A condenser microphone can last for many years with basic care.
• Store it in a dry case or cabinet.
• Use a stand that cannot easily tip over.
• Keep food, drinks, and smoke away from the capsule.
• Do not blow into the microphone to test it.
• Use a soft brush or approved cleaning method for external dust.
• Avoid touching the diaphragm.
• Let a cold microphone warm gradually before use in a humid room.
Moisture is a serious risk because the capsule gap is very small. High humidity can cause noise, weak output, or temporary instability.
Do not open the microphone unless you have the right training. Capsule alignment and internal voltages can be delicate. For expensive microphones, professional service is safer than home repair.
Frequently Asked Questions About How Do Condenser Microphones Work
How do condenser microphones work in simple terms?
A condenser microphone uses a thin diaphragm and a fixed backplate to form a capacitor. Sound moves the diaphragm, changing the capacitance, and internal electronics turn that change into an audio signal.
Do all condenser microphones need phantom power?
Most professional XLR condenser microphones need external power, commonly 48-volt phantom power. USB condenser microphones receive power through USB, while some compact models use batteries or other internal power systems.
Are condenser microphones better than dynamic microphones?
Neither type is always better. Condenser microphones usually capture more detail, while dynamic microphones often handle loud sources, rough use, and noisy rooms more easily.
Can you use a condenser microphone without an audio interface?
You can use a USB condenser microphone without a separate audio interface because its interface is built in. An XLR condenser microphone normally needs an audio interface, mixer, or preamp that provides phantom power.
Why does my condenser microphone sound noisy?
Noise may come from room sound, computer fans, electrical interference, a poor cable, or too much gain. Move the microphone closer to the source, test another cable, and check the recording level before replacing equipment.
Can a condenser microphone record loud instruments?
Yes, but placement and input gain matter. Keep the microphone farther away, use a suitable pad if available, and watch for clipping in both the microphone and the audio interface.
Why do condenser microphones sound more detailed?
Their light diaphragms can respond quickly to small changes in air pressure. This can capture fine high-frequency detail, but it can also reveal room reflections, background noise, and harsh source sounds.
Conclusion
A condenser microphone works by using sound to move a diaphragm, changing the capacitance between the diaphragm and backplate. Its internal electronics then convert that tiny change into a practical audio signal. Power, capsule design, polar pattern, placement, room acoustics, and gain settings all shape the final recording.
The best results come from using the right microphone for the room and source. Start with careful placement, a pop filter, controlled gain, and good listening habits before buying more equipment. Try these steps in your next recording, explore reliable microphone guides, and share your results or questions in the comments.