

Electret microphones work by turning sound-driven changes in capacitance into a small electrical audio signal.
If you have ever used a phone, laptop, headset, or lavalier mic, you have likely used an electret microphone. Understanding how do electret microphones work means looking at three simple parts: a thin vibrating diaphragm, a charged electret material, and a tiny field-effect transistor (FET). Together, they create a practical microphone that is small, sensitive, affordable, and reliable.
What Is an Electret Microphone?
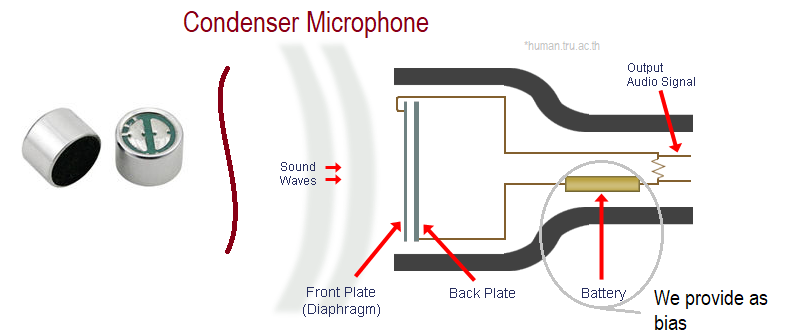
An electret microphone is a type of condenser microphone. It uses a thin diaphragm and a fixed backplate to form a small capacitor. When sound moves the diaphragm, the distance between the diaphragm and backplate changes, which changes the capacitor’s electrical behavior.
The key difference is the electret material. It holds a permanent electric charge, much like a magnet holds a permanent magnetic field. This built-in charge removes the need for the high-voltage polarization supply used by many traditional condenser microphones.
So, how do electret microphones work without a separate polarizing voltage? The electret provides the permanent charge, while a small external power source runs the internal FET and signal circuit.

How Do Electret Microphones Work?
To understand how do electret microphones work, follow the sound from the air to the audio output.
1. Sound reaches the diaphragm
A person speaks, a guitar string vibrates, or a speaker produces music. These actions create tiny changes in air pressure. The microphone’s diaphragm responds to those changes.
The diaphragm is often made from a thin plastic film coated with a conductive layer. It is light enough to move quickly, so it can follow both low bass sounds and high speech frequencies.
2. The diaphragm changes the capacitance
The diaphragm sits close to a rigid backplate. Together, these parts act like two plates of a capacitor.
When the diaphragm moves closer to the backplate, capacitance increases. When it moves away, capacitance decreases. The movement follows the pattern of the original sound wave.
3. The electret maintains the electric field
An electret is a dielectric material that stores a lasting electric charge. It may be placed on the diaphragm, on the backplate, or in a separate layer within the capsule.
This charge creates an electric field between the diaphragm and backplate. As the spacing changes, the stored electrical energy changes as well. That variation becomes the raw audio signal.
4. The FET converts the change into a useful signal
The capsule produces a high-impedance signal. Most audio circuits cannot use that signal directly without difficulty.
A tiny FET, usually built into the microphone capsule, acts as an impedance converter. It changes the high-impedance capsule output into a lower-impedance signal that can travel through a circuit, cable, recorder, or sound card.
5. The external circuit supplies power
Most electret microphone capsules need a small DC supply. This power does not usually create the capsule’s main polarizing field. Instead, it powers the internal FET.
Common power methods include:
• Plug-in power from a laptop, phone adapter, or portable recorder
• Bias voltage from a small microphone circuit
• Phantom power through a suitable professional microphone circuit
• A battery-powered preamp or wireless transmitter
The audio signal rides on the DC supply and is separated later by a coupling capacitor or input circuit.
The Main Parts Inside an Electret Microphone
Although an electret microphone capsule is very small, its design includes several important parts.
Diaphragm
The diaphragm is the moving surface that reacts to sound pressure. A thinner diaphragm can respond quickly, but it may also be more delicate.
Its size and tension affect:
• Sensitivity
• Frequency response
• Maximum sound pressure level
• Resonance
• Distortion
Backplate
The backplate is a fixed conductive surface behind the diaphragm. Small holes in the backplate allow air movement and help control the diaphragm’s response.
The gap between the diaphragm and backplate must remain very small and stable. Dust, moisture, or physical damage can affect the capsule’s performance.
Electret layer
The electret layer stores the permanent charge. Common electret materials include special polymer films that are charged during manufacturing.
The charge can last for many years, but it is not perfectly permanent. Heat, humidity, contamination, and poor storage can slowly reduce performance.
Internal FET
The FET is the first active electronic device in the signal path. It works as a buffer and impedance converter.
This part needs power, which explains why many electret microphones need a small bias voltage even though they do not need a traditional condenser microphone’s high polarization voltage.
Housing and acoustic ports
The capsule housing protects the internal parts. Small openings let sound reach the diaphragm.
Some capsules also include an acoustic filter, protective mesh, or rear vent. These features help shape the frequency response and reduce wind or handling noise.

How Electret Microphones Convert Sound Into Voltage
The conversion process is based on capacitance. A simplified capacitor relationship is:
C = εA ÷ d
Here:
• C is capacitance
• ε is the dielectric constant
• A is the plate area
• d is the distance between the plates
The diaphragm changes the value of d as it moves. Even a very small movement can create a measurable change in capacitance because the diaphragm and backplate are close together.
The electret’s permanent charge allows this capacitance change to produce a changing voltage or current. The FET then buffers that signal.
A simple way to picture it is to imagine a flexible wall facing a fixed wall. Sound pushes the flexible wall back and forth. The changing space between the two walls changes the electrical relationship between them.
This is why how do electret microphones work is closely linked to both mechanical design and electrical design. The capsule must move accurately, and the circuit must read that movement without adding too much noise.

What Powers an Electret Microphone?
Electret microphones need power in most practical designs. However, the required voltage and current are usually low.
A typical capsule may operate from a few volts and draw a small current. Exact values vary by capsule, FET design, sensitivity, and manufacturer.
Plug-in power
Small consumer devices often provide plug-in power through the microphone input. Computers, phones, cameras, and portable recorders may use this system.
Plug-in power is not the same as professional phantom power. The voltage, wiring, and current can differ, so adapters must be compatible.
Phantom power
Some electret microphones use an internal circuit that accepts 48-volt phantom power. The capsule itself may still operate at a much lower voltage after regulation.
Never assume that every electret capsule can connect directly to a 48-volt source. A bare capsule may be damaged if the circuit does not limit and regulate the power.
Battery power
Wireless transmitters, lavalier systems, and compact recorders often power electret capsules from batteries. This approach is useful when the recording device cannot provide bias power.
Bias resistor and coupling capacitor
A basic circuit often includes:
• A DC supply
• A bias resistor for the FET
• A coupling capacitor to remove DC from the audio output
• An output resistor or preamp input
The coupling capacitor passes the audio variation but blocks the steady DC voltage. This keeps the next audio stage from receiving unwanted direct current.

Electret Microphone Frequency Response and Sensitivity
Frequency response describes how evenly a microphone captures different pitches. A flat microphone treats bass, midrange, and treble more evenly. A shaped microphone may boost speech clarity or reduce low-frequency noise.
Electret microphones can have a wide frequency range, but quality varies greatly between capsules. A tiny low-cost capsule may sound thin or noisy, while a carefully designed electret microphone can sound clear and balanced.
Sensitivity tells you how much output a microphone produces for a given sound pressure. It is often listed in decibels relative to 1 volt per pascal.
A more sensitive microphone produces a stronger signal from the same sound. However, higher sensitivity is not always better. It can also make the microphone more likely to overload in front of loud sources.
Important specifications include:
• Sensitivity
• Self-noise
• Frequency response
• Maximum sound pressure level
• Signal-to-noise ratio
• Output impedance
• Operating voltage
• Current consumption
When comparing microphones, read the full data sheet instead of relying only on sensitivity. A sensitive microphone with high self-noise may perform worse in a quiet recording than a slightly less sensitive microphone with a cleaner circuit.

Electret Microphone Versus Traditional Condenser Microphone
Both microphone types use capacitance changes. The main difference is how the electrical charge is supplied.
A traditional externally polarized condenser microphone needs a high-voltage polarization supply. The diaphragm and backplate are charged by the microphone’s power circuit.
An electret microphone uses a permanently charged dielectric material. It still needs power for its FET and other electronics, but it usually does not need a high-voltage polarization supply.
Electret microphone benefits
• Small physical size
• Low cost
• Low power use
• Good sensitivity
• Simple circuit design
• Easy integration into phones, cameras, and computers
• Reliable performance in many everyday devices
Traditional condenser benefits
• Often offers very low noise
• Can provide excellent detail
• May handle professional recording demands well
• Allows more control over capsule polarization
The category alone does not determine sound quality. A well-designed electret microphone can outperform a poorly designed traditional condenser microphone. Capsule quality, circuit noise, housing design, and acoustic tuning all matter.

Advantages of Electret Microphones
Electret microphones became popular because they solve several practical problems at once.
They are compact
The capsule can be only a few millimeters wide. This makes it useful for phones, hearing aids, smart speakers, security systems, and wearable devices.
They use little power
An electret capsule often needs only a small amount of current. This is important for battery-powered equipment.
They are affordable
Mass production keeps the cost low. Manufacturers can place several capsules in one device for stereo recording, noise reduction, or beamforming.
They can sound very good
A high-quality electret microphone can capture speech, instruments, and environmental sound with impressive clarity. Good acoustic design matters more than the word “electret” on the package.
They are easy to build into products
The capsule works with simple bias circuits and small preamps. This makes it practical for do-it-yourself electronics and commercial products.
Limitations of Electret Microphones
Electret microphones are useful, but they are not perfect.
The electret charge can weaken
The permanent charge may slowly decline over a long period. Heat and moisture can speed up this process.
They can produce circuit noise
The FET and bias circuit add noise. In very quiet recording spaces, this noise may be more noticeable than the capsule’s sound.
Cheap capsules vary in quality
Low-cost capsules may have inconsistent sensitivity, uneven frequency response, or poor protection from interference.
They may overload
A small capsule can distort when exposed to loud sound. Check the maximum sound pressure level before using one near drums, amplified guitar, or industrial equipment.
Moisture can cause problems
Condensation may create leakage paths inside the capsule. This can cause crackling, weak output, or intermittent operation.
Power mistakes can damage the capsule
Applying the wrong voltage or wiring can harm the FET. Always check the capsule’s specifications before building a circuit.

Where Are Electret Microphones Used?
Once you understand how do electret microphones work, their wide use becomes easier to explain.
Common applications include:
• Smartphones and tablets
• Laptop computers
• Wired and wireless headsets
• Lavalier microphones
• Hearing aids
• Security cameras
• Intercoms
• Smart speakers
• Automotive hands-free systems
• Musical instrument pickups
• Measurement equipment
• Voice-controlled devices
• Toys and educational electronics
Lavalier microphones are a good example. They need to be small, light, sensitive, and low in power use. An electret capsule meets those needs better than many larger microphone designs.
Multiple electret capsules are also used in microphone arrays. A device can compare the signals from several capsules to find the direction of a voice or reduce steady background noise.
A Practical Electret Microphone Circuit
A basic circuit can be built with a capsule, a resistor, a capacitor, and an audio input.
A common arrangement works like this:
Connect the positive supply to one side of a bias resistor.
Connect the other side of the resistor to the capsule’s positive terminal.
Connect the capsule’s negative terminal to ground.
Take the audio signal from the capsule side of the resistor.
Use a coupling capacitor between that signal point and the amplifier input.
Connect the amplifier input to a suitable ground reference.
The resistor sets the capsule’s operating current. Its value depends on the supply voltage and capsule specification. A common starting range may be several thousand ohms, but the data sheet should guide the final choice.
The coupling capacitor and input resistance form a high-pass filter. If the capacitor is too small, bass response may drop. If it is large enough, the microphone can pass speech and music without unwanted low-frequency loss.
Keep the wires short when possible. Use shielded cable for longer runs, and place a small power-supply bypass capacitor near the microphone circuit.
How to Test an Electret Microphone
If a microphone seems dead, test the power and wiring before blaming the capsule.
Use this basic process:
Check the capsule polarity.
Measure the DC voltage at the capsule with a multimeter.
Confirm that the supply is within the recommended range.
Inspect solder joints for cracks or bridges.
Listen for output through a known working amplifier.
Tap near the capsule lightly, rather than striking the diaphragm.
Test with a different cable or input.
A multimeter can confirm bias voltage, but it cannot fully show audio quality. To inspect the audio waveform, use an oscilloscope or a suitable audio interface.
One common mistake is connecting a bare electret capsule directly to a speaker input or expecting it to drive headphones. The capsule’s output is too weak, and its impedance is too high. It needs a suitable preamp or input stage.
Another mistake is covering the sound port with glue, tape, or thick foam. This can reduce treble and make the microphone sound dull.
How to Improve Electret Microphone Sound
Good results depend on more than the capsule itself.
Use proper placement
For speech, place the microphone close enough to achieve a strong voice signal but far enough away to avoid breath noise and harsh “p” sounds.
Add a windscreen
A foam windscreen can reduce air blasts and light wind. It will not solve severe outdoor wind, but it helps with normal speech.
Control the room
Soft furnishings reduce reflections. A microphone may sound clearer in a small room with curtains and rugs than in a large room with bare walls.
Avoid excessive gain
Too much preamp gain increases hiss and may cause clipping. Set the gain so normal speech is strong but loud sounds still have headroom.
Use shielding
Keep microphone cables away from power adapters, motors, and poorly shielded digital circuits. Electret capsules produce small signals, so interference can become audible.
Choose the right capsule
For quiet recording, look for low self-noise. For loud sources, check maximum sound pressure level. For speech, study the midrange response and off-axis behavior.
Common Problems and Their Causes
Understanding how do electret microphones work makes troubleshooting much easier.
No sound
Possible causes include:
• No bias power
• Reversed wiring
• Broken cable
• Damaged FET
• Incorrect input connection
Very low output
Possible causes include:
• Incorrect bias resistor
• Weak electret charge
• Poor capsule placement
• Blocked sound port
• Faulty coupling capacitor
• Input gain set too low
Hiss
Possible causes include:
• Noisy preamp
• Very low microphone sensitivity
• Excessive gain
• Poor power filtering
• Long unshielded cable
Hum or buzz
Possible causes include:
• Ground loops
• Poor shielding
• Nearby power supplies
• Digital circuit interference
• Incorrect cable wiring
Distortion
Possible causes include:
• Excessive sound pressure
• Preamp clipping
• Incorrect supply voltage
• Damaged diaphragm
• A bias point that is unsuitable for the FET
Troubleshooting works best when you change one thing at a time. This simple habit prevents confusion and helps you identify the real cause.
Safety and Design Tips
Electret microphone circuits are usually low voltage, but careful design still matters.
• Follow the capsule data sheet.
• Do not apply phantom power directly to an unprotected capsule.
• Limit current with the correct resistor or circuit.
• Protect the capsule from static discharge.
• Keep moisture away from the sound port.
• Use a clean, regulated supply for low-noise recording.
• Add a coupling capacitor when the next stage should not receive DC.
• Test the circuit at low gain before connecting expensive audio equipment.
Electret capsules are small and easy to damage with heat. When soldering, work quickly and use a clean, temperature-controlled iron. Avoid heating the capsule body for longer than necessary.
Frequently Asked Questions About How Do Electret Microphones Work
How do electret microphones work without phantom power?
They can work from a small bias supply provided by a phone, recorder, camera, battery, or simple microphone circuit. The electret material supplies the permanent charge, while the external power runs the internal FET.
Do electret microphones need electricity?
Most electret microphone capsules need a small amount of electricity for the internal FET. The electret charge itself is permanent, so the microphone does not need a high-voltage polarization supply.
Are electret microphones condenser microphones?
Yes. An electret microphone is a type of condenser microphone because it uses a diaphragm and backplate whose capacitance changes with sound. Its permanent electret charge replaces the external polarization voltage used in many other condenser microphones.
Do electret microphones sound good?
They can sound very good when the capsule, FET, preamp, and acoustic housing are well designed. Sound quality varies widely, so specifications such as self-noise, frequency response, and maximum sound pressure level are important.
What voltage does an electret microphone need?
Many small capsules operate from a low DC voltage, often a few volts, but the correct value depends on the model. Always check the manufacturer’s specifications before connecting a power source.
Can an electret microphone use 48-volt phantom power?
Some complete electret microphones can use phantom power because they include a circuit that regulates and limits it. A bare electret capsule should not be connected directly to 48 volts unless the circuit is designed to protect it.
Why does my electret microphone sound quiet?
A quiet signal may result from missing bias power, an incorrect resistor, weak preamp gain, bad wiring, or a damaged capsule. Measure the DC operating voltage first, then check the signal path.
Conclusion
How do electret microphones work? Sound moves a charged diaphragm, the diaphragm changes capacitance, and an internal FET converts that change into a usable audio signal. A small power supply runs the electronics, while the electret material provides the lasting electric charge.
This simple design explains why electret microphones appear in so many everyday devices. They are compact, efficient, affordable, and capable of clear sound when matched with the right circuit and application.
If you are building or repairing a microphone, start with the data sheet, use the correct bias circuit, and test the power before changing anything else. Explore more audio electronics guides, try a simple electret circuit, and share your microphone project or question in the comments.
