

Stringing a 12-string guitar means replacing each paired course carefully, matching the correct gauges, and tuning slowly.
Learning how to string a 12 string guitar is easier when you treat each pair as one musical course. I have restringed many 12-string acoustics, and the main lessons are simple: use the right set, keep the bridge and tuners organized, and raise tension in small steps. This guide explains the full process, common mistakes, tuning tips, and ways to protect your guitar.
What You Need Before You String a 12-String Guitar
Before learning how to string a 12 string guitar, gather the right tools. A calm setup prevents mistakes and keeps the guitar stable.
You will need:
• A complete 12-string guitar string set
• A string winder
• A wire cutter
• A tuner, preferably a clip-on or chromatic model
• A bridge-pin puller or the notch on your string winder
• A soft cloth
• Lemon oil made for unfinished rosewood or ebony, if needed
• A small ruler for checking action, if you want to inspect the setup
Use a string set made for your guitar. Acoustic, electric, classical, and 12-string bass strings are not interchangeable. A 12-string acoustic guitar usually uses bronze or phosphor bronze strings, while an electric 12-string guitar needs electric guitar strings with the correct ball ends.
String gauges matter because a 12-string guitar carries much more tension than a six-string guitar. A common light acoustic set may use gauges around .010 to .047, but exact sizes vary by brand and design. Always check the gauge printed on the package.
A soft cloth is useful for cleaning dust under the strings. Avoid household oils, furniture polish, and rough fabric. These can harm the finish or leave residue on the fingerboard.

Understand the String Pairs and Tuning
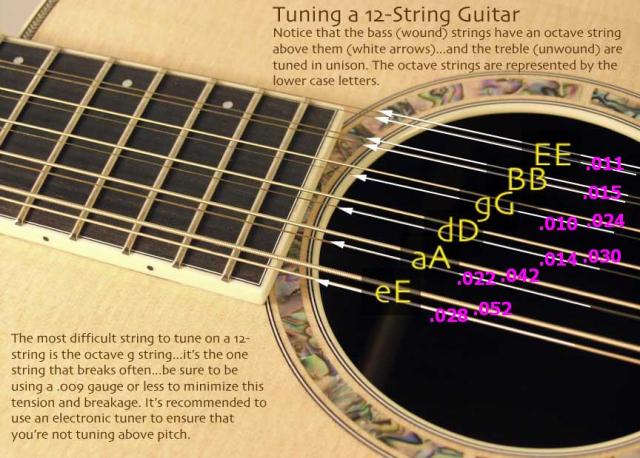
A 12-string guitar has six courses. Each course contains two strings that are played together. The pairs create the wide, shimmering sound associated with artists such as The Byrds, Led Zeppelin, and many folk and rock players.
Standard tuning is:
• Course 1: high E and high E
• Course 2: B and B
• Course 3: G and G
• Course 4: D and a thinner octave D
• Course 5: A and a thinner octave A
• Course 6: low E and a thinner octave E
The lowest four courses usually contain one heavier wound string and one thinner octave string. The B and high E courses usually use two strings of the same pitch and similar gauge.
Look closely at the old strings before removing them. The octave strings are thinner and often sit beside the heavier strings in a clear pattern. Your guitar may place the octave string above or below its partner, depending on the bridge and nut design.
Never assume the string layout from memory. Some guitars use unusual bridge or tuner arrangements. Take a photo of the headstock, bridge, and string paths before you begin. This small step can save a great deal of confusion.
When you learn how to string a 12 string guitar, think of each pair as a team. The two strings must sit in the correct slots, pass through the correct nut grooves, and reach the correct tuning posts.

Prepare the Guitar for restringing
place the guitar on a stable table or workbench. Put a folded towel under the neck if the instrument needs extra support. Keep the headstock away from the edge of the table.
You can replace the strings one at a time or remove all of them first. Both methods work, but each has benefits.
Replacing strings one at a time:
• Keeps some tension on the neck
• Makes the string path easier to copy
• Reduces the chance of mixing up pairs
• Helps beginners feel more secure
Removing all strings at once:
• Makes cleaning easier
• Gives you full access to the fingerboard
• Lets you inspect the bridge, saddle, and nut
• Works well when the guitar is in good condition
For a first attempt, I suggest replacing one course at a time. This method feels slower, but it reduces errors. On a valuable or older guitar, maintaining a steady change in tension is also a sensible precaution.
Loosen each old string with the tuner before cutting it. Do not cut a fully tight string in the middle. Sudden release can make the string whip, and it can put unnecessary shock on the instrument.
After loosening the string, cut it near the center and remove both ends. Place old strings in a bag or wrap them safely. Small cut ends can be sharp.
This is also a good time to inspect the guitar:
• Look for lifting at the bridge
• Check for cracks near the bridge and soundhole
• Inspect the tuner posts for loose screws
• Look for sharp edges in the nut slots
• Check whether the saddle is leaning or moving
If you see a lifting bridge, a cracked top, or severe neck movement, stop and ask a qualified guitar technician for help.
How to String a 12 String Guitar Step by Step
The process for how to string a 12 string guitar differs slightly between acoustic and electric models. The steps below focus mainly on a steel-string acoustic guitar with bridge pins.
1. Start with the lowest course
Begin with the low E course. Find the two strings labeled for the lowest pair. One will be thicker, and the other will be a much thinner octave string.
Insert the ball end of the heavier string into the correct bridge hole. Place the bridge pin into the hole with its groove facing the string. Push the pin down while holding the string firmly.
Pull the string gently upward. This helps the ball end catch under the bridge plate instead of sitting against the bottom of the pin. If the ball end is not seated correctly, it may pop out while tuning.
Repeat the process with the thin octave string. Keep both strings in the correct course. Do not place the octave string in a neighboring hole.
2. Route the strings toward the tuning posts
Guide each string along the fingerboard and through the correct nut slot. The string should sit naturally in the groove without force.
At the headstock, check the tuner layout. A 12-string guitar often has six tuners on each side, but some models use a 3-over-3 layout with paired posts. Follow the original path or your photograph.
Do not twist the string around itself before it reaches the post. A clean path reduces friction and improves tuning stability.
3. Measure the winding length
Pull the string past its tuning post. Leave extra length for several wraps.
As a general guide:
• Leave about two to three tuner-post lengths for wound bass strings
• Leave about three to four tuner-post lengths for plain treble strings
The exact amount is not critical. Too little length can cause poor grip. Too much creates messy wraps and makes tuning harder.
Bend the string sharply at the point where it meets the tuning post. This bend helps keep the string in place while you wind it.
4. Wind the string neatly
Use the string winder, but turn it slowly at first. The first wrap should sit above the cut end. The remaining wraps should move downward toward the headstock surface.
Keep gentle tension on the string as you wind. Loose coils can overlap, slip, or create tuning problems.
For a right-handed tuner layout, the winding direction may differ from one side of the headstock to the other. The goal is always the same: the string should pull toward the center of the headstock and leave the post at a clean angle.
Do not force the string into a sharp angle. A smooth path places less stress on the nut and tuning post.
5. Repeat the process for the other courses
Work from the low E course toward the high E course, or change one complete course at a time. Many players prefer this order because it gradually brings the guitar up to tension.
Install both strings in each course before moving to the next. This makes it easier to compare the string positions and keeps the instrument organized.
While installing each pair, check these points:
• The heavier string is in the correct bass-side slot
• The thin octave string is in its matching slot
• Both strings pass cleanly through the nut
• Neither string crosses another string
• The bridge pins sit at similar depths
• The wraps remain neat on the tuner posts
This careful approach is the heart of how to string a 12 string guitar without creating avoidable tuning problems.
Tune a 12-String Guitar Safely
Fresh strings stretch. A 12-string guitar also has many strings pulling against the neck, bridge, and top. Tune slowly and check the instrument as you go.
First, bring every string close to pitch. Do not tune one string fully while the other eleven remain loose. A rough pass keeps the tension more balanced.
Tune each course together:
- Tune the heavier string near its target pitch.
- Tune its partner near the same course pitch or octave pitch.
- Check both strings again.
- Repeat the process until the pair sounds stable.
For standard tuning, the courses are E, A, D, G, B, and E from lowest to highest. The octave strings in the E, A, D, and G courses sit above the main notes by one octave.
Use a chromatic tuner and watch the note name carefully. A thin octave string can sound deceptively high. If you tune it to the wrong octave, it may break.
After the first pass, stretch each string gently. Place one finger under the string around the twelfth fret, lift it slightly, and move along a short section. Use light pressure. Never yank the string.
Retune after stretching. New strings may need several cycles before they hold pitch. I usually tune, stretch, retune, and then let the guitar rest for a few minutes.
If the guitar feels unusually tight, stop and check the gauges and tuning. A string set that is too heavy can create excessive tension. Lower tuning, such as D standard, is sometimes useful for older guitars or players who want less tension, but follow the guitar maker’s guidance.

Check Intonation, Action, and String Seating
Changing string gauge can affect the guitar’s feel and intonation. If you use the same gauge as before, major changes are less likely. Still, a short inspection is worthwhile.
Play an open note and compare it with the fretted note at the twelfth fret. The two notes should be close. A large difference may indicate an intonation issue, a saddle problem, or a string that has not fully seated.
Check the action by looking at the space between the strings and frets. If the strings suddenly sit much higher, the bridge may be lifting or the neck may need attention.
Inspect the bridge pins after tuning. They should remain seated. If one pin rises, loosen that string and reseat the ball end under the bridge plate.
Also check the nut. Each string should sit in its groove without binding. You may hear a sharp ping while tuning if a string sticks and then releases. This can happen when the nut slot is too tight or rough.
Do not file nut slots or adjust the truss rod unless you know the correct procedure. These parts require careful measurement. A small mistake can create buzzing, poor action, or permanent damage.

Common Mistakes to Avoid
The most common problems come from rushing. A 12-string setup has twice as many strings, but it does not need twice the stress.
Avoid these mistakes:
• Installing a six-string set on a 12-string guitar
• Mixing octave strings with the wrong course
• Cutting tight strings without loosening them first
• Winding loose coils around the tuner post
• Tuning a thin octave string too high
• Forgetting to seat the ball end under the bridge plate
• Changing to heavier gauges without checking the guitar
• Using the wrong string type for an acoustic or electric guitar
• Cutting strings too short before measuring the winding length
• Trying to fix a damaged bridge with extra tuning changes
One mistake I made early on was cutting a thin string too close to the tuner. It looked neat, but there was not enough length for a secure wrap. The string slipped during tuning, so I had to remove it and start again. Now I measure the extra length before making any cut.
Another common error is placing all the octave strings on one side of the courses. The guitar may still look almost correct, but the sound and playing feel will be wrong. Use the old string layout or the manufacturer’s diagram as your guide.

Choose the Right Replacement Strings
String choice affects tone, comfort, volume, and tuning stability. There is no single best 12-string guitar string set for every player.
Phosphor bronze strings often produce a warm, balanced sound. 80/20 bronze strings can sound brighter and more open when new. Coated strings may last longer for players with acidic sweat, though some musicians prefer the feel and tone of uncoated strings.
Consider these factors:
• Light gauges feel easier to fret
• Medium gauges can provide more volume and a fuller tone
• Phosphor bronze often sounds warm and balanced
• 80/20 bronze often sounds bright and clear
• Coated strings may resist corrosion longer
• Silk and steel sets offer lower tension on some instruments
Match your choice to the guitar maker’s recommendations. Vintage guitars, small-body guitars, and lightly built instruments may not tolerate heavy strings well.
If your fingers hurt, do not immediately press harder. Check your action, string gauge, and tuning. A properly set up 12-string guitar should feel demanding but not painful.
Replace strings when they sound dull, feel rough, show corrosion, or fail to stay in tune. Players who perform often may change them every few weeks. Casual players may get several months from a set.

Keep a 12-String Guitar in Good Condition
Good care makes every future string change easier. Store the guitar in a case or quality gig bag, away from heat, cold, and sudden humidity changes.
Wood responds to changes in moisture. Very dry air can contribute to cracks, sharp fret ends, and top movement. Excess moisture can cause swelling and high action. A soundhole humidifier may help in dry climates, but use one made for guitars and follow its instructions.
Wipe the strings after playing. Sweat and skin oils speed up corrosion. A clean microfiber cloth can remove residue without harming the finish.
Keep a record of your string set. Write down:
• Brand and model
• String gauge
• Tuning
• Date of installation
• Any setup changes
This record helps you repeat a sound and feel you enjoy. It also makes troubleshooting easier.
If tuning remains unstable after the strings settle, inspect the nut, bridge pins, tuner gears, and string wraps. Persistent problems may need a professional setup. A skilled repair technician can check neck relief, nut slots, saddle height, and intonation.

Frequently Asked Questions About How to String a 12 String Guitar
How often should I change the strings on a 12-string guitar?
Change them when they sound dull, feel rough, show rust, or lose tuning stability. Frequent players may change strings every few weeks, while occasional players may wait several months.
Should I remove all the strings at once?
You can, but replacing one course at a time is easier for beginners. It keeps some tension on the guitar and gives you a clear reference for each string’s path.
What tuning is standard for a 12-string guitar?
Standard tuning is E, A, D, G, B, and E from the lowest course to the highest. The lower four courses use octave pairs, while the B and high E courses usually use unison pairs.
Which string is the octave string?
The octave string is the thinner string in the E, A, D, and G courses. It sounds one octave higher than the heavier string beside it.
Why does my 12-string guitar keep going out of tune?
Fresh strings stretch, and poorly seated bridge pins or loose tuner wraps can also cause slipping. Nut friction, old strings, temperature changes, and incorrect string gauges may contribute as well.
Can I use heavier strings for more volume?
Heavier strings may increase volume and low-end response, but they also create more tension. Use only gauges approved for your guitar, especially if it is vintage, lightly built, or showing signs of bridge movement.
How long does it take for new 12-string strings to settle?
They may need several tuning and stretching cycles. Many guitars become more stable after a few hours of playing, though some new strings can take a day or two to settle fully.
Conclusion
Learning how to string a 12 string guitar becomes manageable when you work course by course. Use the correct set, photograph the original layout, seat each bridge pin properly, wind cleanly, and tune in small steps.
Take your time with the first restringing. The extra care will protect the guitar, improve tuning stability, and help you get the bright, rich sound that makes a 12-string so special. Try the process with a fresh set, keep notes on your setup, and share your experience or questions with other guitar players.
