

You can test your microphone in minutes by checking its connection, input settings, and recorded sound.
Learning how to check if your microphone is working can save you from awkward calls, silent videos, and failed recordings. The best test checks both hardware and software, because a mic may be fine while the wrong input device is selected. This guide covers computers, phones, browsers, common fixes, and simple ways to confirm that your voice is clear.
Why your microphone may not work
A microphone problem does not always mean the microphone is broken. The cause may be a loose cable, blocked permission, muted input, low volume, or the wrong device selected in an app.
Common causes include:
• The microphone is not plugged in fully.
• Bluetooth headphones are connected to another device.
• Your computer is using its built-in mic instead of your headset mic.
• The app does not have permission to use the microphone.
• The input volume is too low.
• A physical mute switch is turned on.
• The microphone driver or operating system has a temporary error.
When you learn how to check if your microphone is working, test one part at a time. Think of the process like checking a lamp: confirm the bulb, the power, the switch, and the outlet instead of guessing.

Prepare your microphone for testing
Before you start, place the microphone close to your mouth but not directly in front of it. A space of about 4 to 8 inches usually works well for a headset or USB microphone.
Complete these basic checks:
Connect the microphone firmly.
If it uses USB, try another USB port.
If it uses a 3.5 mm plug, check that it is in the microphone port or headset port.
Turn off any mute switch on the microphone, headset, keyboard, or cable.
Charge wireless microphones and headphones.
Disconnect other microphones that may confuse your computer.
Restart the app you plan to use.
For Bluetooth devices, confirm that the microphone appears as both an output and input option when needed. Wireless devices can connect for sound playback but fail to provide the microphone input.

How to check if your microphone is working on Windows
Windows includes a built-in microphone test. It lets you choose an input device and see whether the system detects your voice.
Test the microphone in Windows 11
Open the Start menu.
Select Settings.
Choose System.
Select Sound.
Find the Input section.
Choose your microphone.
Speak normally and watch the input meter.
If the meter moves when you speak, Windows is receiving sound. If it stays still, check the selected device, cable, mute button, and microphone permissions.
You can also select the microphone to view its properties. Use the input volume control to raise the level if your voice is too quiet. Avoid setting it too high, because a loud signal may sound harsh or distorted.
Test the microphone in Windows 10
Open Settings.
Select System.
Choose Sound.
Scroll to Input.
Select your microphone from the device list.
Speak and watch the “Test your microphone” level.
Windows may show a result after you speak. A moving meter confirms that the computer receives an audio signal, but it does not guarantee perfect sound quality. You should still record a short sample and listen to it.
Check microphone permissions
If the input meter does not move, privacy settings may block access.
Open Settings.
Select Privacy & security.
Choose Microphone.
Turn on microphone access.
Allow apps and desktop apps to access the microphone.
After changing this setting, close and reopen your meeting or recording app. This is one of the most common steps when learning how to check if your microphone is working on Windows.
How to check if your microphone is working on a Mac
macOS also provides a simple way to confirm microphone input. The test shows whether your Mac receives sound and lets you adjust the input level.
Open the Apple menu.
Select System Settings.
Choose Sound.
Select the Input tab.
Click the microphone you want to test.
Speak and watch the input level.
The input level should respond to your voice. If it does not, select another microphone and test again. This helps you determine whether the issue affects one microphone or the Mac itself.
Use the input volume slider to make your voice louder or softer. If the level reaches the top every time you speak, lower it to prevent clipping.
Check microphone access on macOS
Apps need permission to use the microphone.
Open System Settings.
Select Privacy & Security.
Choose Microphone.
Turn on access for the app you use.
Quit and reopen that app.
A browser, video call tool, or recording program may not detect a newly allowed microphone until it restarts. If you are using a website, also check the microphone permission beside the website address.
How to check if your microphone is working on a phone
Your phone can test its microphone without extra equipment. The easiest method is to record a short voice memo and play it back.
On an iPhone
Open the Voice Memos app.
Tap the record button.
Speak for 10 seconds.
Stop the recording.
Play it back with the phone speaker or headphones.
Try speaking near the bottom edge of the phone, where one microphone is often located. Modern phones have several microphones, so a voice memo may test a different microphone than a video call.
Also test the camera. Record a short video with the front camera, then another with the rear camera. If one recording sounds clear and the other sounds weak, only one microphone path may have a problem.
On an Android phone
Open a voice recorder app.
Record a short message.
Play it back.
Record a video with the front and rear cameras.
Compare the sound from each recording.
Remove a thick case if it covers a microphone opening. Dust and lint can also block the tiny openings, but do not push sharp objects into them. Use a soft, dry brush and gentle pressure.
When checking how to check if your microphone is working on a phone, remember that different apps may use different microphones. A working voice recorder does not always prove that every microphone used by calls or cameras works properly.

How to check if your microphone is working online
An online microphone tester can provide a fast check through your browser. These tools usually ask for permission, display an input meter, and sometimes let you record a short sample.
Use an online test carefully:
Open a trusted microphone testing page.
Allow microphone access when your browser asks.
Select the correct microphone.
Speak at a normal volume.
Watch for movement on the sound meter.
Listen to the recording if the tool provides playback.
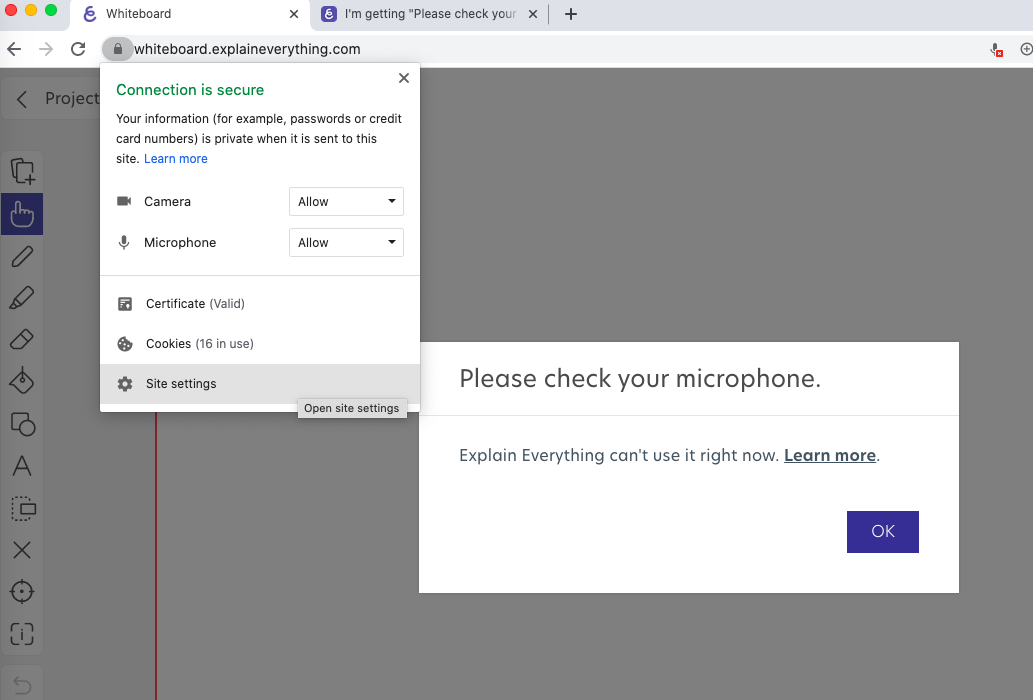
If the browser asks for permission and you choose Block, the test cannot work. Select the lock or settings icon near the website address and change microphone access to Allow.
Online tests have limits. They can show that your browser receives sound, but they may not reveal echo, background noise, or problems inside a specific meeting app. For that reason, test the microphone in the exact app you plan to use.
How to test your microphone in Zoom, Teams, and Meet
A microphone may work in Windows or macOS but fail in a meeting app. This often happens because the app uses a different input device.
Zoom
Open Zoom settings and select Audio. Choose your microphone, then use the built-in test option to record and play back your voice.
Microsoft Teams
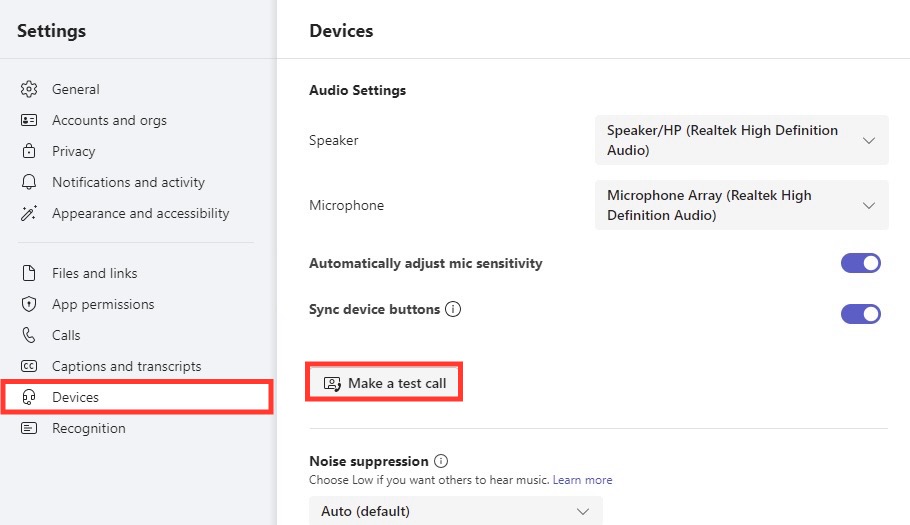
Open Settings and choose Devices. Select your microphone, then use the test call feature if it is available in your version of Teams.
Google Meet
Join or open a meeting preview. Select the microphone settings and choose the correct input device. Speak and watch the microphone indicator respond.
Before an important call, enter the meeting early and run the test. I have seen people spend several minutes changing system settings when the real issue was a muted headset button. A quick test inside the app often finds the problem faster.
How to tell whether the sound quality is good
A microphone can be working and still sound poor. A useful test checks volume, clarity, noise, echo, and delay.
Listen for these problems:
• Very low volume means the input level may be too low or the microphone may be too far away.
• Distortion or crackling often means the input level is too high, the cable is damaged, or the connection is unstable.
• Hissing may come from electrical noise, poor equipment, or a noisy computer port.
• Echo usually happens when speakers play sound back into the microphone.
• Muffled speech may result from a blocked microphone opening, a thick foam cover, or poor placement.
• Choppy sound can point to Bluetooth interference, a weak connection, or software problems.
Record a 10 to 20 second sample. Say a few normal sentences, pause, and speak slightly louder. Then listen with headphones. Headphones reveal small clicks and background sounds that phone speakers may hide.
The goal is not studio perfection. For calls, your voice should be easy to understand without making the listener raise the volume or strain to hear you.
How to fix a microphone that is not detected
If the microphone does not appear in your sound settings, work through the basic hardware checks first.
Unplug and reconnect the microphone.
Try another port or adapter.
Test the microphone on another computer or phone.
Check for a physical mute control.
Replace the cable if it is detachable.
Charge the device if it is wireless.
Remove and pair the Bluetooth device again.
Restart the computer.
If another device also fails to detect the microphone, the microphone, cable, or adapter may be damaged. If the microphone works elsewhere, the original computer may have a permission, driver, port, or configuration problem.
On Windows, updating or reinstalling the audio driver may help. Use the computer maker’s support page when possible, because generic driver tools can install the wrong software.
On a Mac, install available system updates and check the selected input again. If an external microphone still does not appear, test another cable and port before assuming the hardware has failed.
Common mistakes to avoid
Many microphone tests fail because the test itself is not fair. A few simple habits can make your result more accurate.
• Do not test while your microphone is muted.
• Do not speak from across the room.
• Do not rely only on an input meter. Listen to a recording too.
• Do not test with loud music playing in the background.
• Do not assume the first listed input is the right one.
• Do not cover the microphone with your hand.
• Do not use a sharp tool to clean the microphone opening.
• Do not change several settings at once.
Change one setting, test again, and note what happened. This method may feel slower, but it makes the cause much easier to find.
A mistake I often see is testing only the microphone hardware and not the app. A microphone can pass a system test yet remain muted in a video call. Always complete one final test in the program you will use.
When to replace or repair your microphone
Replacement makes sense when the microphone fails on several devices, produces constant crackling, or has visible cable or connector damage. A low-cost microphone may cost less to replace than to repair.
Before buying a new one, confirm that the problem is not the adapter. Some laptops use a combined headset jack, while older computers may use separate microphone and headphone ports. A compatible adapter can solve the issue.
For professional recording, consider the microphone type:
• USB microphones are simple and connect directly to a computer.
• XLR microphones usually need an audio interface.
• Headset microphones are practical for calls and gaming.
• Lavalier microphones clip onto clothing and work well for mobile video.
• Built-in microphones are convenient but may capture more room noise.
Your room also affects sound. Soft furniture can reduce echo, while bare walls and hard floors can make speech sound distant. Equipment matters, but placement and room conditions matter too.
Frequently Asked Questions About How to Check if Your Microphone Is Working
How do I quickly test if my microphone is working?
Open your computer’s sound settings and speak while watching the input meter. For a phone, record a voice memo and play it back.
Why does my microphone show input but no one can hear me?
The meeting app may use the wrong microphone, or its microphone permission may be blocked. Check the app’s audio settings and choose the same microphone that works in your system test.
How can I test my microphone without downloading software?
Use your operating system’s sound settings, a built-in voice recorder, or a browser-based microphone test. These options can confirm whether your device receives an audio signal.
Why is my microphone so quiet?
The input volume may be too low, or the microphone may be too far from your mouth. Raise the input level slightly, move the microphone closer, and check for a mute switch or blocked opening.
How do I know if my microphone is broken?
Test it on another device with a different cable or adapter when possible. If it is not detected anywhere and has visible damage or constant noise, the microphone may need repair or replacement.
Can a microphone work in one app but not another?
Yes. Each app can use different permissions and input settings. Select the correct microphone inside the app and restart it after changing access.
Conclusion
Knowing how to check if your microphone is working starts with a simple system test, but a complete check also includes permissions, cables, input selection, recording quality, and the app you plan to use. Test your voice at a normal distance, listen to a short recording, and change only one setting at a time.
If the microphone fails on every device, inspect the hardware or consider a replacement. If it works elsewhere, focus on the original device’s settings and permissions. Run this checklist before your next meeting, class, podcast, or video, and share your experience or explore more audio guides for better results.
