

A dynamic microphone converts sound into an electrical signal through a moving diaphragm, voice coil, and magnetic field.
If you have ever wondered how does a dynamic microphone work, the answer begins with a simple but powerful idea: sound moves air, and moving air can create electricity. This guide explains the full process, from the first vibration at the grille to the audio signal sent to a mixer, recorder, or amplifier.
What Is a Dynamic Microphone?
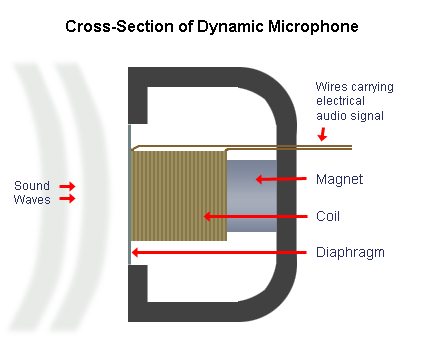
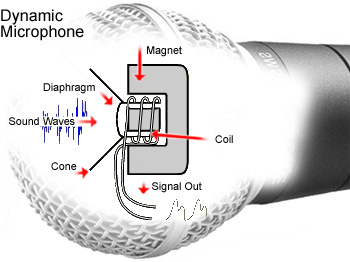
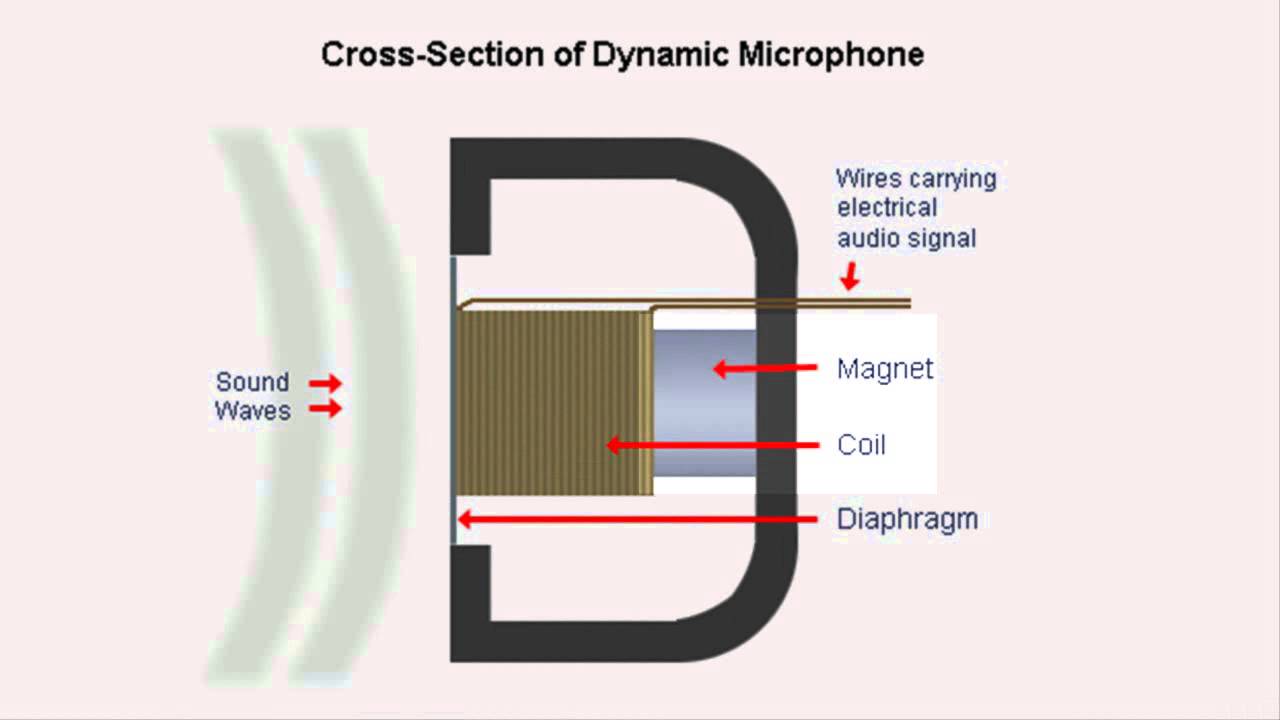
A dynamic microphone is a passive microphone that changes sound waves into an electrical audio signal. It uses a thin diaphragm, a small voice coil, and a permanent magnet to do this job.
The design is similar to a tiny loudspeaker working in reverse. A loudspeaker uses electricity to move a cone and create sound. A dynamic microphone uses sound to move a diaphragm and create electricity.
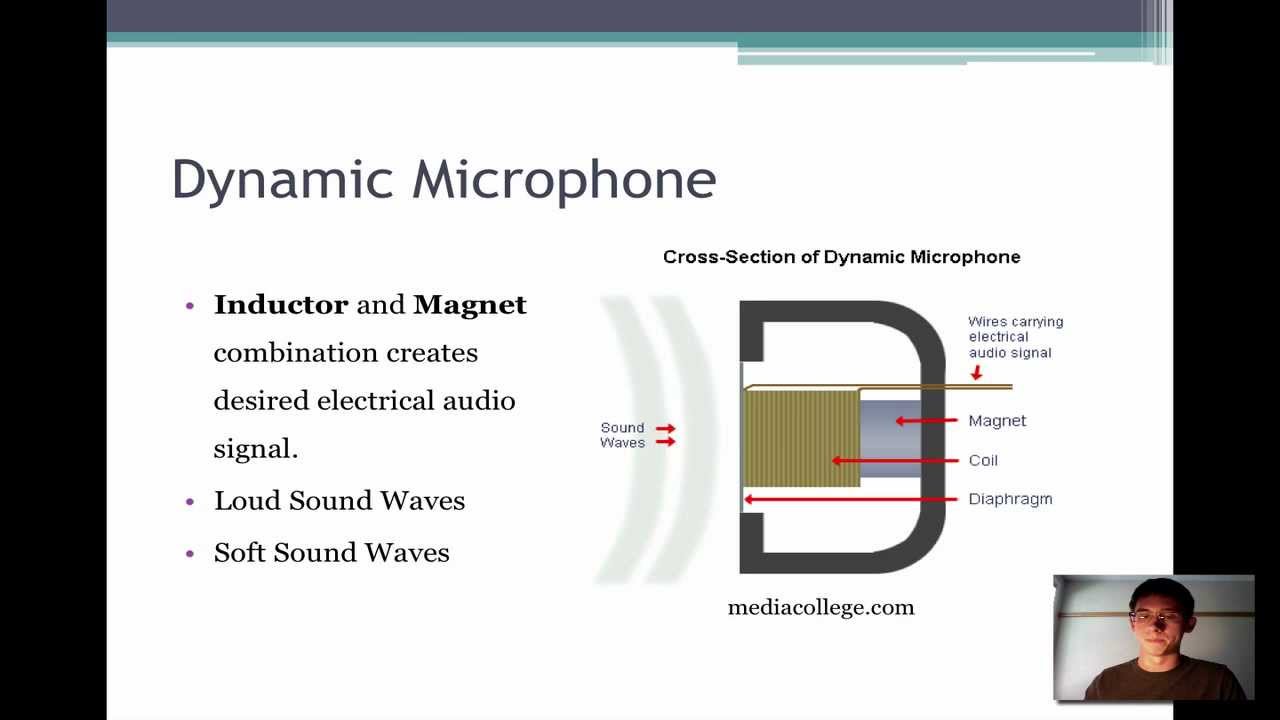
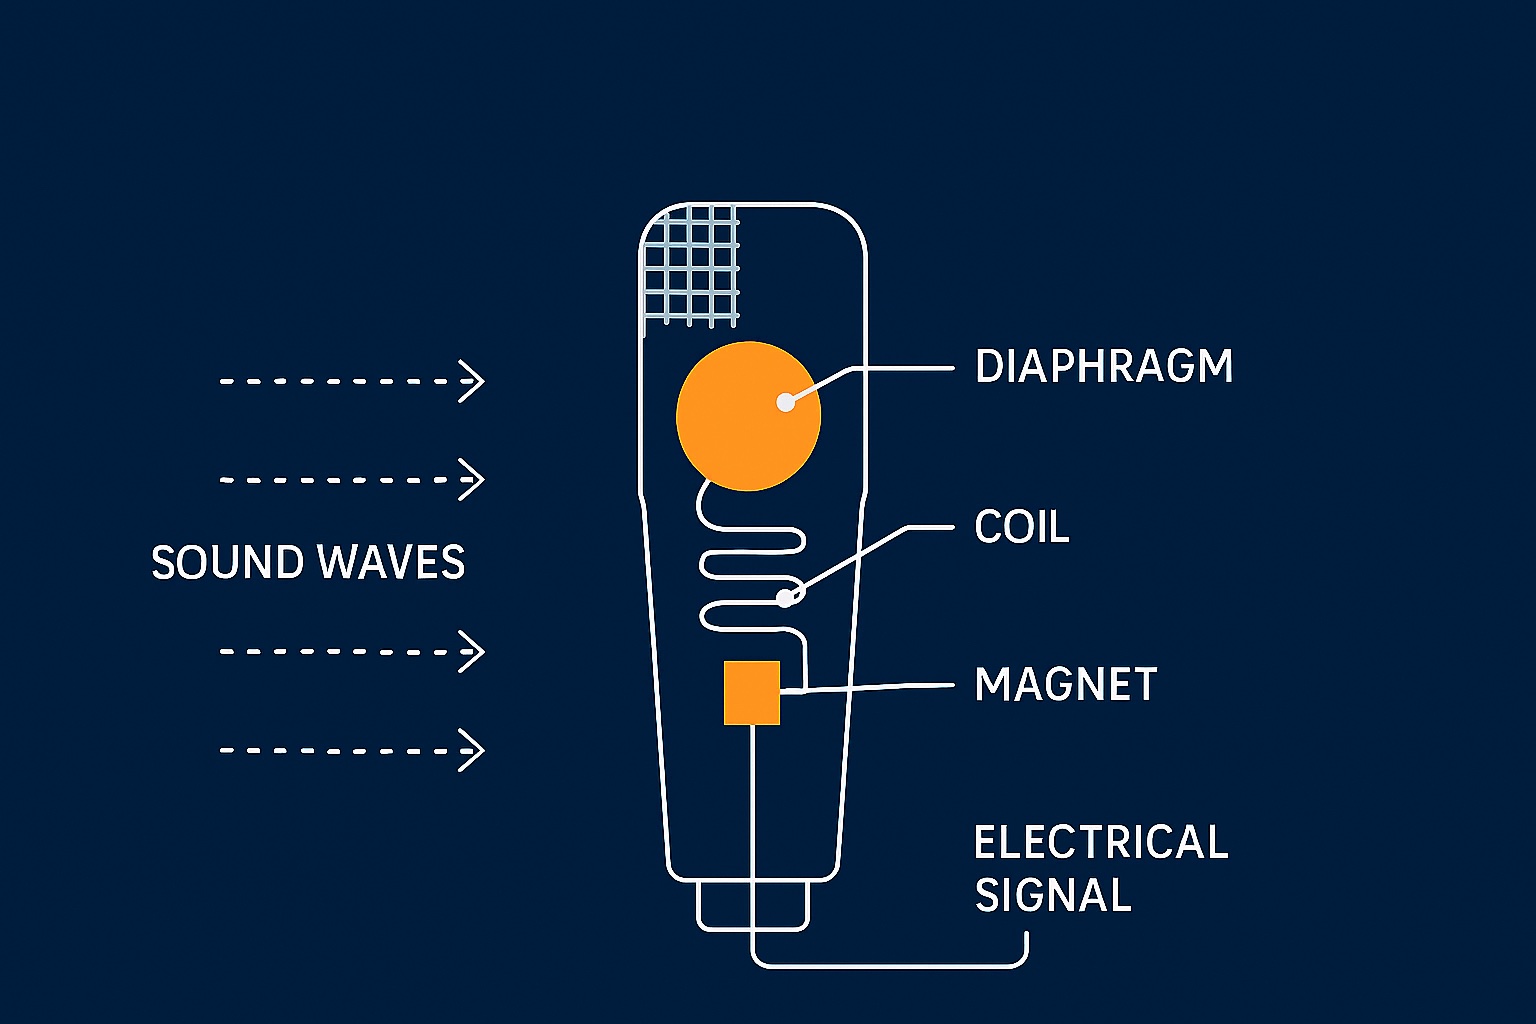
The key parts include:
• Diaphragm: A thin membrane that moves when sound waves strike it.
• Voice coil: A small wire coil attached to the diaphragm.
• Permanent magnet: A magnet that creates a steady magnetic field around the coil.
• Pole pieces: Metal parts that help focus the magnetic field.
• Housing and grille: The outer body that protects the internal parts.
Because the design is simple and strong, dynamic microphones are common on live stages, in rehearsal rooms, broadcast studios, and home recording setups.
How Does a Dynamic Microphone Work Step by Step?
To understand how does a dynamic microphone work, picture a small drum connected to a wire coil inside a magnet. When sound hits the “drum,” the coil moves. That movement creates the audio signal.
Here is the process in order:
A sound creates air pressure changes
Your voice, guitar, or drum produces vibrations in the air. These vibrations reach the microphone grille as alternating areas of high and low pressure.The diaphragm moves
The air pressure pushes and pulls the diaphragm. Loud sounds make larger movements, while quiet sounds make smaller movements.The voice coil moves with the diaphragm
The voice coil is attached to the back of the diaphragm. As the diaphragm moves, the coil moves inside the magnetic field.The magnetic field produces voltage
The moving coil cuts through the magnetic field. Based on electromagnetic induction, this motion creates a small electrical voltage.The voltage follows the sound wave
The electrical signal copies the pattern of the original sound. Its strength relates to volume, while its frequency pattern relates to pitch and tone.The signal travels to audio equipment
The microphone sends this low-level signal through its XLR cable to a preamp, mixer, audio interface, or powered speaker.
That is the basic answer to how does a dynamic microphone work. It does not need batteries or phantom power because the sound wave itself moves the parts that generate the signal.

The Science Behind a Dynamic Microphone
The working principle behind a dynamic microphone is electromagnetic induction. When a conductor moves through a magnetic field, a voltage can appear across that conductor.
In this case, the conductor is the voice coil. The magnet stays still, while the diaphragm and coil move back and forth. The direction and speed of that movement control the direction and strength of the generated voltage.
A simple version of the relationship looks like this:
• Faster coil movement creates a stronger voltage.
• Slower coil movement creates a weaker voltage.
• Movement in one direction creates one voltage polarity.
• Movement in the opposite direction creates the opposite polarity.
The microphone does not create a perfect copy of every sound by accident. Its diaphragm, coil, magnet, and housing are carefully designed to respond to some frequencies more strongly than others. This response is called the frequency response.
For example, a vocal dynamic microphone may add presence in the upper midrange. That boost can help speech or singing sound clearer in a busy mix. A kick drum microphone may emphasize low frequencies and the attack of the beater.
This is also why two dynamic microphones can sound very different, even though both use the same basic operating principle.
Main Parts and What They Do
The diaphragm
The diaphragm is the microphone’s first point of contact with sound. It must be light enough to move quickly but strong enough to survive repeated vibration.
A larger diaphragm may capture more low-frequency detail, while a smaller diaphragm may respond more quickly to fast changes. Neither design is automatically better. The best choice depends on the sound source and the desired tone.
The voice coil
The voice coil is a thin wire wrapped around a small former. It connects the diaphragm’s movement to the magnetic system.
The coil must remain aligned inside the magnetic gap. If it rubs against the magnet or pole piece, the microphone may produce distortion, noise, or a scratchy sound.
The magnet
The permanent magnet creates the magnetic field needed for signal generation. Dynamic microphones usually use strong permanent magnets made from materials such as neodymium or ferrite.
A stronger magnet does not always mean a better microphone. The magnet must work with the coil, diaphragm, and acoustic design as a complete system.
The grille and windscreen
The grille protects the diaphragm from impact, dust, and moisture. It also helps control air movement around the capsule.
A foam windscreen or internal pop filter reduces bursts of air from sounds such as “P,” “B,” and “T.” It cannot fix poor microphone technique, but it can reduce plosive noise.
The shock mount
A shock mount or internal suspension helps isolate the microphone from handling noise. Without this protection, touching the stand or tapping the microphone body can create loud low-frequency thumps.
Why Dynamic Microphones Do Not Need Phantom Power
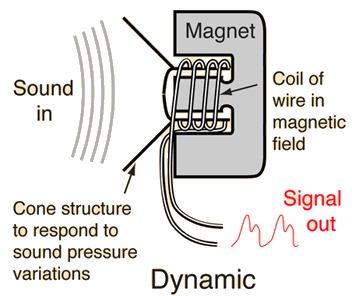
Most standard moving-coil dynamic microphones generate their own signal. The diaphragm moves the coil, and the coil produces voltage through electromagnetic induction.
As a result, a typical passive dynamic microphone does not need phantom power. Phantom power is a DC voltage, often 48 volts, sent through balanced XLR cables to power condenser microphones or active electronics.
Turning on phantom power is usually safe for a properly wired balanced dynamic microphone. However, problems can occur with damaged cables, faulty equipment, or unusual active microphone designs. Check the microphone manual when you are unsure.
Some dynamic microphones include a built-in preamp, active electronics, or a USB connection. These models may require power even though their capsule uses a dynamic operating principle.
The important lesson is simple: a passive dynamic microphone needs gain, not phantom power. If the signal is quiet, raise the preamp gain or use an appropriate inline microphone booster.
Dynamic Microphone vs. Condenser Microphone
The difference between dynamic and condenser microphones often causes confusion. Both capture sound, but their capsules work in different ways.
A dynamic microphone uses a moving coil and magnet. A condenser microphone uses a thin conductive diaphragm and a backplate that form a variable capacitor.
Here is a simple comparison:
• Dynamic microphones are usually rugged and handle high sound pressure well.
• Condenser microphones often capture more fine detail and high-frequency air.
• Dynamic microphones usually need more preamp gain.
• Condenser microphones need power for their electronics and capsule system.
• Dynamic microphones are often easier to use in loud or untreated spaces.
• Condenser microphones can reveal more room sound, breath detail, and background noise.
Neither type is best for every task. A dynamic microphone may work well for a loud guitar cabinet, live vocal, snare drum, or podcast in a noisy room. A condenser may suit a quiet vocal booth, acoustic guitar, piano, or detailed studio recording.
In practical testing, the room often matters as much as the microphone. A bright condenser in a hard, reflective room can sound harsh, while a dynamic microphone may produce a cleaner result simply because it hears less unwanted space.
Benefits of Dynamic Microphones
Dynamic microphones remain popular because they solve real recording and performance problems.
Durability
A well-built dynamic microphone can withstand drops, travel, loud stages, and regular handling. This makes it a practical choice for touring musicians, schools, houses of worship, and event crews.
High sound pressure handling
Many dynamic microphones can capture loud sources without immediate overload. This makes them useful for guitar amplifiers, brass instruments, kick drums, and close-miked vocals.
Strong background rejection
Many dynamic microphones have a focused pickup pattern. When aimed correctly, they can reduce some sound from the sides and rear.
This does not mean they remove all background noise. Placement, room treatment, and microphone technique still matter.
No external power for passive models
You can connect a passive dynamic microphone to many mixers, interfaces, and portable recorders without installing batteries or switching on phantom power.
Natural live sound
Dynamic microphones often have a controlled frequency response that helps a source sit in a mix. Their sound can feel focused, present, and less exposed than a highly sensitive condenser microphone.
Limitations of Dynamic Microphones
Learning how does a dynamic microphone work also means understanding its limits.
A dynamic microphone often produces a lower output level than a condenser microphone. This means your audio interface may need more gain. If the preamp is noisy, raising the gain too far can reveal hiss.
Dynamic microphones may also capture less very-high-frequency detail. Some listeners describe this as smooth or warm. Others may find it less open than a condenser microphone.
The microphone’s direction also matters. A cardioid dynamic microphone rejects much of the sound from behind, but the rejection is not perfect. Reflections from walls can still enter the front of the capsule.
Handling noise is another concern. Touching the microphone body, moving the stand, or rubbing the cable can create unwanted sound. Use a stand, a shock mount, and a secure cable connection when possible.
Finally, proximity effect can increase bass when you place a directional microphone close to the source. This can add warmth, but it can also make speech muddy or vocals boomy.

How to Use a Dynamic Microphone Correctly
Good technique can improve the result more than buying a more expensive microphone.
Try these practical steps:
Point the microphone at the sound source
Aim the front of the microphone toward the singer, speaker, instrument, or amplifier. Many dynamic microphones reject sound from the rear, not the front.Keep a steady distance
Start about 4 to 8 inches from a vocal microphone. Move closer for a fuller sound and farther away for a more natural or roomy sound.Use a pop filter or windscreen
This helps reduce bursts of air. Angle the microphone slightly off-axis if plosives remain a problem.Avoid touching the microphone
Hold it only when the design and performance require it. For recording, use a stand whenever possible.Set gain with headroom
Ask the performer to sing or play at the loudest expected level. Set the input so peaks do not clip.Watch the room
A dynamic microphone can reject some room noise, but it cannot erase loud fans, traffic, or strong reflections.Test placement before equalization
Move the microphone first. Small changes in distance and angle often work better than heavy EQ.
One lesson I have seen repeatedly in hands-on microphone tests is that users often blame the microphone before checking distance. A singer who moves from 2 inches away to 6 inches away can change the bass balance, volume, and clarity in seconds.

Common Applications for Dynamic Microphones
Dynamic microphones are used in many settings because they are flexible and reliable.
Live vocals
Their focused pickup patterns help performers hear a clear vocal sound without capturing too much stage noise. A singer can also hold a dynamic microphone during a performance with less risk of damage.
Podcasting and broadcasting
A dynamic microphone can reduce room sound in a home office or untreated room. Proper positioning remains vital, especially when the room has hard walls.
Electric guitar amplifiers
Place the microphone close to the speaker grille for a direct, focused sound. Moving it toward the center often increases brightness, while moving it toward the edge usually creates a darker tone.
Drums
Dynamic microphones are common on snare drums, toms, and kick drums. Their durability and high sound pressure handling make them suitable for aggressive playing.
Speech and public address
Dynamic microphones work well for announcements, meetings, presentations, and worship services. Their simple design also makes them easy to maintain.
Field recording
Some dynamic models are useful for rough field work, interviews, and situations where equipment may face dust, wind, or rough handling. However, they may not capture quiet sounds as clearly as more sensitive microphone types.
How to Troubleshoot a Quiet or Bad-Sounding Dynamic Microphone
If your dynamic microphone sounds weak, muffled, or noisy, check the simple causes first.
• Confirm the cable is fully inserted at both ends.
• Test a different XLR cable.
• Try another input on the mixer or audio interface.
• Increase preamp gain without allowing the signal to clip.
• Check whether the microphone is aimed at the correct side.
• Move closer to the sound source.
• Turn off unnecessary processing while testing.
• Listen for damage, rattling, or intermittent sound.
A quiet signal does not always mean the microphone is broken. Some low-output dynamic microphones need more clean gain than a basic interface can provide. An inline gain booster may help, but it requires phantom power from the interface and must be used with compatible equipment.
Never blow forcefully into the microphone to test it. This can stress the diaphragm and create moisture. Speak at a normal level, tap the stand lightly, or use a known sound source instead.
Frequently Asked Questions About How Does a Dynamic Microphone Work
How does a dynamic microphone work without power?
A passive dynamic microphone uses sound to move a diaphragm and voice coil inside a permanent magnetic field. That movement creates a small electrical signal through electromagnetic induction, so the microphone does not need a battery or phantom power.
Does a dynamic microphone need phantom power?
A standard passive dynamic microphone does not need phantom power. Some dynamic microphones include active electronics or USB circuitry, so always check the product instructions before use.
Is a dynamic microphone better than a condenser microphone?
Neither microphone type is always better. Dynamic microphones are often better for loud sources, live use, and noisy rooms, while condensers may capture more detail in a quiet, controlled space.
Why is my dynamic microphone so quiet?
Dynamic microphones often have lower output than condenser microphones and may need more preamp gain. Check the cable, input settings, microphone position, and available clean gain before assuming the microphone is faulty.
Can a dynamic microphone record vocals?
Yes, dynamic microphones can record both singing and spoken vocals. They often give vocals a focused sound and can reduce room noise, especially when the singer stays close and on-axis.
Do dynamic microphones reject background noise?
Many directional dynamic microphones reduce sound from the sides and rear, but they do not remove all background noise. Good placement, a quiet room, and correct gain settings still make a major difference.
Conclusion
A dynamic microphone works by turning air movement into electrical energy. Sound moves the diaphragm, the diaphragm moves the voice coil, and the coil generates a signal inside a permanent magnetic field.
This simple design explains why dynamic microphones are durable, reliable, and useful for vocals, drums, guitar amps, podcasts, and live events. They may need more gain than condenser microphones, but careful placement can produce a clear and professional result.
Try changing distance and angle before reaching for EQ. Test your microphone with the sound source at its real performance level, then make small adjustments until the signal feels balanced. Explore more microphone techniques, compare recordings, and share your results in the comments.