

Mic a grand piano by starting with two matched condensers, careful placement, and a focused listening test.
Learning how to mic a grand piano is part science, part art, and part room control. The piano has a wide range, many moving parts, and strong reflections from the lid, floor, and nearby walls. A good setup must capture clear bass, warm mids, bright treble, and the natural movement of the instrument without harshness or phase problems.
This guide explains how to mic a grand piano in a studio, home room, concert space, or live stage. You will learn which microphones to use, where to place them, how to avoid common mistakes, and how to shape the sound with distance, angle, and lid position.

Understand the sound of a grand piano
A grand piano is not one simple sound source. Its strings stretch across the case, while the soundboard spreads vibration through the entire instrument. The lid then projects that sound into the room.
The bass strings are longer and produce strong low energy. The middle strings carry much of the body and warmth. The treble strings add attack, detail, and brightness. Because these ranges sit in different parts of the piano, microphone placement has a major effect on tone.
Before you mic a grand piano, listen to the instrument from several positions:
• Near the keyboard for a direct, percussive sound
• Above the open lid for a balanced, full sound
• Near the tail for more bass and body
• Several feet away for a natural room sound
• Behind the player for a softer and less mechanical tone
A microphone does not simply “record the piano.” It records the piano from one specific viewpoint. Moving a microphone only a few inches can change the balance between bass, midrange, hammer noise, and room sound.
In my own sessions, the biggest improvement often came from moving the microphones before touching an equalizer. A small change in distance can solve a harsh top end faster than a complex plug-in chain.
How the lid affects the sound
The lid works like an acoustic reflector. A fully open lid gives the piano more projection and brightness. A half-stick position can produce a smoother sound with less room energy. Closing the lid lowers volume and softens the top end, but it can also reduce openness.
For most recording work, begin with the lid fully open or on the long stick. Then listen. If the piano sounds too sharp or loud, try the short stick before reaching for EQ.
How the room affects the piano
Hard walls can create early reflections that make the piano sound harsh or hollow. A large room may add depth, while a small room can make the low end feel crowded.
Walk around the piano while someone plays. Listen for spots where the tone sounds even. That simple test can reveal the best microphone area before you set up any stands.
Choose the right microphones
The best microphone for a grand piano depends on the sound you want, the room, and the recording format. There is no single microphone that works for every piano.
Small diaphragm condenser microphones are a common choice for detailed stereo recording. They usually capture fast attacks and clear high frequencies. Large diaphragm condensers can sound fuller and softer, especially when the piano itself is bright.
Ribbon microphones can give a smooth and rich tone. However, many ribbon microphones have lower output and require more clean gain. Some are also sensitive to strong air movement, so avoid placing them too close to the soundboard or strings.
Dynamic microphones can work in live settings. They are rugged and often reject more room sound, but they may not capture the same detail as condenser microphones.
Common microphone choices
• Small diaphragm condensers: Clear, fast, and detailed
• Large diaphragm condensers: Full, smooth, and sometimes less aggressive
• Ribbon microphones: Warm, natural, and soft in the high end
• Dynamic microphones: Strong, durable, and useful on loud stages
• Boundary microphones: Low profile and practical for some live setups
Use matched stereo microphones when possible. A matched pair has similar sensitivity and frequency response, which helps create a stable stereo image.
For a basic studio setup, two cardioid condenser microphones are a reliable starting point. For a more natural room sound, try omnidirectional microphones if the room sounds good.
Phantom power and microphone safety
Most condenser microphones need 48-volt phantom power. Turn phantom power off before connecting or removing microphones, especially when using ribbon microphones unless the manufacturer confirms they are phantom-safe.
Check the microphone manual before use. Some ribbon microphones can be damaged by faulty cables, patch bays, or incorrect phantom power.

Prepare the piano and recording space
Good preparation makes how to mic a grand piano much easier. Start by checking the piano itself. A piano that is out of tune, noisy, or uneven will not become perfect through microphone placement.
Ask the pianist to play every register. Listen for rattles, squeaks, buzzing strings, pedal noise, and uneven notes. Fix mechanical problems before recording when possible.
Prepare the room
Before placing microphones, control unwanted reflections.
• Move the piano away from a bare wall if the room allows
• Place rugs under the piano to reduce floor reflections
• Use acoustic panels or thick curtains on strong reflection points
• Keep large reflective objects away from the open lid
• Avoid placing the piano directly in a corner
Do not make the room completely dead unless that sound suits the music. A piano often needs some natural air. The goal is control, not silence.
Reduce unwanted piano noise
Some mechanical sounds are normal. Pedal movement, key action, and soft hammer noise can add realism. They become problems only when they distract from the performance.
Check the following:
• Loose music desk parts
• Noisy pedals
• Squeaky hinges
• Vibrating lamps or stands
• Rattling objects near the piano
• Noisy bench movement
A useful personal lesson is to record a short test before the full session. I have caught small stand vibrations and pedal squeaks this way, long before they became difficult editing problems.

Start with a basic stereo microphone setup
A stereo pair is usually the best place to begin when learning how to mic a grand piano. It gives the listener a sense of the instrument’s width while preserving a natural balance between the low and high registers.
Place the microphones above the strings with the lid open. Start near the curved side of the piano, around one-third to halfway from the keyboard toward the tail. Keep the microphones about 8 to 18 inches above the strings as a starting point.
Ask the pianist to play the loudest part of the song. Adjust the microphones while listening to the full performance, not just a quiet verse.
Suggested starting position
Try this setup:
Place the left microphone over the lower strings.
Place the right microphone over the middle or upper strings.
Aim each microphone toward the soundboard area, not directly at the hammers.
Keep the pair close enough to act as one stereo image.
Record a short passage and listen in stereo and mono.
If the sound is too bright, move the microphones higher or farther from the hammers. If the piano sounds too distant, lower them slightly or move them closer to the strings.
The exact distance depends on the piano and room. Treat these measurements as starting points, not fixed rules.
Avoid pointing directly at the hammers
The hammers create attack and mechanical detail. A microphone aimed straight at them may produce a sharp, aggressive sound. This can work for pop or rock, but it may sound tiring in solo piano music.
Angling the microphones toward the soundboard often gives a rounder tone. You can still capture detail without making every hammer strike dominant.

Use popular stereo microphone techniques
Different stereo techniques change the width, depth, and mono compatibility of a grand piano recording. The best choice depends on the music and the room.
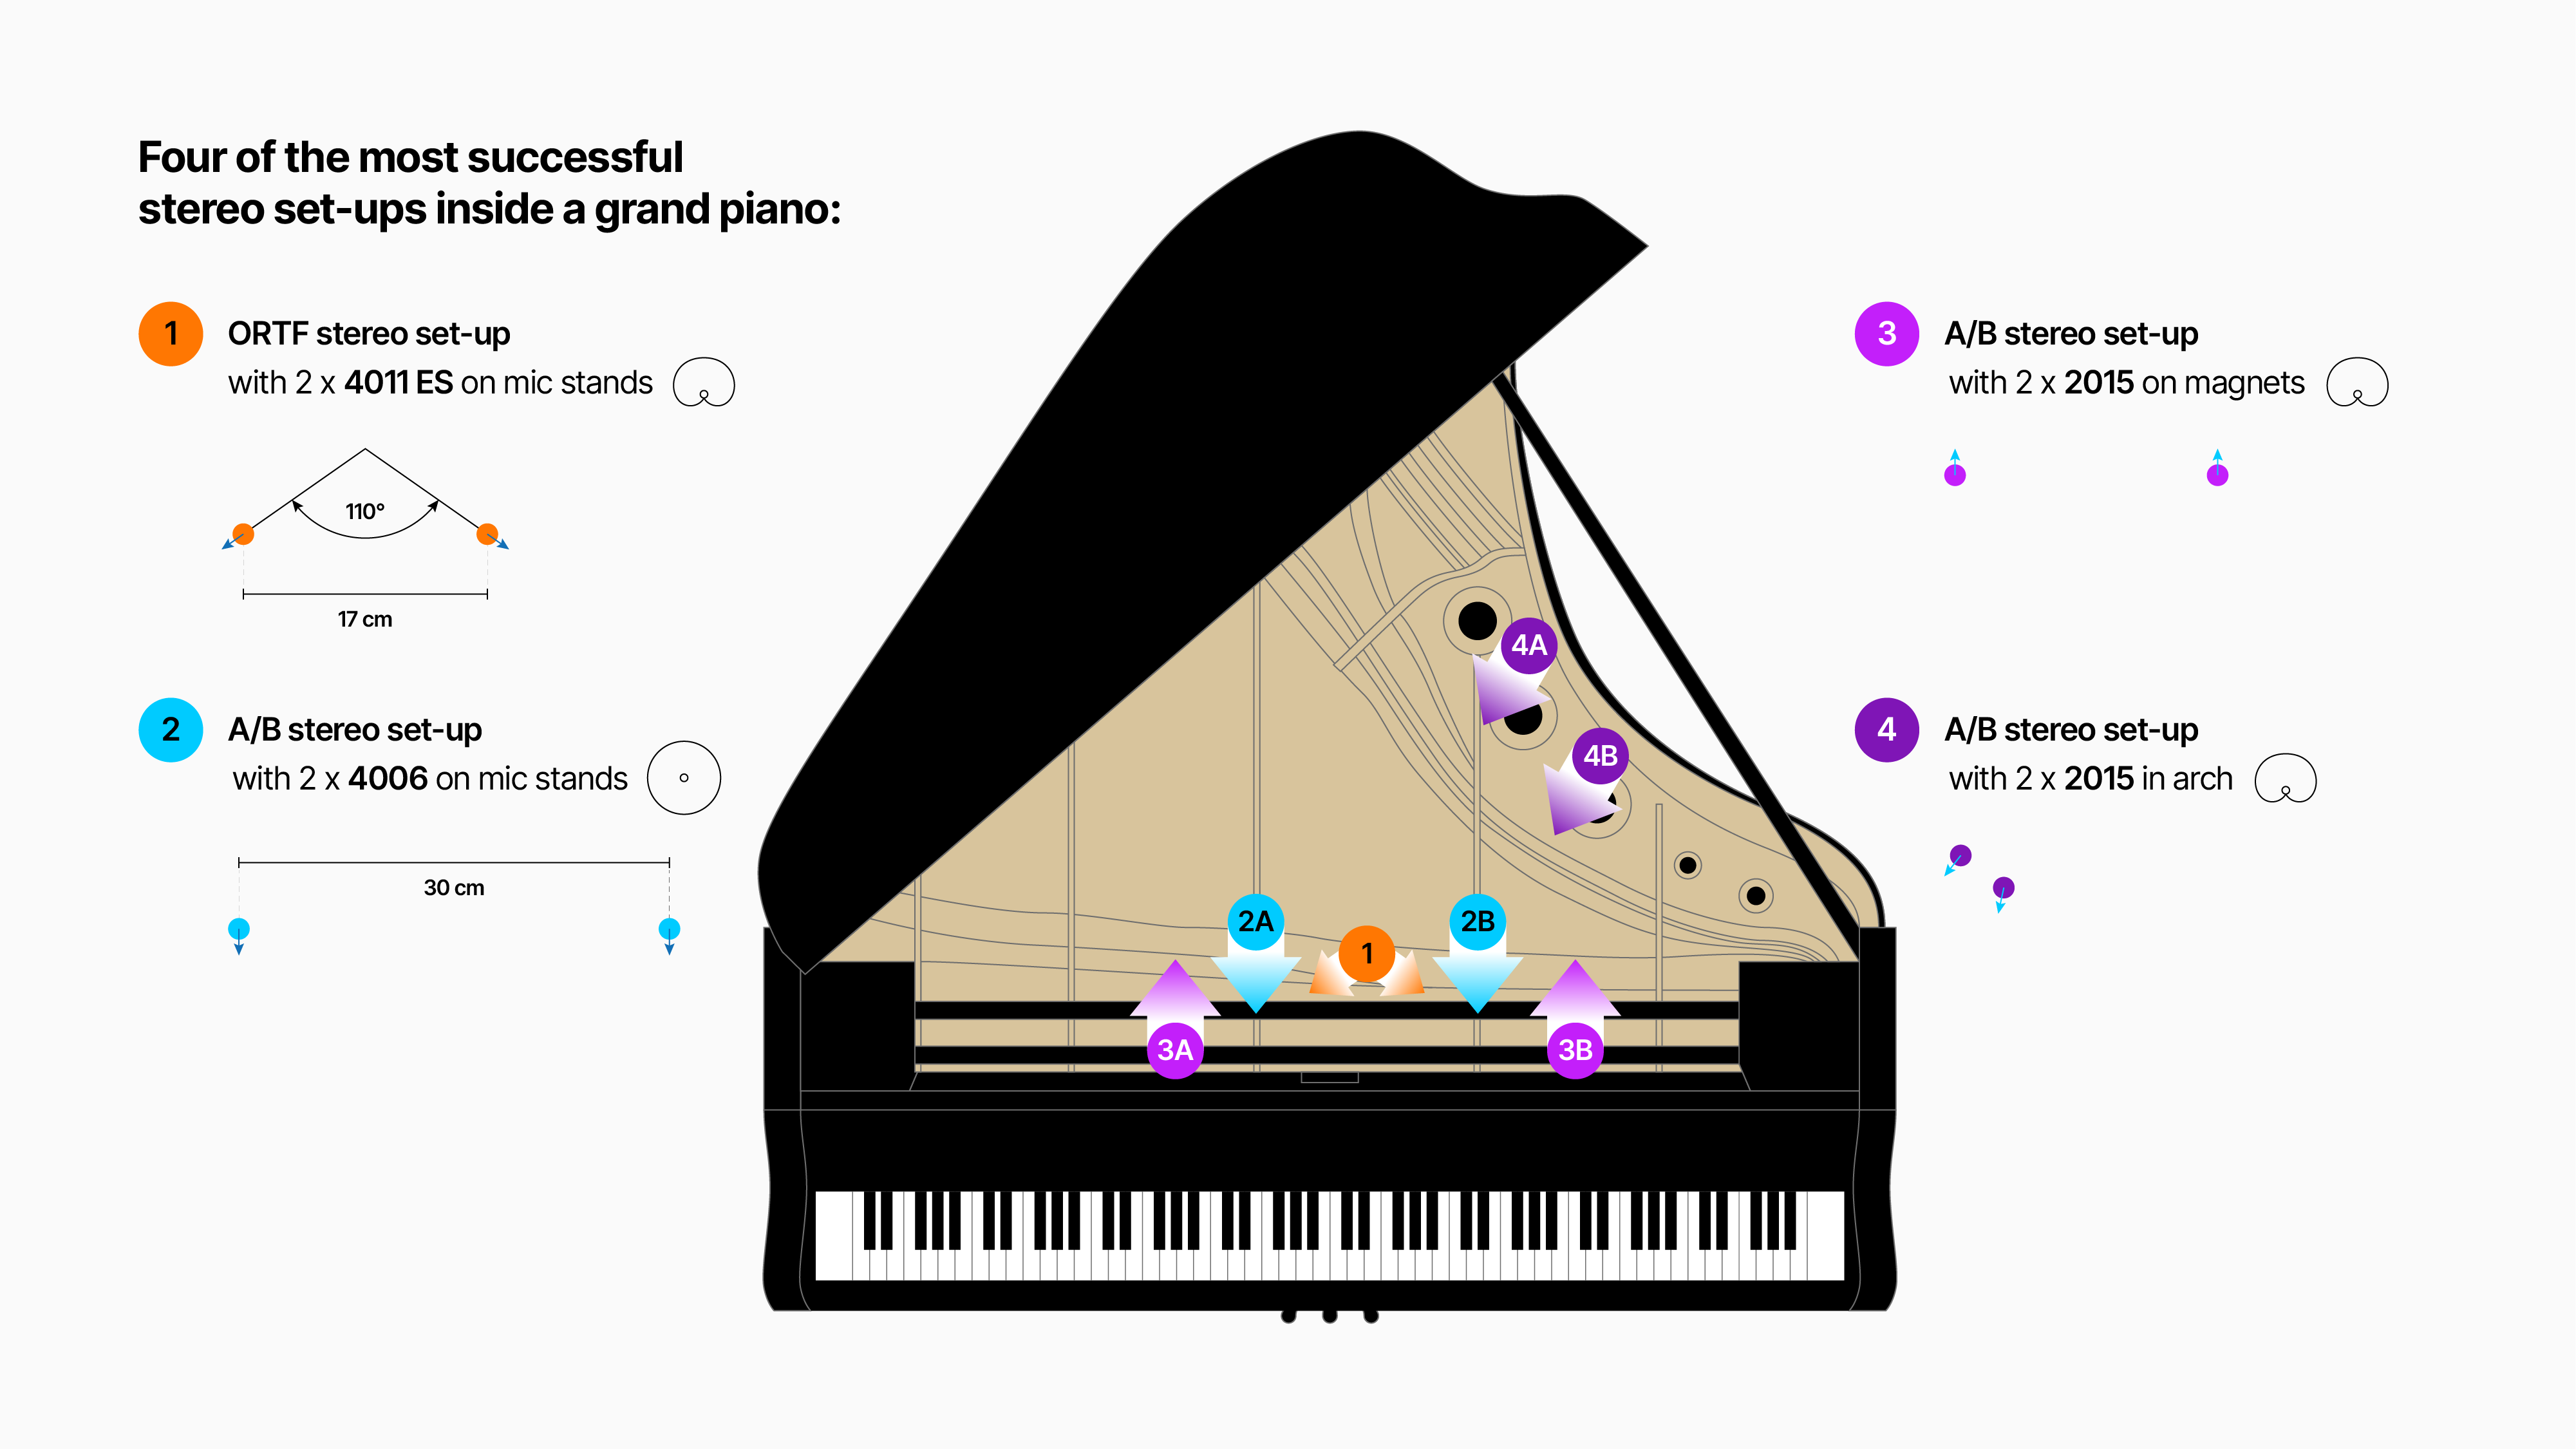
Spaced pair
A spaced pair places two microphones apart from each other. One microphone covers the bass side, and the other covers the treble side.
This method can sound wide and impressive. It often gives the piano a large stereo image, but it may create phase differences when summed to mono.
Start with the microphones 12 to 24 inches apart. Keep them at a similar height, then listen carefully for a hole in the center.
X/Y coincident pair
An X/Y pair uses two directional microphones with their capsules close together. The microphones point left and right from nearly the same location.
X/Y usually provides strong mono compatibility and a focused stereo image. It may sound less wide than a spaced pair, but it is often a safe choice for broadcast, video, and live work.
Place the pair above the middle of the piano. Rotate the microphones until the bass and treble feel balanced.
ORTF
ORTF uses two cardioid microphones spaced about 6.7 inches apart with an angle of about 110 degrees. It creates a natural blend of level and timing differences.
This technique can sound wider and more open than X/Y. It also needs careful placement because a poor room can become more obvious.
Mid-side
Mid-side recording uses one forward-facing microphone and one figure-eight microphone. The side signal is decoded into left and right channels during recording or mixing.
Mid-side is useful when you want to adjust stereo width later. Narrow the side signal for a focused piano, or increase it for more room and width. Always monitor the result in mono because the side channel must be decoded correctly.
Spaced omnidirectional pair
Omnidirectional microphones can capture a deep, natural piano tone. They are less sensitive to proximity effect than cardioid microphones and can sound open in a good room.
The limitation is room quality. Omnis hear more of the space, so they may expose reflections, traffic, HVAC noise, and low-frequency buildup.

How to mic a grand piano in a studio
For a studio recording, begin with a stereo pair and add room microphones only when needed. Close microphones give control, while room microphones add depth and realism.
A practical studio setup may include:
• A main stereo pair above the strings
• A distant stereo pair several feet away
• One optional spot microphone near the bass side
• One optional spot microphone near the treble side
Do not add microphones simply because you have spare inputs. Every microphone can add phase shift, noise, and a less focused sound.
Start with the main pair alone. Then bring in the room microphones one at a time. If the piano becomes hollow or thin, check polarity and timing. You may need to move the room microphones or delay them slightly during mixing.
A warm studio setup
For a warm sound, use large diaphragm condensers or ribbons placed higher above the strings. Aim away from the hammers and let the room contribute some body.
This approach works well for jazz, ballads, singer-songwriter music, and classical pieces with a soft touch.
A detailed studio setup
For more attack, use small diaphragm condensers placed closer to the strings. Keep the microphones slightly off-axis from the hammers to control harshness.
This sound can fit pop, rock, cinematic music, and dense arrangements where the piano must remain clear.
A natural classical setup
For classical piano, place a stereo pair farther away from the instrument. Let the microphones capture the piano, lid, room, and performance as one sound.
Avoid excessive close miking unless the room is poor or the production requires extra definition. Classical recording often benefits from a balanced perspective rather than an oversized stereo image.

How to mic a grand piano for live sound
Live piano miking has different demands. Feedback, stage volume, monitor placement, and bleed often matter more than perfect room tone.
Use cardioid or hypercardioid microphones when you need strong rejection. Keep the microphones inside the piano if the lid allows it, but avoid placing them where the pianist can hit them or where the lid can damage them.
A common live setup uses two compact condensers or dynamic microphones mounted under or near the lid. Secure every stand and cable. A loose microphone can become a safety risk during a performance.
Live sound tips
• Keep microphones away from stage monitors
• Aim null points toward loud amplifiers
• Use the lowest practical gain before feedback begins
• High-pass unnecessary low rumble
• Check the piano in the full band mix
• Test the sustain pedal and soft pedal
In a live mix, the best piano sound alone may not be the best piano sound in the band. A slightly thinner tone can sit better beside bass, drums, guitars, and vocals.

Set gain and monitor the recording
Piano transients can be strong, even when the average level seems moderate. Ask the pianist to play the loudest section before setting input gain.
Leave healthy headroom. Peaks around minus 12 to minus 6 dBFS are a practical starting point in a 24-bit recording system. There is no need to record close to digital zero.
Listen through headphones and studio monitors. Headphones help you hear mechanical noise and small phase issues. Monitors help you judge the piano’s size and relationship with the room.
Record at least one minute of test material. Include:
• Quiet notes
• Loud chords
• Low bass passages
• High treble passages
• Pedal changes
• The loudest musical section
Do not trust the sound only at low volume. A piano that seems smooth quietly may become harsh when played loudly.

Check phase and mono compatibility
Phase problems occur when microphones capture the same sound at different times or with different polarities. The result may be a thin, hollow, or unstable piano tone.
This is common with spaced pairs and multiple room microphones. It is less common with coincident techniques such as X/Y, but it can still happen.
Check your recording in three ways:
• Listen in stereo for width and balance
• Sum to mono for cancellations
• Flip polarity on one microphone to compare the result
If the mono sound becomes weak, try these fixes:
• Move the microphones closer together
• Increase the distance from the strings
• Use an X/Y arrangement
• Change the angle of one microphone
• Remove an unnecessary microphone
The three-to-one guideline can also help reduce comb filtering. When using multiple microphones, try to keep the distance between microphones at least three times greater than the distance from each microphone to its sound source. It is a useful starting rule, not a law.
Shape the tone with microphone placement
Placement usually solves more problems than EQ. Make one change at a time and record a new test.
If the piano sounds too bright:
• Move the microphones higher
• Aim them away from the hammers
• Move them farther from the strings
• Try a ribbon or large diaphragm condenser
• Reduce the lid opening if the music allows it
If the piano sounds too dark:
• Move the microphones closer
• Aim slightly toward the hammers
• Lower the microphones carefully
• Use a brighter condenser
• Open the lid farther
If the bass is too strong:
• Move the bass microphone toward the center
• Raise the microphone height
• Move the pair away from the tail
• Check for room corners and low-frequency buildup
If the piano sounds thin:
• Check phase and polarity
• Bring the microphones closer together
• Move the pair farther from the hammers
• Add a controlled room microphone
• Listen from the pianist’s perspective
The most important question is not “Where should the microphone go?” It is “What does this piano need in this room for this song?”
Avoid common grand piano miking mistakes
Many poor piano recordings come from simple setup errors. Fortunately, most are easy to prevent.
Placing microphones too close
Very close microphones can capture strong hammer noise and uneven string balance. They may also exaggerate small differences between notes.
Start farther away than you think. Move closer only when the room or arrangement demands more direct sound.
Using too many microphones
Extra microphones can make the piano seem bigger at first. They may also create phase problems and make the tone harder to control.
Build the sound with the smallest number of microphones that works.
Ignoring the pianist
The player’s position changes the best microphone location. A powerful pianist may need more distance. A gentle player may need closer microphones for detail.
Ask the pianist whether the sound feels natural from the bench. Their feedback can reveal problems that are not obvious from the control room.
Recording without checking mono
A wide stereo piano can collapse badly in mono. Always check mono before the session is finished, especially for television, streaming, radio, and phone speakers.
Fixing placement problems with EQ
EQ can improve a good recording, but it cannot fully repair a poor microphone position. If the piano is harsh, boomy, or hollow, move the microphones first.
Simple starting setups for different goals
These setups give you practical points of reference.
For solo piano
Use a matched pair of cardioid or omni condensers. Place them 1 to 3 feet above the strings and adjust the distance until the piano sounds even and natural.
For pop piano
Use a closer cardioid pair or X/Y setup. Capture enough attack to cut through guitars, vocals, and drums. Keep the stereo image controlled if the piano will be heavily processed.
For jazz piano
Try a warm pair of large diaphragm condensers or ribbons. Place them high enough to soften hammer noise while preserving the instrument’s body.
For classical piano
Use a more distant stereo pair in a good room. Let the room provide depth, and avoid making the bass and treble feel artificially separated.
For live piano
Use compact cardioid microphones with secure mounting. Prioritize feedback control, isolation, and safe cable placement over a wide studio-style image.
Frequently Asked Questions About How to Mic a Grand Piano
What is the best microphone for a grand piano?
There is no single best microphone for every grand piano. Matched small diaphragm condensers are a dependable starting point because they capture detail and stereo balance, while ribbons and large diaphragm condensers can provide a warmer tone.
How many microphones do you need to mic a grand piano?
Two microphones are enough for most stereo recordings. You can add room or spot microphones later, but begin with the smallest setup that gives you the tone and width you need.
Where should microphones be placed on a grand piano?
Start above the strings, near the curved side of the piano, about 8 to 18 inches above the instrument. Move the microphones toward the tail for more bass, toward the keyboard for more attack, and higher for a smoother sound.
Should the grand piano lid be open when recording?
An open lid usually gives the piano more projection, brightness, and room energy. A half-stick or lower lid can soften the sound and reduce volume, which may work better in a bright room or live setting.
Is it better to use cardioid or omnidirectional microphones?
Cardioid microphones offer more control and reject some room sound, making them useful in untreated spaces and live setups. Omnidirectional microphones can sound open and natural, but they require a room with good acoustics and low noise.
How do you prevent phase problems when miking a grand piano?
Use a coincident stereo method such as X/Y, keep spaced microphones carefully aligned, and always check the recording in mono. If the piano becomes thin or hollow, move the microphones or remove one microphone from the setup.
Should you mic the hammers or the soundboard?
Miking toward the hammers gives more attack and mechanical detail. Miking toward the soundboard usually produces a rounder and more balanced tone, so many engineers angle the microphones between these two areas.
Conclusion
How to mic a grand piano depends on the instrument, room, music, and desired sound. Start with two good microphones, place them above the strings, and listen before making technical changes. Small shifts in height, angle, and distance can change the recording more than expensive equipment.
Control the room, check the lid position, set conservative gain, and test every setup in stereo and mono. Avoid using too many microphones, and trust careful listening over fixed placement rules.
Try one setup today and record a short test with the loudest part of the performance. Compare the results, make one change at a time, and keep notes so your next session improves. If you found these techniques useful, explore more recording guides or share your own grand piano miking experience in the comments.
