

To properly use a microphone, place it at the right distance, speak toward the correct side, set gain without clipping, and keep unwanted noise away. For most voices, start with the microphone 4 to 8 inches from your mouth, slightly off to one side, then adjust the input level so normal speech peaks around -12 to -6 dBFS.
Whether you are recording a podcast in a U.S. home office, joining a work call from a New York apartment, streaming from a gaming room in Texas, or singing at a local venue, good microphone technique matters more than an expensive microphone. Correct placement and level settings can make a basic microphone sound clear and a high-end microphone sound poor.
Understand What Your Microphone Does
A microphone changes sound waves into an electrical audio signal. Your voice makes air move. The microphone detects that movement and sends a signal to a computer, phone, mixer, camera, or speaker system.
The microphone itself does not make a poor room sound good. It also cannot fully remove traffic, air-conditioning noise, keyboard clicks, or echo. Good results come from the whole recording setup:
- The microphone
- Your distance and angle
- The input gain
- The room
- The cable or wireless connection
- The recording device or audio interface
- The software settings
Dynamic, condenser, USB, and XLR microphones
Microphones come in several common types. The type affects how you connect and use it.
| Microphone type | Common use | Main feature | What to watch for |
|---|---|---|---|
| Dynamic | Speech, live vocals, instruments | Handles loud sound and often rejects more room noise | Usually needs close placement |
| Condenser | Podcasts, studio vocals, music, voice-over | Captures quiet detail and high frequencies | Picks up more room sound and needs power |
| USB | Calls, streaming, home recording | Connects directly to a computer | Fewer upgrade and routing options |
| XLR | Studio, live sound, broadcasting | Connects to an interface, mixer, or camera | Needs compatible equipment and cables |
| Lavalier | Interviews, presentations, video | Clips close to the speaker | Clothing noise and cable movement can be a problem |
| Shotgun | Film and video production | Focuses sound from the front at a distance | Placement and room reflections still matter |
A dynamic microphone can be useful in a noisy room because you normally place it close to your mouth. A condenser microphone may capture more detail, but it can also capture more echo and background noise.
Check the microphone’s pickup pattern
The pickup pattern shows where a microphone hears sound best.
- Cardioid: Mainly hears the front and rejects much of the rear sound.
- Supercardioid or hypercardioid: Has a narrower front pickup area but may hear some sound from behind.
- Omnidirectional: Hears sound from all directions.
- Bidirectional or figure-eight: Hears the front and rear while rejecting the sides.
The front is not always the side with the visible logo. Some microphones are designed for end-address use, while others are side-address microphones. Look for the manufacturer’s symbol, manual, or model diagram before speaking into it.

Set Up the Microphone Before You Speak
Start with a stable setup. Place the microphone on a stand, boom arm, or mount that will not move when you touch the desk. A loose stand can transmit bumps and vibration into the recording.
Keep the microphone away from the edge of a desk if possible. Desk surfaces can reflect your voice and carry typing or tapping sounds. A shock mount can reduce some stand vibrations, but it will not stop loud bumps from reaching the microphone through the air.
Connect the correct cable
Use the connection your microphone requires:
- Plug a USB microphone directly into the computer or compatible device.
- Plug an XLR microphone into an audio interface, mixer, recorder, or compatible camera input.
- Connect a lavalier microphone to the correct TRS or TRRS input.
- Use an adapter only when it matches the microphone and the recording device.
A three-pin XLR cable is not the same as a USB cable. A passive XLR microphone normally cannot connect directly to a computer without an audio interface or other suitable device.
Turn on required power
Condenser microphones often need phantom power, usually labeled 48V, from an audio interface or mixer. Turn on phantom power only after connecting the microphone and checking its manual.
Do not assume every microphone uses phantom power. USB microphones receive power through USB. Some microphones use batteries. Passive ribbon microphones may be damaged by incorrect phantom-power use, especially with faulty cables or equipment, so follow the manufacturer’s instructions.
A safe basic order is:
- Turn the input gain down.
- Connect the microphone.
- Confirm that the microphone and cable are supported.
- Turn on phantom power only if the microphone requires it.
- Raise the gain while speaking normally.
- Turn phantom power off before disconnecting equipment when the manual recommends that practice.

Place the Microphone at the Right Distance and Angle
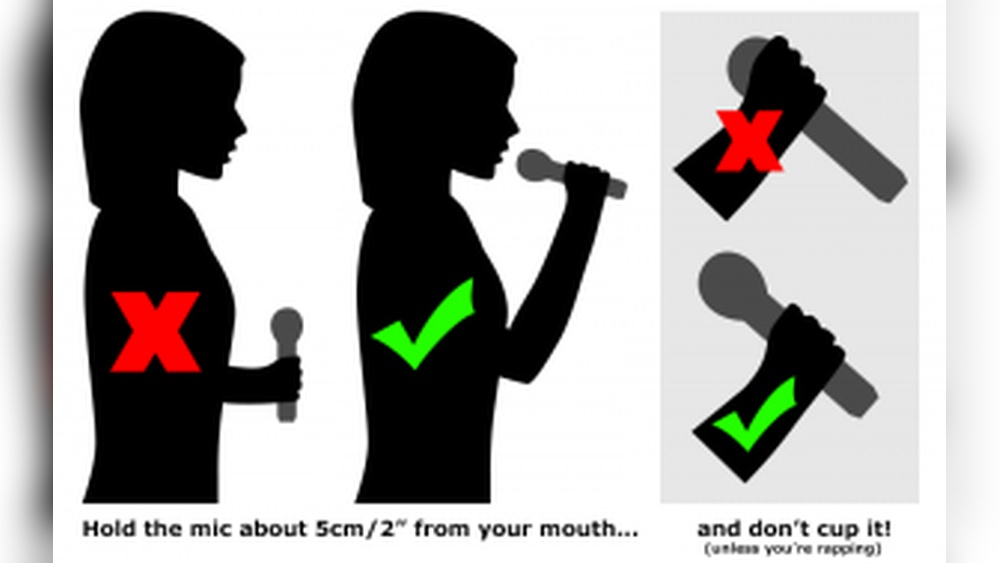
Distance is one of the fastest ways to change microphone sound. Move closer and your voice usually becomes fuller and louder. Move farther away and the room becomes more noticeable.
For spoken voice, begin about 4 to 8 inches from the microphone. This is a starting point, not a rule. A sensitive condenser microphone may work well from farther away, while a quiet dynamic microphone may need closer placement.
Keep your mouth aimed at the microphone’s intended pickup area. Do not speak across the wrong side of a side-address microphone.
Use a slight off-axis angle
Point the microphone slightly to the side of your mouth instead of aiming it directly at your lips. A small angle can reduce bursts of air caused by “P,” “B,” and “T” sounds.
A pop filter or foam windscreen can help. Keep the filter between your mouth and the microphone, with a small gap between the filter and the microphone capsule. A filter does not replace correct distance and angle.
Keep the distance steady
A changing distance causes changing volume. If you lean toward the microphone for quiet lines and away for loud lines, the recording may sound uneven.
Try to keep your mouth in the same general position. For a spoken recording, mark the correct spot on the desk or boom arm if that helps. When you turn your head, the volume and tone may change, especially with a directional microphone.
Use the proximity effect carefully
Many directional microphones produce more low-frequency sound when the speaker moves very close. This is called the proximity effect.
It can give a voice more warmth, but too much can make the recording muddy or boomy. If your voice sounds thick, move back slightly or angle the microphone away from the center of your mouth.
Set the Input Gain Without Clipping
Gain controls how much the microphone signal is amplified before recording. Volume controls how loud you hear the signal after it has been recorded or processed. These controls are related, but they are not the same.
Set gain while speaking at your normal loudness. Do not whisper during setup if you plan to speak loudly in the recording. Ask yourself how loud you will be during the loudest part, then test that level.
For digital recording, aim for normal peaks around -12 to -6 dBFS. Occasional higher peaks may be acceptable, but the signal should not reach 0 dBFS. When the meter reaches 0 dBFS, the recording can clip and sound harsh or distorted.
A simple gain-setting method
- Open the input meter in your recording or call software.
- Speak at your normal distance and volume.
- Include a few louder words or realistic phrases.
- Raise the gain until normal speech is clear.
- Confirm that loud speech does not hit the red zone.
- Record a short test.
- Listen with headphones before starting the full session.
The exact meter colors differ by software. The useful goal is the same: a strong, clean signal with enough space below the maximum level.
What clipping sounds like
Clipping may sound like:
- Crackling on loud words
- Harsh or fuzzy consonants
- Distortion that remains even after lowering playback volume
- A waveform cut flat at the top or bottom
Lowering the playback volume does not repair clipped audio. Move farther from the microphone, reduce the input gain, or both. A limiter can help prevent future peaks, but it cannot reliably restore a recording that has already clipped.
Improve the Room Before Buying New Equipment
A quiet, controlled room often helps more than a new microphone. Hard walls, windows, bare floors, and ceilings reflect your voice. These reflections can create echo and make speech sound distant.
You do not need a professional studio to improve a U.S. bedroom, office, or living room. Try these low-cost changes:
- Close windows and doors.
- Turn off fans, air conditioners, and noisy appliances when practical.
- Move away from bare walls and large windows.
- Place soft furniture, curtains, or rugs near strong reflection points.
- Avoid recording in an empty room.
- Keep the microphone close enough that your voice is much louder than the room.
Do not cover a microphone with a blanket while it is operating. Blocking airflow around equipment can increase heat, and a loose blanket can create handling noise or other hazards. Use room treatment around the speaker rather than wrapping the microphone.
Listen for echo
Record 10 seconds of speech and listen with headphones. If you hear a short, hollow repeat after each word, the room is reflecting sound. If the room sounds loud even when you stop talking, background noise is competing with your voice.
A directional microphone can reduce sound from some directions, but it does not remove room echo from the front or nearby surfaces. Place the microphone close and control the room when possible.
Monitor Your Audio With Headphones
Headphones reveal problems that speakers may hide. Use closed-back headphones if you need to prevent the microphone from picking up playback.
Listen for:
- Hum or buzzing
- Crackles when the cable moves
- Echo from the room
- Keyboard and chair noise
- Plosive bursts
- Excessive bass
- Distortion
- Delayed monitoring
If you hear your own voice with a delay, reduce or disable software monitoring. A small delay can make it hard to speak naturally. Many audio interfaces offer direct monitoring, which sends the input to your headphones with little or no software delay.
Do not set headphone volume so high that it causes discomfort. High sound levels can contribute to hearing damage. If your ears feel tired or ring after a session, lower the volume and take a break.
Adjust Microphone Settings for Calls, Streaming, and Recording
The best settings depend on the task. A live call needs clear speech and stable levels. A podcast or voice-over gives you more time to edit. A live performance needs feedback control and reliable monitoring.
For video calls
Use this basic setup:
- Select the correct microphone in the meeting app.
- Speak at your normal distance.
- Check the app’s input meter.
- Turn off automatic gain if it causes pumping or sudden level changes.
- Use headphones when possible.
- Mute notifications and nearby devices.
- Record or test a short sample before an important meeting.
Some video-call apps apply noise suppression, echo cancellation, or automatic gain. These tools can help in a noisy room, but they may cut off quiet words or alter music. Test them with the content you plan to use.
For podcasts and voice-over
Use a consistent distance and record a short room tone sample. Room tone is the sound of the room when no one is speaking. It can help with editing gaps, but it does not fix loud background noise.
Keep your mouth near the same position throughout the recording. Mark the boom arm or use a physical reference point. Record separate tracks for each speaker when possible so you can adjust each voice independently.
For live events
Place the microphone close to the speaker or singer. Keep the microphone pointed away from the loudspeaker to reduce feedback. Feedback happens when sound from the speaker re-enters the microphone, is amplified, and repeats through the system.
Do not point the microphone toward stage monitors or room speakers. A sound technician may need to adjust equalization, monitor placement, or system gain. Do not raise the microphone level repeatedly if feedback begins.
Use Microphone Accessories for a Clearer Signal
Accessories can solve specific problems, but each one has limits.
Pop filter
A pop filter reduces bursts of air from plosive sounds. It works best when placed between your mouth and the microphone. It can also help you keep a steady distance.
Foam windscreen
A foam windscreen reduces light air movement and some handling noise. It is useful for some speech and outdoor work, but it may not stop strong plosives as well as a pop filter.
Shock mount
A shock mount reduces vibration from the stand, desk, or boom arm. It does not block room noise, traffic, or sound from your computer fan.
Boom arm or stand
A boom arm lets you place the microphone at mouth level without forcing it onto the desk. Tighten the joints enough to prevent movement, but do not over-tighten them.
Headphones
Headphones help you find faults before they become part of the recording. They are often more useful than adding software effects after the fact.
Fix Common Microphone Problems
Check the simplest and safest causes first. Many microphone problems come from the wrong input being selected, a muted channel, a loose cable, or an incorrect gain setting.
| Problem | Likely causes | What to check |
|---|---|---|
| No sound | Wrong input, mute, bad cable, missing power | Select the microphone, unmute it, check the cable, and confirm required power |
| Very quiet sound | Gain too low, microphone too far away, wrong pickup side | Raise gain carefully, move closer, and confirm the front of the microphone |
| Distorted sound | Gain too high, speaker too close, clipping | Lower input gain and test at the loudest expected volume |
| Loud room noise | Microphone too far away, noisy room, sensitive microphone | Move closer, reduce room noise, and use a suitable pickup pattern |
| Echo | Hard surfaces, distant microphone, speakers feeding back | Use headphones, move closer, and soften nearby reflection points |
| Plosive pops | Direct mouth-to-capsule airflow | Use a pop filter and angle the microphone slightly |
| Hum or buzz | Power, cable, computer, or grounding problem | Try another cable or port and separate audio cables from power cables |
| Crackling | Damaged cable, loose connector, overloaded input | Reseat connections, replace the cable, and lower gain |
| Delayed voice | Software monitoring latency | Disable software monitoring or use direct monitoring |
If a USB microphone fails, try another USB port and check the operating system’s input settings. If an XLR microphone fails, test the cable, interface input, phantom-power setting, and channel mute one at a time.
Do not open powered audio equipment unless you are qualified to service it. Disconnect equipment before inspecting damaged cables or connectors.
Avoid These Common Microphone Mistakes
The most common mistake is speaking too far away. Distance makes the voice quieter compared with the room, so the recording captures more echo and background noise.
Other mistakes include:
- Speaking into the rear of a directional microphone
- Holding a sensitive microphone in your hand
- Touching the stand during recording
- Setting gain by watching only the software volume slider
- Recording with the microphone pointed at a laptop fan
- Using heavy noise reduction to hide a poor room
- Placing speakers directly in front of the microphone
- Forgetting to check the selected input device
- Assuming a pop filter fixes every plosive
- Standing too close to a loudspeaker at a live event
- Turning the gain up after clipping has already occurred
- Using an adapter without checking connector wiring and device compatibility
A microphone should not need to be forced into an extreme setting. If the signal is too quiet with the gain high, check distance, connection, power, and microphone compatibility before adding more processing.
A Practical Microphone Setup Checklist
Use this checklist before each important recording or call:
- The microphone is on a stable stand or boom arm.
- The correct side of the microphone faces you.
- The microphone is about 4 to 8 inches away as a starting point.
- Your mouth is slightly off-axis when plosives are a problem.
- A pop filter is in place for close vocal recording.
- The correct input is selected in the computer or app.
- Required phantom power is enabled only when appropriate.
- Gain is set while speaking at normal and loud levels.
- Peaks stay below digital clipping.
- Headphones reveal no hum, echo, or delay.
- Fans, notifications, and unnecessary devices are quiet.
- You made a short test recording and listened to it.
A successful setup produces a clear voice with steady volume, low background noise, no clipping, and little unwanted echo. If the test fails, change one thing at a time so you know which adjustment helped.
Frequently Asked Questions
Should I speak directly into a microphone?
Only if the microphone is designed for front-address use and the microphone’s instructions support that position. Side-address microphones often require you to speak into the side with the logo or capsule symbol. Check the manual if the correct side is unclear.
How far should I sit from a microphone?
Start 4 to 8 inches away for spoken voice. Move closer for a stronger voice and more room rejection, or farther away if the sound is boomy. Keep the distance steady during the recording.
Why does my microphone sound muffled?
Possible causes include a blocked windscreen, speaking into the wrong side, excessive bass from close placement, poor room reflections, or aggressive noise-reduction software. Confirm the microphone angle and distance first.
Do I need a pop filter?
A pop filter is useful when your voice creates strong bursts on “P” and “B” sounds. It is not required for every microphone or speaker, but it is a simple way to reduce plosives during close recording.
Do USB microphones need phantom power?
No. USB microphones receive power through the USB connection. Do not send external phantom power to a USB microphone unless the manufacturer specifically says the setup supports it.
Can a microphone remove background noise?
A microphone can reduce some noise through close placement and a directional pickup pattern, but it cannot remove every unwanted sound. A quiet room, proper distance, and careful gain setting usually work better than relying only on software noise removal.
Why is my voice delayed in my headphones?
The delay usually comes from software monitoring. Turn off monitoring in the recording or call app, or use direct monitoring through an audio interface if available.
Final Takeaway
Proper microphone use comes down to four habits: aim the correct side at your mouth, stay close and steady, set gain below clipping, and monitor with headphones. Then control the room and fix problems at the source instead of trying to repair them with heavy software processing.
Before your next recording, make a short test. Check the distance, gain, room noise, and headphone sound. That simple check can prevent most common microphone problems.
