

You can make a basic lavalier microphone in the United States with an electret microphone capsule, a small cable, a compatible plug, and a few simple tools. The easiest design uses plug-in power from a camera, audio recorder, computer, or wireless transmitter.
This guide shows how to build a small wired lavalier mic for speech. It also explains connector wiring, testing, sound problems, and safe ways to improve the design. A homemade mic can work well for practice, school projects, interviews, and backup audio, but it may not match the noise control or durability of a commercial lavalier.

What You Need to Make a Lavalier Microphone
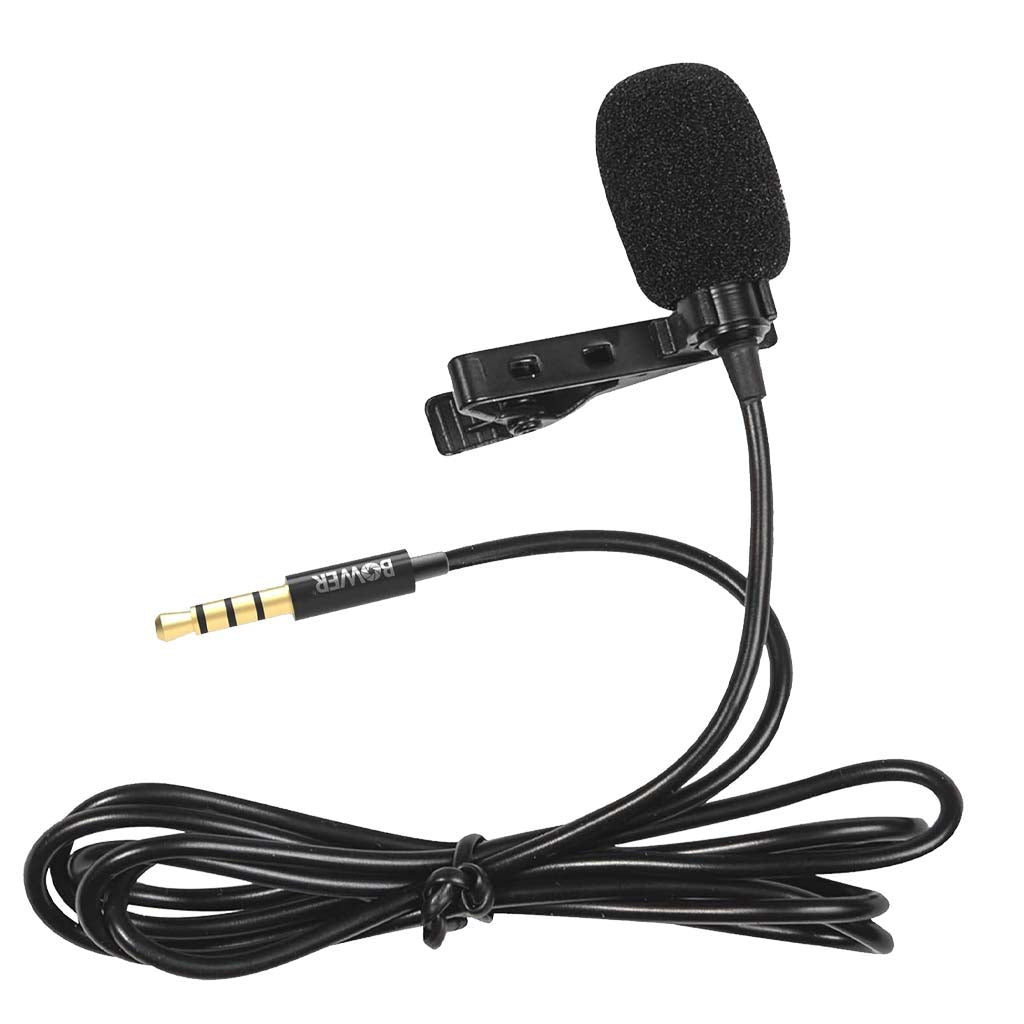
A simple lavalier microphone needs an electret capsule, a cable, and a plug that matches your recording device.
Basic parts
- One omnidirectional electret microphone capsule
- One thin, flexible, shielded microphone cable
- One compatible audio plug or connector
- Heat-shrink tubing
- Small alligator clip, tie clip, or lapel clip
- Solder
- Flux-core solder
- Electrical tape or liquid electrical insulation
- Small plastic or metal capsule housing
- Strain relief material, such as heat-shrink tubing or epoxy
A typical electret capsule is 6 to 10 millimeters wide. Choose an omnidirectional capsule for general speech. It picks up sound from many directions, so the speaker does not need to face the capsule perfectly.
You will also need:
- Soldering iron with a fine tip
- Wire strippers
- Small cutters
- Helping hands or a small clamp
- Multimeter
- Heat gun or another safe heat source
- Safety glasses
- A well-ventilated work area
Many electret capsules need DC bias power. This power usually comes from the device through the microphone input. It is often called plug-in power. The capsule is not normally connected directly to a speaker or headphone output.
Parts that affect the result
| Part | What it changes |
|---|---|
| Electret capsule | Sensitivity, noise, tone, and pickup pattern |
| Cable | Flexibility, handling noise, and durability |
| Connector | Whether the microphone works with your device |
| Housing | Wind protection and physical protection |
| Clip | Placement and clothing noise |
| Shielding | Resistance to hum and electrical noise |
Do not use an unshielded wire for a long microphone cable. It may pick up hum from lights, chargers, computers, and power cables.

Understand Lavalier Microphone Wiring
The simplest lavalier circuit uses the electret capsule as a two-wire microphone. One side carries the audio signal. The other side connects to ground.
An electret capsule often has two terminals:
- Positive terminal: audio signal and bias connection
- Negative terminal: ground
Some capsules mark the positive terminal with a plus sign. On many capsules, the negative terminal connects to the metal case. This is common, but you should still check the capsule’s data sheet when one is available.
Basic two-wire circuit
For a common 3.5 mm microphone input, the basic wiring is:
Electret capsule positive  ─── Tip
Electret capsule negative  ─── Sleeve / Ground
Ring                         ─── Leave unconnected unless your device requires it
The device usually supplies a small DC voltage through the microphone input. The capsule’s internal transistor changes that current as sound reaches the diaphragm. The input then converts the changing signal into audio.
This simple design works only when the recording device provides suitable plug-in power. A device with a line input may not power the capsule correctly.
3.5 mm TRS wiring
A 3.5 mm TRS plug has three contacts:
- Tip: left audio or microphone signal
- Ring: right audio, auxiliary contact, or unused contact
- Sleeve: ground
For a basic mono microphone:
Capsule positive  → Tip
Capsule negative  → Sleeve
Ring              → Not connected
This arrangement is common for camera microphones and some audio recorders. It is not universal, so check the manual for your device.
3.5 mm TRRS wiring for phones
Many phones use a 3.5 mm TRRS headset jack. In the common CTIA layout, the contacts are:
Tip     → Left headphone audio
Ring 1  → Right headphone audio
Ring 2  → Ground
Sleeve  → Microphone
A phone lavalier made for this layout usually needs:
Capsule positive  → Sleeve
Capsule negative  → Ring 2
Some older devices use the OMTP layout instead. OMTP swaps the microphone and ground contacts. A CTIA-to-OMTP adapter may be needed.
USB-C and Lightning phones usually need a compatible digital adapter. A passive 3.5 mm plug does not automatically work with every phone adapter.
Important connector warning
Do not assume that all 3.5 mm microphone connectors use the same wiring. Before soldering, check:
- The recording device manual
- The microphone input type
- Whether the input supplies plug-in power
- The connector standard
- Whether the device expects a microphone or line-level signal

How to Make a Basic Wired Lavalier Microphone
Build the microphone in small stages. Test each connection before closing the housing.
Step 1: Choose the connector
Select the connector for your device first.
For many cameras and recorders, use a 3.5 mm TRS plug. For a phone with a headset jack, use a CTIA-compatible TRRS plug or a suitable adapter.
If you want to use the microphone with more than one device, a short adapter cable is often better than building several connectors onto the microphone cable.
Step 2: Cut and prepare the cable
Cut the cable to the length you need. A common lavalier cable length is about 1 to 1.5 meters, but the right length depends on how the mic will be used.
Strip only a small section of the outer jacket. Separate the conductors carefully:
- Signal conductor
- Ground or shield
- Any unused conductors
If the cable has a braided shield, twist it into a ground wire. Add a small amount of solder to each conductor. This process is called tinning and makes the final joint easier to form.
Do not remove more insulation than needed. Long exposed wires can touch each other and cause noise or a short circuit.
Step 3: Identify the capsule terminals
Look for the positive mark on the capsule. If there is no mark, inspect the capsule closely or check the part number.
A common electret capsule has:
- A positive terminal connected to an insulated internal element
- A negative terminal connected to the metal case
Use a multimeter on continuity mode only as a clue. Do not apply unknown voltage to the capsule during testing.
Step 4: Solder the capsule
For a basic TRS microphone:
Capsule positive  → Cable signal conductor
Capsule negative  → Cable shield or ground conductor
Keep the solder joint small. Large blobs can add weight and make the capsule harder to mount.
After soldering, inspect the joint. It should look smooth and secure. A dull, cracked, or loose joint may be a cold solder joint.
Step 5: Add insulation
Cover each exposed connection with a small piece of heat-shrink tubing. If the capsule terminals are very close together, insulate them separately before adding a larger outer layer.
Do not let the positive terminal touch:
- The negative terminal
- The metal capsule case
- The cable shield
- The clip or metal housing
A short may stop the microphone from working or cause noise.
Step 6: Solder the plug
Use the wiring plan for your connector.
For a basic TRS plug:
Signal conductor  → Tip
Ground shield     → Sleeve
Ring              → No connection
For a CTIA TRRS microphone:
Signal conductor  → Sleeve
Ground shield     → Ring 2
Tip and Ring 1    → No connection
Slide the plug’s shell and strain relief onto the cable before soldering. This is a common mistake. If you forget, you may need to remove the soldered plug and start again.
Keep unused contacts insulated. Do not allow the shield to touch the tip or microphone contact.
Step 7: Add strain relief
The cable will bend most near the capsule and plug. Protect both areas with heat-shrink tubing.
You can also use:
- A short flexible rubber sleeve
- A knot inside a larger housing
- A small amount of flexible adhesive
- A purpose-made cable boot
Avoid covering the microphone’s sound inlet. The capsule needs an open path for sound.
Step 8: Mount the capsule
Place the capsule inside a small housing or use a commercial microphone clip.
Leave a small opening near the front of the capsule. Do not seal the sound port with hard glue. If the capsule faces into solid material, the sound will become muffled.
Use a small foam windscreen over the capsule. Foam reduces light air movement and protects the capsule from contact with clothing.
Step 9: Attach the clip
Mount the clip a few inches below the speaker’s mouth. A position near the upper chest often gives a balanced voice.
Keep the capsule:
- Facing outward
- Away from necklaces and buttons
- Clear of rubbing fabric
- Loose enough to avoid pulling the cable
The clip should hold the cable without squeezing the capsule.
Step 10: Test the microphone
Connect the microphone to the correct input. Start with the recording level low. Record a short sample while speaking at a normal volume.
Check for:
- Clear speech
- No constant hum
- No crackling when the cable moves
- No severe distortion
- No rubbing noise
- Normal recording level
If the test works, gently move the cable and clip. A working microphone that fails when moved usually has a weak solder joint, poor strain relief, or cable damage.

How to Test and Troubleshoot a DIY Lavalier
Start with the simplest and safest checks. Many microphone problems come from connector wiring rather than the capsule itself.
The microphone produces no sound
Possible causes include:
- The connector is wired for the wrong standard
- The device does not provide plug-in power
- The capsule polarity is reversed
- A solder joint is open
- The cable has an internal break
- The device is using the wrong input
- The phone adapter does not support analog microphones
Try these checks:
- Confirm that the device recognizes an external microphone.
- Check whether the input provides plug-in power.
- Test the microphone with another compatible device.
- Inspect the plug for accidental shorts.
- Check cable continuity with a multimeter.
- Reflow weak or cracked solder joints.
Reversing the capsule polarity may stop it from working, but do not assume polarity is the only problem. Connector standards cause many failures.
The recording has a loud hum
Hum often comes from shielding or nearby electrical equipment.
Try:
- Moving the cable away from power adapters
- Using a shielded cable
- Separating the microphone cable from AC power cords
- Testing without a computer charger connected
- Checking that the ground connection is solid
- Using a shorter cable
If the hum changes when you touch the plug or metal housing, the ground or shield may be incomplete.
The audio is too quiet
A weak signal may result from:
- A low-sensitivity capsule
- An input with little plug-in power
- A device expecting a different microphone type
- A poor connection
- The microphone being too far from the speaker
Move the mic closer before increasing gain. More gain also raises background noise.
A simple passive electret lavalier may need a small preamp when used with an input that cannot provide enough bias or gain. Adding a preamp makes the circuit more complex and requires its own power source.
The audio is distorted
Distortion can occur when:
- The capsule is too close to a loud sound source
- The input gain is set too high
- The device supplies an unsuitable bias voltage
- The microphone is damaged
- The input expects a different signal level
Lower the input gain first. Then place the capsule farther from the mouth. Speech recorded too close can overload even a good microphone.
The cable creates rustling noise
Clothing noise usually comes from movement between the cable, clip, and shirt.
Reduce it by:
- Securing the cable below the clip
- Leaving a small cable loop near the microphone
- Keeping the capsule from touching fabric
- Using a softer cable
- Adding a foam windscreen
- Placing the capsule on a stable part of the garment
A lavalier can sound clear while still being poor for movement. Test it while walking, turning, and touching the cable.

How to Improve the Sound and Durability
The biggest improvements usually come from placement, cable control, and wind protection. Changing the capsule may help, but it should not be the first step.
Use a foam windscreen
A foam windscreen helps reduce light wind and breath noise. It does not fully protect the microphone outdoors. For outdoor recording, use additional wind protection and keep the capsule out of direct airflow.
Do not use thick material that blocks the capsule opening. It may reduce high-frequency detail and make speech sound dull.
Add a cable loop
Make a small loop below the capsule and secure it with the clip. The loop absorbs some movement before it reaches the capsule.
This simple step can reduce bumps caused by cable tension.
Use a better capsule
If the basic microphone works but sounds harsh or noisy, try a capsule with documented sensitivity and frequency response. Look for the manufacturer’s data sheet.
Specifications can help compare capsules, but they do not guarantee better real-world sound. Placement, clothing, cable movement, and the input circuit also affect the result.
Add an inline capacitor only when needed
Some circuits use a capacitor to block DC or reduce radio-frequency interference. The correct value depends on the input circuit and the desired low-frequency response.
Do not add random components to a working microphone. A capacitor that is too small can reduce bass. A capacitor connected in the wrong place can stop the microphone from working.
Consider a powered circuit
A battery-powered preamp can provide more control over gain and output level. It also adds:
- A battery
- A switch
- A housing
- More wiring
- More possible noise
- More maintenance
For a first project, use the recording device’s plug-in power. Build a powered preamp only when the basic microphone works and you understand the input requirements.
Common Mistakes to Avoid
These errors are easy to prevent:
- Wiring the microphone to a headphone output instead of a microphone input
- Confusing TRS and TRRS layouts
- Forgetting to slide the plug shell onto the cable first
- Leaving the capsule terminals uninsulated
- Using an unshielded cable
- Sealing the sound port with glue
- Placing the capsule under a collar or thick fabric
- Making the cable too long
- Skipping a continuity test
- Increasing gain before fixing placement
- Connecting the microphone to a device that does not supply plug-in power
- Assuming a phone adapter supports every analog microphone
A passive electret lavalier is not a universal microphone. Its performance depends on the capsule, wiring, power, input impedance, gain, and physical placement.

Safety When Building the Microphone
Soldering involves heat, fumes, and small parts. Work on a stable surface with good ventilation.
Follow these precautions:
- Wear eye protection
- Keep the soldering iron in its stand
- Do not touch the iron tip
- Wash your hands after handling solder
- Keep lead-based solder away from food and children
- Avoid breathing solder fumes
- Unplug the iron when finished
- Disconnect the microphone before changing wiring
- Never connect unknown voltage to the capsule
Do not connect a homemade microphone to a speaker output, amplifier output, or other high-power output. Those connections can damage the microphone and equipment.
If you use a battery-powered circuit, insulate the battery terminals and prevent wires from shorting. Stop using the microphone if the battery becomes hot, swollen, or damaged.

A Practical Build Checklist
Before recording, confirm each item:
- The capsule positive terminal is identified
- The cable has a signal conductor and shield
- The plug matches the recording device
- The microphone input supplies suitable plug-in power
- The capsule terminals are insulated
- The plug has strain relief
- The capsule sound port is open
- The clip holds the microphone securely
- A short test recording sounds clear
- The cable does not create loud rustling or hum
For the easiest first build, use an omnidirectional electret capsule, a short shielded cable, and a TRS plug for a camera or recorder with a microphone input. If you plan to use a phone, verify the CTIA wiring and use a compatible adapter.

Frequently Asked Questions
Can I make a lavalier microphone without soldering?
Yes, but the choices are limited. You can use screw terminals, crimp connectors, or a ready-made capsule cable. These methods are usually larger and less reliable than soldered joints. For a small lavalier, soldering gives the cleanest connection.
Can I plug a homemade lavalier directly into an iPhone?
Only if the setup supports the phone’s input standard. Newer iPhones generally need a compatible Lightning or USB-C audio adapter. A passive 3.5 mm microphone will not work with every adapter.
Does an electret microphone need a battery?
Not always. Many electret capsules receive plug-in power from a camera, recorder, computer, or wireless transmitter. If the input does not provide suitable power, the microphone may need a battery-powered preamp or another active circuit.
Why does my microphone work on a camera but not on a phone?
The devices may use different connector layouts. A camera may use TRS wiring, while a phone headset input may use CTIA TRRS wiring. The phone may also require an analog audio adapter.
Is a homemade lavalier as good as a store-bought microphone?
It can produce usable speech, but commercial microphones often offer better capsule matching, shielding, strain relief, wind protection, and quality control. A DIY microphone is most useful when you want to learn, repair, customize, or create a low-cost backup.
Can I use a dynamic microphone capsule instead?
Yes, but the circuit and output level may differ. A dynamic capsule does not use the same bias method as an electret capsule. It may also need more gain from the recorder or a preamp.
Conclusion
The simplest way to make a lavalier microphone is to wire a two-terminal electret capsule to a shielded cable and a connector that matches your recording device. Connect the capsule signal to the correct microphone contact and the negative terminal to ground.
The key steps are correct connector wiring, clean solder joints, insulation, strain relief, and careful placement on clothing. Test the microphone before closing the housing, and fix power or connector problems before adding extra circuit parts.
