

A USB audio interface converts analog sound into digital data and sends it to your computer for recording.
If you have ever plugged a microphone into a computer and wondered why the sound suddenly becomes clear, the answer starts with the audio interface. Understanding how does a USB audio interface work helps you choose the right gear, fix recording problems, and get better sound without wasting money. This guide explains the full signal path in simple terms, from the microphone capsule to your recording software and back to your headphones or speakers.
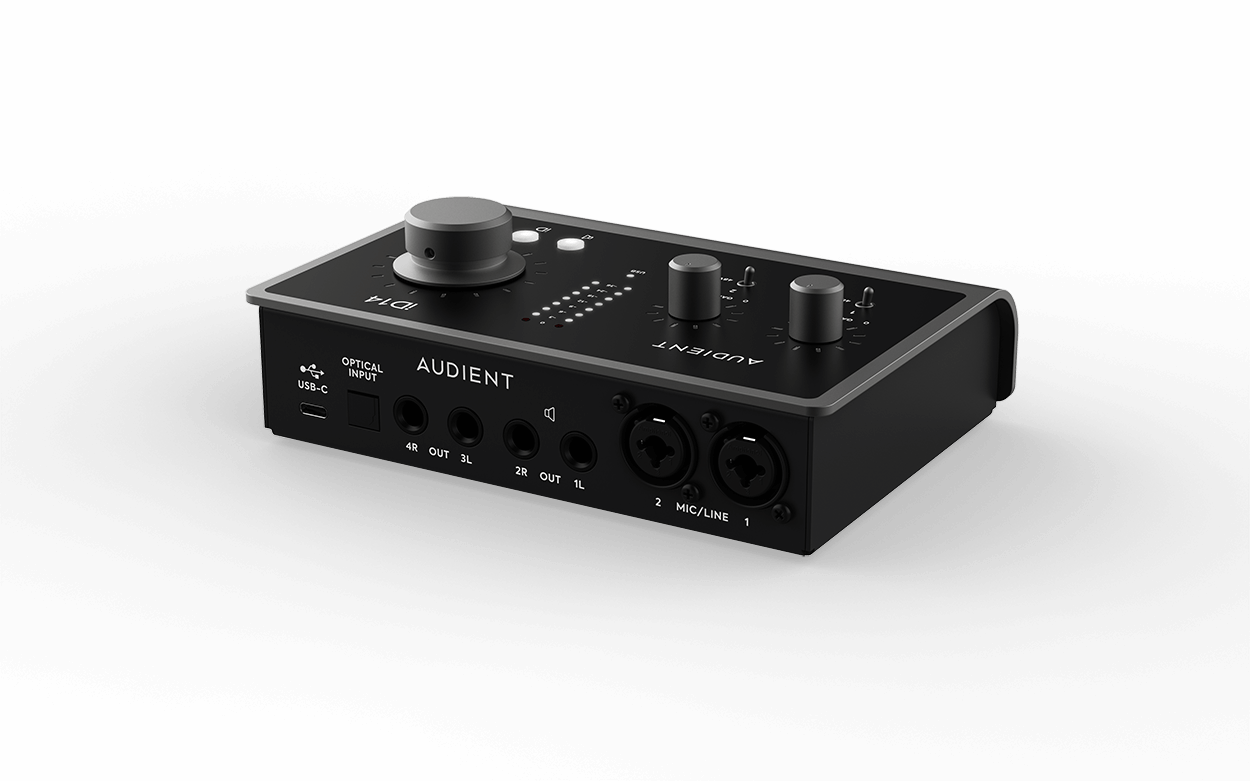
What is a USB audio interface?
A USB audio interface is a device that connects microphones, instruments, headphones, and studio monitors to a computer. It manages the movement of audio between the analog world and the digital world.
Microphones and electric instruments create analog signals. Computers, however, store and process digital data. The interface acts as a translator between these two systems.
Most USB audio interfaces include:
• Microphone inputs for XLR cables
• Instrument inputs for guitar or bass
• Line inputs for mixers, keyboards, and other devices
• Headphone outputs
• Speaker outputs
• Gain controls
• Phantom power for condenser microphones
• USB connection to a computer
• Direct monitoring controls on many models
A basic interface may have one or two inputs. Larger models can support many microphones at once. The best choice depends on what you record and how many sources you need at the same time.

How does a USB audio interface work?
How does a USB audio interface work? It takes an analog sound signal, changes it into digital data, sends that data through USB, and can later convert it back into analog sound.
The process has several key stages:
- A microphone or instrument creates an analog signal.
- The preamp raises the signal to a useful level.
- The analog-to-digital converter samples the signal.
- The USB connection sends digital audio to the computer.
- Recording software stores and processes the audio.
- The digital-to-analog converter changes playback data into sound.
- Headphones or speakers reproduce the sound.
Think of the interface as a skilled interpreter. It listens to an electrical version of sound, translates it into computer language, and then translates it back when you want to hear playback.
This process happens very quickly. With the right settings, you can record vocals, guitar, podcasts, or music while monitoring the result with very little delay.

The audio signal path explained
Understanding the signal path makes how does a USB audio interface work much easier to understand. Every part has a specific job.
1. The microphone or instrument creates a signal
A microphone changes air movement into a small electrical signal. A guitar pickup does something similar by changing string movement into an electrical signal.
These signals are often weak. A microphone may produce a signal that is far too quiet for a computer to use directly. That is why the signal enters a preamp first.
2. The preamp adds clean gain
The preamp boosts the incoming signal. The gain knob controls how much amplification the signal receives.
Good gain settings are important. Too little gain creates a weak recording that may require heavy boosting later. Too much gain causes clipping, which creates harsh distortion.
A useful starting point is to set the loudest performance peaks around minus 12 to minus 6 decibels full scale in your recording software. This leaves headroom for sudden loud sounds.
3. The converter changes analog sound into digital data
The analog-to-digital converter, often called an ADC, measures the electrical signal thousands of times each second. Each measurement becomes a digital value.
Two specifications matter most:
• Sample rate describes how often the signal is measured. Common rates include 44.1 kHz and 48 kHz.
• Bit depth describes the level of detail available in each measurement. Twenty-four-bit recording is common in modern home studios.
A higher sample rate does not automatically make a recording sound better. Your microphone, room, placement, and performance usually matter more.
4. USB sends the data to your computer
After conversion, the interface packages the audio as digital data. The USB cable carries that data to the computer.
The computer does not receive sound in the same way your ears do. It receives a stream of numbers. Your digital audio workstation, such as a recording or music production program, reads those numbers and stores them as an audio file.
USB provides power and data on many interfaces. Some larger units also use a separate power adapter because they need more energy.
5. Software records and processes the audio
Your recording software receives the signal from the interface driver. It can then record, edit, mix, and add effects.
The software may also send audio back to the interface. This happens when you play a recorded track, use a virtual instrument, or listen to a video.
6. Playback returns through another converter
During playback, the process runs in reverse. The digital-to-analog converter, or DAC, changes computer data back into an electrical audio signal.
The interface then sends that signal to headphones, studio monitors, or another analog device. This is why the interface needs both input and output circuits.

What does USB do in an audio interface?
USB carries digital audio between the interface and the computer. It also allows the computer to control the interface and, in many cases, provide its power.
USB is not what improves the sound by itself. The quality depends on the entire design, including the preamps, converters, clock system, drivers, and analog output stage.
Common USB versions include:
• USB 2.0: Still widely used and fully suitable for many recording setups
• USB 3.0 and newer: Useful for devices with higher data needs, though newer USB does not always mean better audio
• USB-C: A connector shape, not a guarantee of USB 3.0 speed or better sound
A USB-C interface may still use USB 2.0 data standards. Always check the technical specifications instead of judging performance by the connector shape.
A reliable cable also matters. If the interface disconnects, try another cable, a different USB port, or a powered hub designed for audio equipment.

How microphone preamps and phantom power work
The preamp is one of the most important parts of a USB audio interface. It raises a quiet microphone signal without adding too much noise.
Dynamic microphones often need more gain than condenser microphones. Ribbon microphones can also need substantial gain, although some active ribbon designs use different requirements.
Phantom power sends about 48 volts through the microphone cable. Condenser microphones often need this power to operate their internal electronics.
Use phantom power carefully:
• Turn the input gain down before switching it on
• Check the microphone manual first
• Do not connect unusual passive devices without confirming compatibility
• Use balanced XLR cables for microphones
• Turn phantom power off before unplugging sensitive equipment when possible
Phantom power is not the same as gain. Phantom power supplies electrical energy. Gain controls the strength of the audio signal.

How does a USB audio interface reduce latency?
How does a USB audio interface work with low latency? It uses drivers, buffers, and direct monitoring to move audio quickly between your performance and your ears.
Latency is the short delay between making a sound and hearing it through the computer. A large buffer gives the computer more time to process audio, but it also creates more delay. A small buffer reduces delay but requires more computer power.
You can usually manage latency with these settings:
• Lower the buffer size while recording
• Raise the buffer size while mixing
• Close unused programs
• Use the correct audio driver
• Avoid unnecessary plug-ins during tracking
• Use direct monitoring when available
Direct monitoring sends the input signal straight to the headphone output. This lets you hear yourself before the signal travels through the computer. It often feels immediate, though you may not hear software effects placed on the track.
A practical setup is to use direct monitoring for vocals and guitars, then listen to software effects during playback.

What is the difference between USB input and output?
USB input means audio travels from the interface into the computer. USB output means audio travels from the computer back to the interface.
For example, when you record a vocal, the microphone signal is an input. When you listen to that vocal through headphones, the returning signal is an output.
Interface specifications may list input and output counts in several ways. A device described as “2-in/2-out” may have two analog inputs and two analog outputs, while headphone routing may be listed separately.
Pay attention to the difference between:
• Microphone inputs
• Line inputs
• Instrument inputs
• Monitor outputs
• Headphone outputs
• Digital inputs and outputs
Two physical connectors do not always equal two separate recording channels. Read the manual if you need advanced routing or multiple headphone mixes.

USB audio interface versus a computer headphone jack
A computer headphone jack is designed mainly for simple playback. A USB audio interface is built for recording and monitoring.
An interface usually provides:
• Better microphone connections
• More input gain
• Lower noise
• Higher output power for headphones
• Balanced outputs for studio monitors
• More reliable control over recording levels
• Direct monitoring
• Support for professional microphones and instruments
This does not mean every interface will sound dramatically better than every computer sound card. A low-cost interface in a noisy room may not solve every problem. Room acoustics, microphone technique, and gain settings still have a major effect.
The biggest advantage is control. An interface gives you proper connectors and a clear signal path for serious recording.
USB audio interface setup: step-by-step
Once you know how does a USB audio interface work, setup becomes simple.
- Install the manufacturer’s driver if your computer requires one.
- Connect the interface with a suitable USB cable.
- Connect headphones or studio monitors.
- Plug the microphone or instrument into the correct input.
- Turn on phantom power only if the microphone needs it.
- Select the interface as the input and output device in your recording software.
- Choose the sample rate and buffer size.
- Raise the gain while performing at your loudest expected level.
- Confirm that the software meter moves without reaching the red zone.
- Record a short test and listen for noise, distortion, or delay.
On many modern computers, basic USB interfaces use class-compliant drivers. Some models still need special drivers for advanced features, lower latency, or extra routing.
If the software does not show the interface, check the system sound settings, reconnect the USB cable, and restart the recording program.
Common mistakes to avoid
Many recording problems come from setup errors rather than defective equipment. These are the mistakes I see most often in home recording workflows.
Setting the gain too high
A red meter usually means the signal is clipping. Lower the input gain and record another test. Software cannot fully repair clipped audio.
Using the wrong input mode
A guitar often needs an instrument or high-impedance input. A line-level keyboard usually needs a line input. The wrong mode can create low volume, distortion, or poor tone.
Recording too close to the microphone
Being close can add bass through the proximity effect. It can also make breaths and mouth sounds more obvious. Start with a pop filter and a consistent distance of about 6 to 12 inches, then adjust by ear.
Ignoring the room
A high-priced interface cannot remove room echo that is recorded with the voice. Soft furnishings, rugs, curtains, and careful microphone placement can help.
Choosing a buffer that is too small
A very small buffer may cause clicks, pops, or dropouts. Increase the buffer when mixing or when the computer struggles.
Confusing balanced and unbalanced cables
Balanced connections help reject noise over longer runs. Use balanced outputs and suitable cables for studio monitors whenever possible.
Buying more inputs than needed
Extra inputs are useful only if you plan to record several sources. A solo creator may need one or two inputs, while a band may need eight or more.
How to choose a USB audio interface
The right interface depends on your work, not just its brand or price.
Consider these factors:
• Input count: Choose enough inputs for your microphones and instruments.
• Preamps: Look for clean gain and enough range for your microphone.
• Phantom power: Make sure it is available if you use condenser microphones.
• Headphone output: Check whether it is loud and clear enough for your headphones.
• Direct monitoring: This helps reduce the feeling of delay.
• Driver support: Confirm compatibility with your operating system.
• MIDI: Choose a model with MIDI ports if you use older keyboards or hardware.
• Portability: Bus-powered models are useful for travel.
• Expandability: Digital expansion may help if your studio grows.
• Build quality: Strong knobs and connectors matter when equipment gets daily use.
Do not assume that expensive means appropriate. A simple two-input interface can produce excellent results when used correctly.
How does a USB audio interface work with a DAW?
How does a USB audio interface work with a DAW? The interface sends recorded audio to the DAW, and the DAW sends playback audio back through the interface.
First, select the interface as the audio device in the DAW settings. Then choose the correct input for each track. For example, input one might receive a vocal microphone, while input two receives a guitar.
You also need to select an output. The main output usually feeds your speakers. A headphone output may mirror that mix or use a separate cue mix.
If you hear no sound, check these items:
• The correct interface is selected
• The track is record-enabled
• The track input matches the physical socket
• The monitor output is turned up
• The DAW is not muted
• The operating system allows microphone access
• The USB device has the correct driver
Can a USB audio interface improve recording quality?
A USB audio interface can improve recording quality by providing better connections, cleaner gain, stronger monitoring, and more suitable converters than a basic computer jack.
However, it cannot fix every issue. The microphone, room, performance, microphone position, and recording levels often matter more than small differences between modern interfaces.
A useful upgrade order is:
- Improve the recording space.
- Learn proper microphone placement.
- Set gain correctly.
- Use a suitable microphone.
- Upgrade the interface when its inputs, noise, or latency limit your work.
This approach saves money and builds better recording habits. In real home studios, a well-placed affordable microphone often beats an expensive microphone placed badly in a reflective room.
Frequently asked questions about how does a USB audio interface work
Does a USB audio interface need external power?
Some small interfaces receive power through USB. Larger models may use an external power adapter for additional inputs, stronger headphone outputs, or more complex circuits.
Can I use a USB audio interface with a laptop?
Yes. Most USB audio interfaces work with laptops that have a compatible USB port or adapter. Check operating system support and use a reliable cable.
Do I need an audio interface for a USB microphone?
Usually, no. A USB microphone already contains its own preamp and analog-to-digital converter. You may still want an interface for XLR microphones, multiple inputs, or studio monitor connections.
Does an audio interface make a microphone louder?
It can make a microphone signal louder through its preamp. It does not automatically improve a poor microphone position or remove room noise.
Can I connect headphones directly to a USB audio interface?
Yes. Most interfaces have a dedicated headphone output with its own volume control. This is often more useful for recording than a computer’s built-in headphone jack.
Is USB better than Thunderbolt for audio?
Both can work well. USB interfaces are widely compatible and often more affordable, while Thunderbolt may offer very low latency and high bandwidth in supported systems.
Why does my USB audio interface make crackling sounds?
Crackling can come from an incorrect driver, a buffer that is too small, a faulty cable, USB power problems, or another program using the audio device. Increase the buffer, update the driver, and test another USB port.
Conclusion
A USB audio interface works by translating analog sound into digital data, sending it to your computer, and converting playback back into an analog signal. Its preamps, converters, USB connection, monitoring system, and drivers all work together to create a practical recording setup.
The key to better results is not simply buying the most expensive interface. Set your gain carefully, use the right input, control latency, place the microphone well, and treat your recording space. Once you understand how does a USB audio interface work, you can record with more confidence and make smarter gear choices. Try a simple recording test today, then explore more guides and share your questions in the comments.
