

Connect a microphone to your computer by plugging it in, selecting it in sound settings, and testing the input level.
Learning how to connect a microphone to a computer is simple once you know which connector, adapter, and sound setting your microphone needs. This guide covers USB, 3.5 mm, XLR, Bluetooth, Windows, Mac, Chromebook, setup errors, and ways to improve recording quality.
Identify Your Microphone Connection
Before learning how to connect a microphone to a computer, check the microphone’s connector. The plug tells you what equipment you need.
Most computer microphones use one of these connection types:
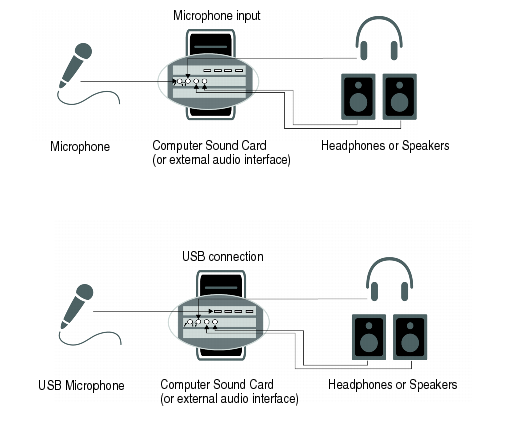
• USB: A USB microphone connects directly to a USB-A or USB-C port. It contains its own small audio interface.
• 3.5 mm: This microphone uses a small round plug. It may connect to a dedicated microphone port or a combined headset jack.
• XLR: XLR microphones are common in studios and live audio. They need an audio interface or mixer before they can connect to a computer.
• Bluetooth: Some wireless microphones pair with a computer through Bluetooth. They are convenient, but sound quality and delay can vary.
• Wireless USB: Many wireless microphone systems include a USB receiver. The receiver connects to the computer, while the microphone connects to the receiver.
A USB microphone is usually the easiest choice for calls, podcasts, gaming, online classes, and voice recordings. An XLR microphone can offer more control, but it requires extra equipment and setup.

How to Connect a USB Microphone to a Computer
A USB microphone is usually plug and play. In most cases, the computer detects it within a few seconds.
Follow these steps:
Find an open USB-A or USB-C port on your computer.
Plug the microphone cable into the microphone.
Connect the other end to the computer.
Wait for the operating system to install the basic driver.
Open your computer’s sound settings.
Select the USB microphone as the input device.
Speak into the microphone and watch the input meter move.
Adjust the input volume until your voice sounds clear without distortion.
Some USB microphones have a mute button, gain knob, headphone jack, or monitoring control. Check that the microphone is not muted before testing it.
If your computer has only USB-C ports and your microphone uses USB-A, use a reliable USB-C adapter or hub. A loose or low-quality adapter can cause the microphone to disconnect.
In my own microphone tests, the most common mistake was choosing the microphone in the recording app but not in the computer’s main sound settings. Selecting it in both places solved the issue quickly.
How to Connect a 3.5 mm Microphone to a Computer
A 3.5 mm microphone may use a dedicated microphone jack or a headset jack. Desktop computers often have separate colored ports, while many laptops use one combined port.
Look for a port marked with:
• A microphone icon
• A headset icon
• The word “mic”
• A pink audio ring on some desktop computers
Insert the microphone plug firmly. Then open your sound settings and select the external microphone as the input device.
Some headset microphones use a TRRS plug. TRRS means the plug has four metal sections for left audio, right audio, ground, and microphone. A computer with separate headphone and microphone ports may need a TRRS splitter.
If the microphone has a TRS plug and your computer has a TRRS headset port, an adapter may also be required. The correct adapter depends on the plug design, so check the microphone manual before buying one.
A 3.5 mm microphone may sound quieter than a USB microphone. This is often due to the computer’s built-in microphone preamp. Increasing the input level can help, but too much gain may add hiss.

How to Connect an XLR Microphone to a Computer
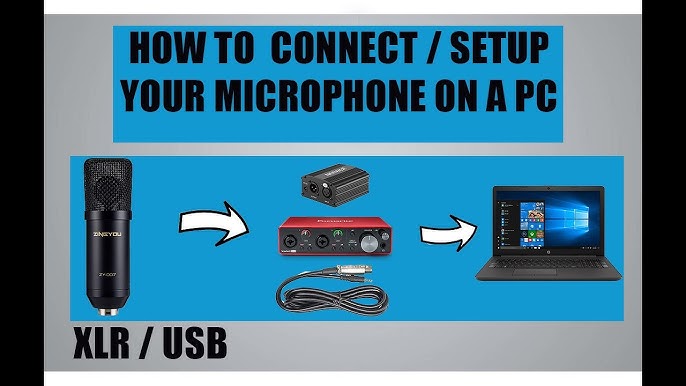
You cannot usually connect an XLR microphone directly to a computer. You need an audio interface, mixer, or compatible USB adapter.
The basic setup looks like this:
Plug the XLR cable into the microphone.
Connect the other end of the XLR cable to the audio interface.
Connect the audio interface to the computer with USB or USB-C.
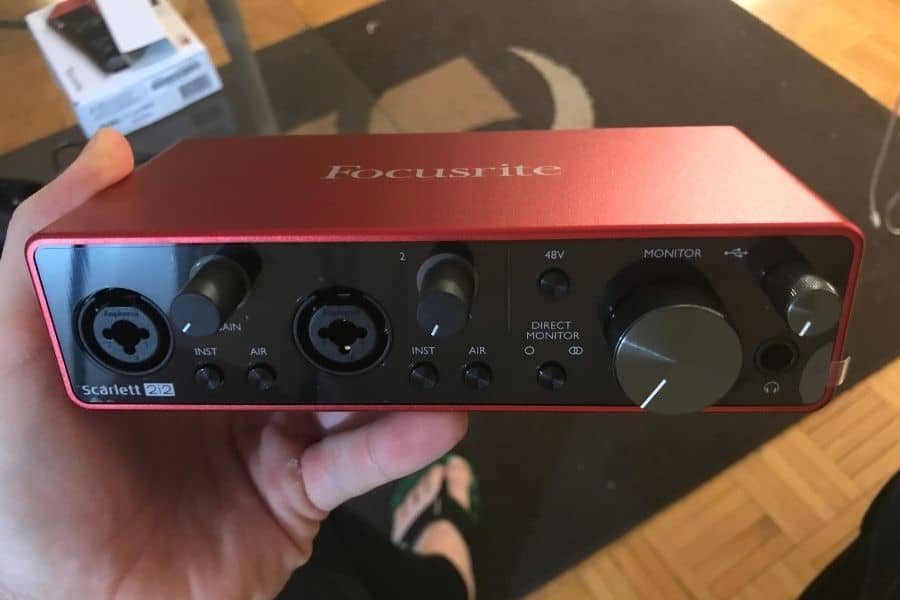
Turn on phantom power only if the microphone requires it.
Select the audio interface as the computer’s input device.
Raise the gain slowly while speaking.
Use headphones connected to the interface to monitor your voice.
Dynamic XLR microphones usually do not need phantom power. Many condenser microphones do need 48-volt phantom power. Check the microphone instructions before switching it on.
An audio interface converts the microphone’s analog signal into digital audio that the computer can understand. It also provides a preamp, which boosts a quiet microphone signal.
Keep the gain low at first. If the input meter reaches the red zone, your recording may clip. Clipping creates harsh distortion that cannot be fully repaired later.

How to Connect a Bluetooth Microphone
Bluetooth microphone setup varies by computer and microphone model. First, charge the microphone and place it near the computer.
On Windows:
Open Settings.
Select Bluetooth & devices.
Turn on Bluetooth.
Choose Add device.
Select Bluetooth.
Choose the microphone from the list.
Open Sound settings and select it as the input device.
On a Mac:
Open the Apple menu.
Select System Settings.
Choose Bluetooth.
Find the microphone and select Connect.
Open Sound settings.
Select the microphone under Input.
Bluetooth is useful for casual calls and mobile work. However, it may introduce delay or reduce sound quality. Some computers also switch to a lower-quality Bluetooth mode when they use the microphone and headphones at the same time.
For music, podcasting, or professional voice recording, a USB microphone or audio interface is often more reliable.

How to Choose the Microphone in Windows
After connecting a microphone, Windows may not select it automatically. You can choose it manually.
Right-click the speaker icon on the taskbar.
Select Sound settings.
Find the Input section.
Choose your microphone from the device list.
Speak and watch the input level.
Adjust the volume if needed.
For more control, open the microphone’s device properties. You can check the input volume, test the microphone, and allow or block access.
Privacy settings can also stop a microphone from working. Go to the microphone privacy settings and make sure these options are enabled:
• Microphone access for the device
• Permission for apps to use the microphone
• Permission for desktop apps to use the microphone
Video meeting apps often have their own microphone menu. Open the app settings and select the same microphone you selected in Windows.
How to Choose the Microphone on a Mac
macOS makes microphone selection simple, but apps still need permission to use the device.
Open the Apple menu.
Select System Settings.
Choose Sound.
Select Input.
Click the connected microphone.
Adjust the input volume.
Speak and check the input meter.
If an app cannot hear you, open Privacy & Security settings. Select Microphone and allow access for the app you want to use.
Many Mac computers automatically detect USB microphones and audio interfaces. If the device does not appear, disconnect it, restart the Mac, and reconnect it directly instead of using a hub.
Mac users should also check the input source inside apps such as Zoom, GarageBand, Audacity, or a web browser. An app may use the built-in microphone even when macOS uses the external microphone.
How to Connect a Microphone to a Chromebook
Chromebooks usually detect USB microphones and headsets automatically.
Connect the microphone to the Chromebook.
Select the time in the lower-right corner.
Open the audio settings.
Choose the microphone under the input options.
Test the microphone in a recording or meeting app.
If the microphone does not appear, remove any adapter and connect it directly when possible. Also check that the website or app has permission to use the microphone.
Chromebooks may offer fewer advanced audio controls than Windows or macOS. A USB microphone with built-in gain controls can make setup easier.

How to Test Your Microphone
Testing your microphone before a call or recording prevents many problems. You do not need professional software for a basic test.
Try these methods:
• Use the microphone test in your computer’s sound settings.
• Record a short clip with the built-in voice recorder.
• Join a private meeting in your video call app.
• Speak while watching the input meter.
• Listen for background noise, echo, crackling, and distortion.
A healthy signal should be strong but not overloaded. Keep the microphone about 4 to 8 inches from your mouth for most voice work. Speak across the front or side of the microphone if it has a front-address or side-address design.
Use headphones during testing. Computer speakers can send your voice back into the microphone and create an echo. Headphones also help you notice noise that may not be obvious through speakers.
I once spent several minutes troubleshooting a microphone that seemed broken. The real problem was a physical mute switch on the cable. Always check the hardware controls before changing drivers or reinstalling software.
Improve Microphone Sound Quality
Connecting a microphone to a computer is only the first step. Placement and room sound often matter more than buying a costly microphone.
Use these practical tips:
• Place the microphone close enough to capture a clear voice.
• Keep the microphone slightly to the side of your mouth to reduce harsh breath sounds.
• Use a pop filter for words with strong “p,” “b,” and “t” sounds.
• Keep fans, air conditioners, and noisy electronics away from the microphone.
• Record in a room with curtains, rugs, or furniture to reduce reflections.
• Avoid placing the microphone directly on a desk if it picks up bumps and keyboard noise.
• Use a small stand, shock mount, or boom arm when suitable.
• Set the recording level before you start speaking.
A quiet room helps, but it does not need to be a professional studio. A bedroom with soft furniture can sound better than a large empty room because hard surfaces reflect sound.
Software noise reduction can help with steady background noise. It cannot fully repair clipping, heavy echo, or a microphone placed too far from the speaker.
Fix Common Microphone Problems
If your computer does not detect the microphone, start with simple checks.
The computer does not recognize the microphone
Try these steps:
Unplug the microphone.
Restart the computer.
Connect the microphone to another port.
Avoid an unpowered USB hub.
Test the microphone on another computer.
Check for system updates and device drivers.
USB microphones normally use standard drivers, but some advanced devices require software from the manufacturer.
The microphone is connected but has no sound
Check that:
• The microphone is not muted.
• The correct input device is selected.
• The input volume is high enough.
• The app has microphone permission.
• The cable is fully inserted.
• An XLR interface has enough gain.
• Phantom power is enabled when required by a condenser microphone.
The sound is distorted
Lower the input gain or microphone volume. Move the microphone slightly farther away and keep the input meter out of the red zone.
Distortion often happens before the sound reaches the recording software. Lowering the volume later may not remove the damage.
The recording contains a hum
A hum may come from a poor cable, electrical interference, a faulty power supply, or an unbalanced connection. Try another cable, another USB port, or a different power outlet.
Keep audio cables away from laptop chargers and power adapters. If an XLR setup continues to hum, an audio professional may need to check the grounding and equipment.
Microphone Connection Mistakes to Avoid
Several simple mistakes can make a working microphone appear faulty.
• Plugging an XLR microphone directly into a computer without an interface
• Using a headphone-only adapter instead of a microphone-compatible adapter
• Selecting the built-in microphone instead of the external device
• Forgetting to allow microphone access
• Leaving a physical mute button turned on
• Setting the gain too high
• Using a damaged or loose cable
• Connecting through a weak USB hub
• Testing with speakers that create feedback
• Assuming every 3.5 mm plug has the same wiring
Take one change at a time when troubleshooting. If you change the cable, port, software, and settings at once, it becomes difficult to know what fixed the issue.
The safest approach is to test the microphone at each stage: hardware, computer settings, and recording app. This method works like checking each link in a chain.
Which Microphone Is Best for Your Computer?
The best microphone depends on how you plan to use it.
| Use case | Suitable microphone |
|---|---|
| Video calls | USB or headset microphone |
| Gaming | USB, headset, or wireless USB microphone |
| Podcasting | USB condenser microphone or XLR microphone |
| Music recording | XLR microphone with an audio interface |
| Online teaching | USB or headset microphone |
| Travel | Compact USB or Bluetooth microphone |
| Noisy room | Dynamic microphone placed close to the speaker |
USB microphones offer simple setup and good value. XLR microphones provide more control and can grow with your recording system. Headset microphones are convenient because the microphone stays close to your mouth.
There is no single best microphone for everyone. Room noise, computer ports, budget, and intended use all affect the right choice.
Frequently Asked Questions About How to Connect a Microphone to a Computer
Can I connect any microphone directly to a computer?
No. USB microphones can connect directly, but XLR microphones usually need an audio interface or mixer. Some 3.5 mm microphones may also need a splitter or adapter.
Why is my microphone connected but not working?
The wrong input device, muted microphone, blocked app permission, or low input volume may be the cause. Check the computer’s sound settings and the recording app’s microphone settings.
Do I need a driver to connect a USB microphone?
Most basic USB microphones work with built-in operating system drivers. Advanced microphones may require manufacturer software for controls, effects, firmware updates, or monitoring features.
Can I connect an XLR microphone to a laptop?
Yes, but you need a USB audio interface or a compatible XLR-to-USB adapter. Connect the XLR microphone to the interface, then connect the interface to the laptop.
How do I stop microphone echo on a computer?
Use headphones instead of speakers, lower the speaker volume, and select only one active microphone. Echo can also happen when the microphone is too close to the computer speakers.
Is USB or XLR better for computer recording?
USB is easier and often works well for calls, streaming, and simple recording. XLR is better when you want stronger control, multiple microphones, external preamps, or a more expandable studio setup.
Conclusion
Connecting a microphone to a computer usually takes only three steps: attach the correct cable, select the microphone as the input device, and test the signal. USB microphones are the simplest option, while XLR microphones need an audio interface.
If the microphone fails, check the mute switch, cable, input selection, app permissions, and gain level before assuming the device is broken. Set up your microphone today, record a short test, and explore more audio tips to make every call, stream, and recording sound clearer.