

Connect your microphone by matching its plug to the correct input, selecting it in your device settings, and testing the sound.
Learning how to connect the microphone is simple once you identify the microphone type and the device you want to use. This guide explains USB, XLR, 3.5 mm, wireless, computer, phone, camera, and mixer setups, along with common mistakes that cause silence, noise, or weak sound.
Identify Your Microphone Type
Before learning how to connect the microphone, check its connector. The plug usually tells you what equipment the microphone needs.
Most microphones use one of these connection types:
- USB: A USB microphone connects directly to a computer, tablet, or compatible phone. It has a built-in audio converter and often works without extra equipment.
- XLR: An XLR microphone has a round connector with three pins. It usually needs an audio interface, mixer, or recorder.
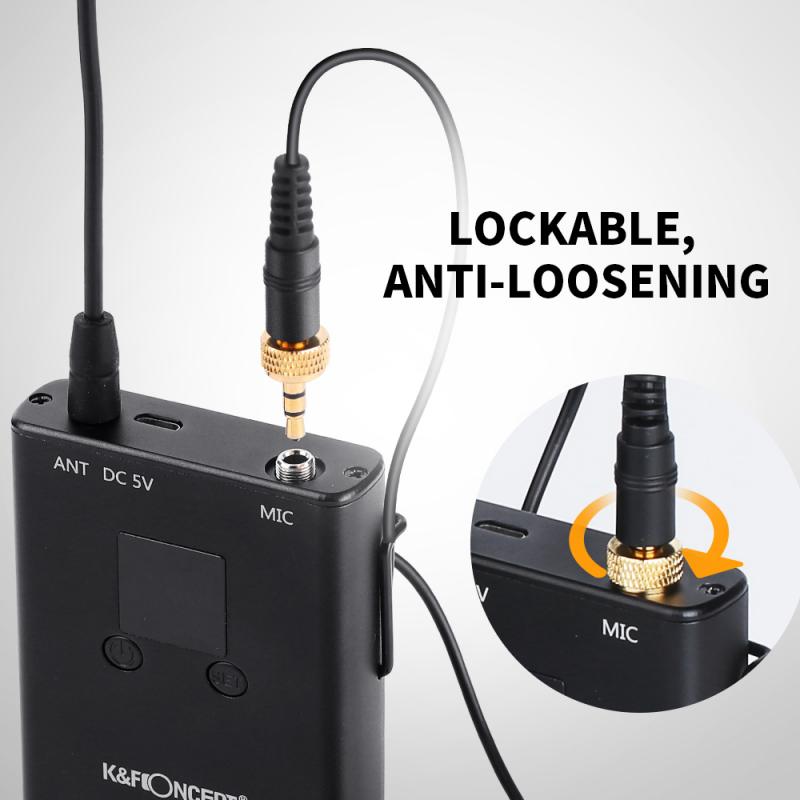
- 3.5 mm: This small plug is common on lavalier microphones, webcams, and some older computer microphones.
- Wireless: A wireless microphone uses a transmitter and receiver. The receiver connects to a camera, phone, mixer, or computer.
- Lightning or USB-C: Some microphones connect directly to modern phones and tablets through these ports.
A simple rule helps: USB microphones connect to a USB port, while XLR microphones connect to an audio interface or mixer. Do not force a connector into a port. Each plug has a different job, much like each key opens a different lock.

How to Connect a USB Microphone
USB microphones are often the easiest choice for podcasts, video calls, gaming, online classes, and voice recordings. They usually receive power from the USB port, so you do not need a separate power supply.
Follow these steps:
- Place the microphone on a stable desk stand or boom arm.
- Connect the USB cable to the microphone.
- Plug the other end into your computer.
- Wait for the computer to detect the microphone.
- Open your sound or audio settings.
- Choose the USB microphone as the input device.
- Speak at a normal volume and watch the input meter.
- Adjust the microphone gain if your model includes a gain knob.
On Windows, open Settings, select System, choose Sound, and find the Input section. On macOS, open System Settings, select Sound, and choose Input.
If the microphone does not appear, try another USB port. Avoid connecting through an unpowered hub when possible. Some USB microphones need more power than a low-cost hub can provide.
A useful setup habit is to connect the microphone before opening your recording app. Some programs choose the first available microphone when they start. Connecting it first reduces the chance of recording from the laptop’s built-in microphone by mistake.

How to Connect an XLR Microphone
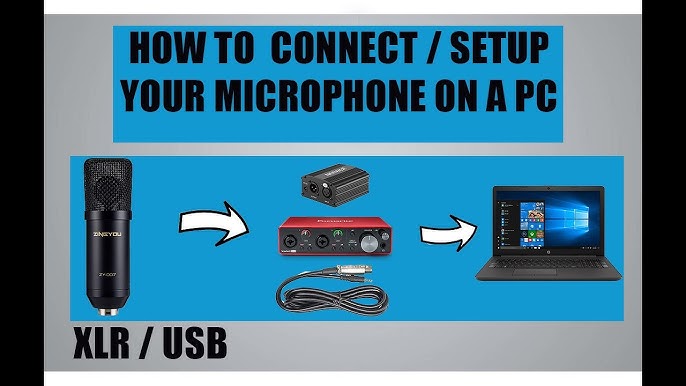
XLR microphones are common in studios, live events, radio stations, and professional video work. An XLR microphone cannot normally connect straight to a computer because most computers do not have an XLR microphone input.
You need an audio interface, mixer, camera adapter, or digital recorder.
Use this order:
- Turn down the interface or mixer gain.
- Plug the XLR cable into the microphone.
- Connect the other end to the interface or mixer input.
- Connect the interface to your computer with USB or another suitable cable.
- Select the interface as your input device.
- Slowly raise the gain while speaking.
- Stop when the signal is strong but does not reach the red or clip area.
Many condenser microphones need 48-volt phantom power. Turn on phantom power only after connecting the microphone and cable. Dynamic microphones usually do not need phantom power, although some active ribbon microphones may have special requirements.
Check the microphone manual before switching on 48V. Incorrect power use can damage certain equipment, especially older or unusual ribbon microphones.
The most common mistake with XLR setups is confusing an XLR cable with an adapter. A simple adapter may change the shape of the plug, but it does not provide the preamp, power, or signal conversion that the microphone needs.
How to Connect a Microphone to a Computer
The steps depend on the microphone connector.
For a USB microphone:
- Plug it into the computer.
- Select it under the system input settings.
- Choose it inside your recording or meeting app.
- Test the input level.
For an XLR microphone:
- Connect it to an audio interface.
- Connect the interface to the computer.
- Select the interface as the input.
- Set the gain on the interface.
For a 3.5 mm microphone:
- Plug it into the correct microphone port.
- Check whether your computer has a separate headphone and microphone jack.
- Select the microphone in the sound settings.
- Test the level in a recording app.
Some laptops combine the headphone and microphone connections into one four-pole jack. A microphone with a separate headphone plug may need a TRRS adapter. This is a small detail, but it explains many “my microphone is not working” problems.
After you connect the microphone, check the privacy settings. Windows and macOS can block microphone access for individual apps. Allow access for the program you trust, then restart the app if it still cannot detect the microphone.

How to Connect a Microphone to a Phone
Modern phones may use USB-C or Lightning ports instead of a standard microphone jack. You may need a phone-compatible microphone, an adapter, or a wireless receiver.
To connect a USB-C microphone:
- Plug the microphone into the phone’s USB-C port.
- Unlock the phone.
- Open the camera or recording app.
- Confirm that the app uses the external microphone.
- Record a short test clip.
For an iPhone with a Lightning port, use a microphone or adapter designed for Lightning devices. Some adapters only support charging and do not carry audio. A proper audio adapter is essential.
For a 3.5 mm microphone, use a compatible TRRS adapter if the phone has no headphone jack. TRRS means the plug has four contact sections. A standard headphone adapter may not support microphone input.
Wireless microphones often work through a small receiver. Connect the receiver to the phone, turn on both units, and wait for them to pair. Keep the receiver close to the transmitter during your first test.
Phone cases can prevent a connector from seating fully. If the phone does not recognize the microphone, remove the case and try again.

How to Connect a Microphone to a Camera
A camera microphone can improve speech, interviews, travel videos, and outdoor recordings. Many cameras use a 3.5 mm microphone input, while professional cameras may use XLR inputs.
For a 3.5 mm microphone:
- Turn off the camera if the manual recommends doing so.
- Connect the microphone to the camera’s microphone input.
- Mount the microphone securely.
- Open the camera audio menu.
- Set the input level manually if possible.
- Record a test clip.
- Listen with headphones before filming.
For an XLR microphone, connect it to the camera’s XLR input or use a suitable audio adapter. Enable phantom power only if the microphone requires it.
Use a shock mount for a camera-mounted microphone. It reduces handling noise and vibration. A furry windscreen can also reduce wind noise outdoors, but it cannot remove loud traffic or strong background sound.
Always monitor the sound with headphones when your camera supports headphone output. A video can look perfect while the audio contains clipping, cable noise, or no signal at all.
How to Connect a Microphone to a Mixer or Audio Interface
A mixer and an audio interface both accept microphone signals, but they serve different main purposes. A mixer lets you blend several audio sources and adjust them in real time. An interface converts microphone audio into digital audio for a computer.
To connect the microphone:
- Plug the microphone into an available input.
- Connect headphones to the mixer or interface.
- Turn the gain control down.
- Select the correct input type if the device has a line or instrument switch.
- Turn on phantom power only when required.
- Speak into the microphone from a normal distance.
- Raise the gain until the meter shows a healthy level.
- Keep peaks below the clipping point.
A good level is strong without touching the red zone. Digital clipping creates harsh distortion that cannot be fully repaired later. Recording slightly lower is safer than recording too loud.
Keep the microphone about 4 to 8 inches from your mouth for many spoken-word setups. Use a pop filter when speaking close to a condenser microphone. This helps reduce bursts of air from sounds such as “p” and “b.”

Set the Correct Input and Output
Connecting the cable is only half the process. Your device and app must also use the microphone as the input source.
Open the audio settings in the program you plan to use. Look for labels such as:
- Microphone
- Input device
- Recording device
- Audio source
- Voice input
Select the exact microphone or interface name. Do not assume the app will use the system default.
For video meetings, check the microphone menu before joining the call. Most meeting apps include a test feature. Use it to confirm that your voice is clear and that the input meter responds.
Your output device is different from your input device. The microphone is the input. Headphones or speakers are the output. Selecting the wrong device can make you think the microphone has failed when the real issue is that you cannot hear the playback.

Adjust Microphone Gain and Volume
Gain controls how much the microphone signal is boosted before it enters your device. Volume controls how loud the signal sounds during playback or monitoring. These controls are related, but they are not the same.
Use this basic method:
- Speak at your loudest normal level.
- Watch the input meter.
- Raise the gain until the level is clear.
- Leave space below the maximum level.
- Record a short sample.
- Listen for hiss, distortion, or room noise.
If the sound is distorted, lower the gain. If the sound is very quiet and noisy, move closer to the microphone and raise the gain slightly.
Microphone distance affects tone as well as loudness. Moving closer often creates a warmer sound, while moving farther away captures more room noise. This effect is called proximity effect with some directional microphones.
A common lesson from real recording setups is that people often keep adjusting software volume when the microphone is too far away. Better placement usually improves sound more than aggressive software boosting.

Fix Common Microphone Connection Problems
If your microphone does not work, check the simple causes first.
The microphone is not detected
Try these steps:
- Disconnect and reconnect the cable.
- Test a different USB port.
- Try another cable.
- Restart the computer or phone.
- Check microphone permission settings.
- Select the microphone manually in the app.
- Install the manufacturer’s current driver or firmware when needed.
The microphone has no sound
Make sure the microphone is not muted. Check the physical mute button, the app mute button, and the system input volume.
For an XLR microphone, confirm that the cable is connected to an input rather than an output. Also check whether a condenser microphone needs phantom power.
The sound is too quiet
Move closer to the microphone. Raise the interface gain slowly. If the input meter remains low, the microphone, cable, adapter, or interface may be incompatible or faulty.
The sound is distorted
Lower the gain and check the input level. Keep the meter out of the red area. If distortion remains, test another cable or input.
The recording has buzzing or humming
Keep audio cables away from power adapters and charging cables. Try a different outlet and disconnect unnecessary devices. Balanced XLR connections usually resist interference better than unbalanced connections.
The microphone echoes
Use headphones instead of speakers. Speaker sound can enter the microphone and create feedback or echo. In meeting apps, enable echo cancellation if the feature is available.
Improve Microphone Sound Quality
A correct connection does not guarantee a good recording. Room sound, microphone position, and speaking habits matter just as much.
Use these practical improvements:
- Face the front of the microphone. Many microphones capture sound best from one specific side.
- Keep a steady distance from the microphone.
- Use a pop filter for close voice work.
- Place the microphone away from loud fans and air conditioners.
- Add soft furnishings to reduce hard room reflections.
- Wear headphones during monitoring.
- Record a short test before a live session.
- Keep spare cables for important work.
Do not rely only on the microphone’s appearance. A costly microphone in a noisy room can sound worse than a basic microphone placed well in a quiet space.
Industry audio guidance commonly recommends monitoring levels and avoiding digital clipping. This principle applies to podcasts, online meetings, voice-over work, music, and video production.
Safety and Compatibility Tips
Use the correct cable and power method for your equipment. A connector that fits does not always mean the devices are electrically compatible.
Remember these points:
- Do not force a plug into a port.
- Check whether an adapter supports microphone audio.
- Confirm phantom power requirements before using 48V.
- Keep liquid away from microphones and interfaces.
- Do not pull a cable by the wire.
- Lower the volume before plugging in headphones.
- Use manufacturer instructions for unusual microphones.
- Update drivers only from trusted sources.
USB microphones are convenient, but they may not work with every phone without an approved adapter. XLR microphones offer flexibility, but they require more equipment and setup knowledge. Wireless systems are useful for movement, but they need charged batteries and a clear radio connection.
Understanding these limits helps you choose the right setup rather than blaming the microphone for an equipment mismatch.
Frequently Asked Questions About How to Connect the Microphone
How do I connect a microphone to my computer?
Connect a USB microphone directly to a USB port, then select it in the computer and app sound settings. An XLR microphone needs an audio interface or mixer between the microphone and the computer.
Can I connect an XLR microphone directly to a laptop?
Usually, no. A laptop normally needs an audio interface or USB mixer to convert the XLR signal into a format it can record.
Why is my connected microphone not working?
Check the cable, mute controls, microphone permissions, input selection, and gain level. If you use an XLR condenser microphone, also confirm whether phantom power is required.
Do USB microphones need an audio interface?
No. A USB microphone has its own digital converter and usually connects directly to a computer or compatible device. An interface is useful when you need XLR microphones, multiple inputs, or advanced monitoring.
How do I connect a microphone to an iPhone or Android phone?
Use a compatible USB-C, Lightning, or 3.5 mm microphone connection. You may need an adapter that supports audio input, and you should test the microphone in the camera or recording app.
Should phantom power be on when connecting a microphone?
Turn phantom power on only when the microphone requires it, such as many condenser microphones. Connect the microphone first, lower the gain, and check the manual before enabling 48V.
Conclusion
Knowing how to connect the microphone starts with identifying its connector and matching it to the right input. USB microphones are simple, XLR microphones need an interface or mixer, and phone or camera setups may require a special adapter.
After connecting the cable, select the correct input, check permissions, set a safe gain level, and record a short test. Take a moment to improve placement and reduce room noise, because good technique often matters more than expensive gear. Try your setup today, explore your device’s audio controls, and share your results or questions in the comments.