

For Minecraft players in the United States, a piano can be more than a nice room detail. You can build a simple decorative piano for a house, or make a working version that plays notes with buttons, pressure plates, or redstone. The best design depends on whether you want a realistic shape, playable music, or both.
This guide shows how to make a Minecraft piano in survival or creative mode. It covers the materials, layout, note blocks, tuning, redstone setup, common problems, and several design options.

Choose the Type of Minecraft Piano You Want
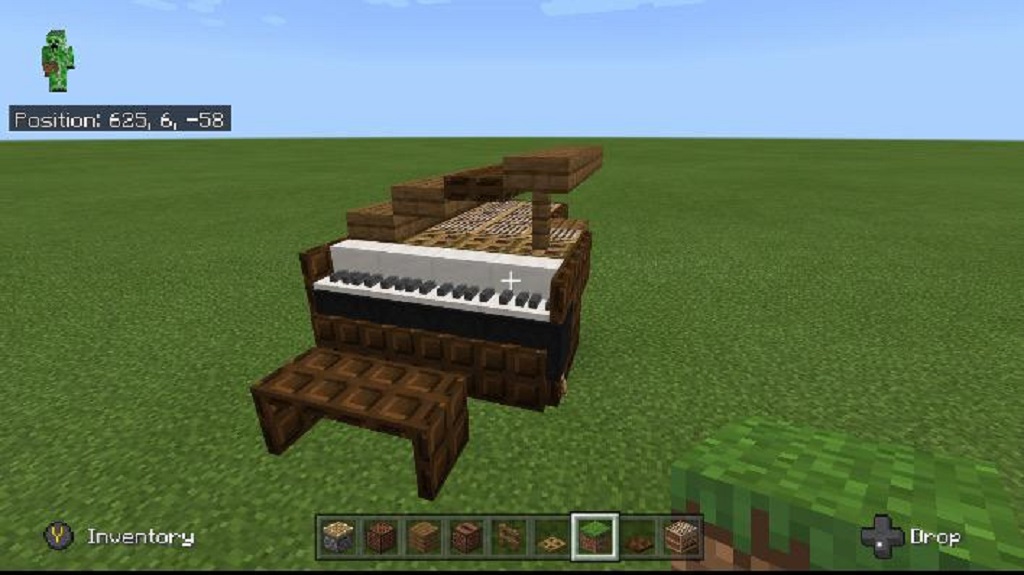
The simplest Minecraft piano is a decorative build made from stairs, slabs, blocks, and trapdoors. A playable piano uses note blocks. A large concert piano can combine both styles.
| Piano type | Best for | Main materials | Difficulty |
|---|---|---|---|
| Decorative upright piano | Houses, libraries, music rooms | Wood, stairs, slabs, buttons | Easy |
| Decorative grand piano | Mansions, stages, theaters | Wood, slabs, fences, trapdoors | Easy to medium |
| Simple playable piano | Basic melodies | Note blocks, buttons, blocks | Medium |
| Redstone piano | Repeated notes and music machines | Note blocks, redstone, buttons | Medium to hard |
| Concert piano build | Large venues and detailed maps | Mixed blocks and note blocks | Hard |
A decorative piano looks like a piano but does not create music. A playable piano creates sounds when you activate its note blocks. If you want the easiest project, start with the decorative version, then add note blocks later.
Materials for a Minecraft Piano
You can make a piano from almost any block palette. Dark oak and blackstone create a classic look, while quartz and polished blackstone create a modern style.
Basic decorative piano materials
For a small upright piano, gather:
- 10 to 20 wooden planks
- 4 to 8 stairs
- 4 to 8 slabs
- 6 to 12 trapdoors
- 2 to 4 buttons
- 1 sign or pressure plate for the music stand
- Optional carpet for a bench
- Optional lanterns, candles, or flower pots
The exact amount depends on the size of the build. You can also use stripped logs, fences, walls, and slabs to add trim.
Materials for a playable piano
For a simple eight-note piano, use:
- 8 note blocks
- 8 buttons or pressure plates
- Redstone dust, if needed
- Building blocks for the case
- Blocks that create the instrument sound
- Optional black blocks for the raised keys
A note block needs a clear space above it to play. Do not cover the top with a full block, trapdoor, or other solid object.
Good block palettes
| Style | Main body | Keys | Detail blocks |
|---|---|---|---|
| Classic wood | Dark oak planks | Quartz or birch | Spruce trapdoors |
| Modern black | Black concrete or blackstone | Quartz | Polished deepslate |
| White piano | Quartz or white concrete | Black concrete | Stone buttons |
| Rustic | Stripped oak or spruce | Birch slabs | Fences and signs |
| Stage piano | Blackstone | Quartz slabs | Iron bars and redstone lamps |
Use contrasting colors for the keys. White keys should stand out from the body. Black keys should sit slightly higher and be placed between selected white keys.

How to Build a Simple Decorative Upright Piano
An upright piano is the easiest Minecraft piano design. It fits against a wall and uses less space than a grand piano.
Step 1: Make the base
Clear a space about 5 blocks wide, 2 blocks deep, and 4 blocks tall. Place a row of dark wood planks on the floor.
This row forms the bottom of the piano. Add stairs or slabs along the front edge to soften the shape. Use stairs facing outward if you want the base to look curved.
Step 2: Build the main body
Place two or three rows of blocks behind the base. Keep the front section open for the keyboard.
A simple layout can look like this from the front:
Top trim
Main body
Keyboard
Lower body
Base
For a small piano, make the body 5 blocks wide. Use stairs at the top corners to create a sloped shape instead of a plain box.
Step 3: Add the keyboard
Place white blocks, slabs, or quartz stairs across the front. A five-block keyboard is enough for a small decorative piano.
For a wider piano, use seven or nine white key blocks. Leave a one-block gap or use thin slabs to make the keys easier to see.
Add black buttons, blackstone walls, or black concrete blocks above the white keys. Place them between some of the white keys rather than between every key. This gives the keyboard a more realistic pattern.
Step 4: Add the music stand
Place a sign, trapdoor, or thin slab above the keyboard. A sign can represent sheet music. A trapdoor angled against the piano body can look like a folding music stand.
For a larger build, place two signs side by side. You can write a short label such as “Music Room” or “Concert Hall.”
Step 5: Build the bench
Place a stair or slab two blocks in front of the piano. Add two fence posts underneath if you want the bench to stand higher.
A dark oak stair works well with most piano designs. For a modern piano, use a quartz slab with black fence posts.
Step 6: Add small details
Use buttons as tuning pins. Place trapdoors on the sides for wood trim. Add carpet under the bench or a rug in front of the piano.
Keep the detail simple. Too many buttons can make the front look noisy instead of realistic.

How to Build a Minecraft Grand Piano
A grand piano has a long keyboard and a wide, curved body. It needs more floor space, but it can become the center of a stage or mansion room.
Step 1: Mark the keyboard
Start with a straight row of 7 to 11 white key blocks or slabs. Make the keyboard at least 3 blocks away from a wall so players can stand in front of it.
Use quartz, birch, or smooth sandstone for the white keys. Use black concrete, blackstone, or polished deepslate for the raised keys.
Step 2: Create the piano body
Behind the keyboard, build a long shape that becomes wider toward the back. Use stairs and slabs to create a gradual curve.
A simple top-down layout may look like this:
Keyboard:  WWWWWWWWW
Body:       BBBBBBBB
Body:        BBBBBBB
Body:         BBBBBB
Body:          BBBB
W represents white keys. B represents the dark piano body.
Do not worry about making a perfect curve. Minecraft blocks create a stepped curve. Stairs, slabs, and trapdoors help hide the sharp edges.
Step 3: Add the lid
Use dark slabs across the top of the body. Make the lid slightly wider than the main body.
For an open grand piano, raise part of the lid with fences or walls. This creates the look of a lid held open. For a closed piano, place the slabs flat across the top.
Step 4: Add the legs
Place three fence posts or walls under the piano:
- One near the keyboard
- One near the middle
- One near the back
Use upside-down stairs or slabs around the legs to make the support look wider.
Step 5: Add the pedals
Place buttons, pressure plates, or small stone slabs below the keyboard. Three small blocks can represent the pedals.
These pedals are decorative unless you connect them to a redstone system.

How to Make a Playable Minecraft Piano With Note Blocks
A playable piano uses note blocks to produce different pitches. Each note block can be tuned by right-clicking it. When activated, the block plays one note.
The easiest design uses one button for each note. Place the note blocks in a row, tune them, and connect each button to one note block.
Step 1: Craft or place the note blocks
In survival mode, a note block requires:
- 8 wooden planks
- 1 redstone dust
Place one note block for each note you want. An eight-note piano is a good starting point because it is easy to tune and wire.
Step 2: Choose the instrument sound
The block underneath a note block controls its instrument sound. Common choices include:
| Block below the note block | Sound type |
|---|---|
| Wood | Bass |
| Stone or other hard rock | Bass drum |
| Sand, gravel, or concrete powder | Snare drum |
| Glass | Click or stick sound |
| Gold block | Bell |
| Packed ice | Chime |
| Wool | Guitar |
| Bone block | Xylophone |
For a piano-like build, test several block types and choose the sound that fits your design. Minecraft does not provide a realistic piano instrument in the standard note block system, so the result is a game-style approximation.
Step 3: Leave air above each note block
Keep the block above every note block empty. If a solid block covers the note block, it will not play.
This is one of the most common reasons a note block appears to be broken. Decorative trim should be placed beside the note blocks, not directly above them.
Step 4: Tune the notes
Right-click a note block to raise its pitch. Each click moves the note up by one step. The note block makes a sound each time you tune it.
For a basic ascending scale:
- Set the first note to the lowest pitch.
- Tune the next note a few steps higher.
- Continue until the notes rise from left to right.
- Press each button to check the order.
You do not need to use a strict musical scale for a decorative Minecraft piano. If you want to play familiar melodies, tune the notes to a known scale and write the order down.
Step 5: Add activation controls
Place a button next to each note block. When you press the button, it sends a short redstone signal to that note block.
You can also use pressure plates. Pressure plates work well when you want to play notes by walking across a keyboard, but they are less precise than buttons.
Step 6: Hide the wiring
If a button does not directly power the note block, place redstone dust between the control and the note block. You can hide the wiring under the floor or behind the piano body.
Keep each control connected to only one note block. If one redstone line reaches several note blocks, pressing one key may play multiple notes.

How to Make a Redstone Piano
A redstone piano can use buttons, levers, pressure plates, or other redstone devices. The control method changes how the piano feels to play.
Button piano
A button piano is the easiest option. Each button sends a short pulse, which activates one note block.
Use buttons when:
- You want clear, separate notes.
- The player will stand in one place.
- You want a compact design.
- You do not need long notes.
Place the buttons in front of the note blocks or on a decorative keyboard. Connect them with redstone dust if they are not directly adjacent.
Pressure-plate piano
Pressure plates can create a walkable keyboard. Place one plate in front of each note block or wire each plate to a separate note block.
Use pressure plates when:
- You want a floor piano.
- Several players may play at once.
- The keys should activate when stepped on.
Pressure plates can be difficult to use for fast music because the player may trigger the wrong key while moving.
Lever piano
A lever keeps a redstone signal active. It can activate a note block once when switched, but it is not ideal for repeated melodies.
Use levers for:
- A display piano
- A sound test station
- A music room control panel
- A note that should stay selected
Redstone repeater system
Repeaters can help carry signals over longer distances. They can also add delay between notes in an automated song.
Place repeaters along long redstone lines. Make sure their delay settings match the timing you want. A long redstone system can become hard to repair, so label each line or build it in a clean grid.

How to Play Songs on a Minecraft Piano
A Minecraft piano can play simple melodies if you know which note belongs to each key. Start with short songs and use a written key map.
For example:
Key 1 = low note
Key 2 = next note
Key 3 = middle note
Key 4 = higher note
Key 5 = high note
Then write a melody as a sequence:
1 - 2 - 3 - 2 - 1
Press each button in order. If the tune sounds too high or too low, retune all the note blocks by the same number of clicks.
Make the piano easier to play
- Put the lowest note on the left.
- Put the highest note on the right.
- Use a sign to label each key.
- Use colored blocks to mark groups of notes.
- Keep the keys close enough to reach without moving.
- Test the piano in the same game mode where it will be used.
Minecraft note blocks do not behave like a full digital piano. They have a limited pitch range, and each note block normally plays one note at a time. A simple piano works best for short melodies, sound effects, and interactive builds.

How to Add Black Keys
Black keys make a Minecraft piano easier to recognize. They also help players see the difference between natural notes and raised notes.
Place the black keys one block higher than the white keys. Use black concrete, blackstone, polished deepslate, or dark oak trapdoors.
For a small keyboard, place black keys above these gaps:
White keys:  W W W W W W W
Black keys:   B B   B B B
The exact pattern does not need to follow real piano spacing unless you want a detailed musical instrument. The main goal is visual contrast.
For a playable piano, keep the black keys decorative unless you give them their own note blocks. A black key that has no control should not be labeled as a playable note.

Common Minecraft Piano Problems and Fixes
The note block makes no sound
Check these items in order:
- Make sure the block is not covered.
- Confirm that the note block receives a redstone signal.
- Check that your game sound is turned on.
- Move away from other loud sounds.
- Test the note block directly by activating it.
- Replace the block underneath and test another instrument sound.
A full block above the note block is a frequent cause. Redstone wiring is another common cause.
Every key plays the same note
Each note block must be tuned separately. Right-click each block the needed number of times.
If the notes still sound the same, check whether your controls activate more than one note block. A shared redstone line may be sending power to several blocks.
The piano looks too square
Use stairs, slabs, trapdoors, and walls to break up large flat surfaces. A grand piano looks better when the rear body widens in steps.
Do not add random blocks only to remove sharp edges. Build the shape in layers so the trim follows the form of the piano.
The piano is too large
Reduce the keyboard to five notes. Use slabs instead of full blocks for the body. An upright piano can fit into a space only a few blocks wide.
A small build often looks better than a large build with empty gaps. Add a bench, rug, lamp, and music stand to make the space feel complete.
The piano sounds like an instrument other than a piano
The block under a note block controls the sound. Change that block and test again.
The standard game does not offer a fully realistic piano tone through ordinary note blocks. Choose the closest sound for your build, or use a custom resource pack if your world allows one.

Tips for Building a Better Minecraft Piano
Use a clear color plan before you place blocks. Two main colors and one accent color are usually enough.
Build the keyboard first. It sets the scale of the rest of the piano. If you build the body first, the keys may look too small or too large.
Leave room for the player. A piano needs space in front of the keyboard. For a public build, leave at least a few blocks between the piano and nearby walls, seats, or stage props.
Add lighting near the piano. Lanterns, candles, or redstone lamps can make the instrument stand out without changing its shape.
If the piano is part of a larger building, match its materials to the room. A quartz piano may look out of place in a rustic cabin, while a dark oak piano may blend into a modern quartz hall.

Best Minecraft Piano Design for Each Goal
Choose the design based on what the piano must do.
- For a small house: Build a five-block-wide upright piano.
- For a modern mansion: Use quartz, black concrete, and smooth slabs.
- For a theater: Build a large grand piano with note blocks hidden inside.
- For an interactive map: Use buttons and clearly labeled note blocks.
- For a music room: Build several playable notes and add a bench, lamps, and wall decoration.
- For survival mode: Start with wood, stone buttons, and a few note blocks.
- For a role-play build: Focus on shape and detail instead of redstone.
The best Minecraft piano is not always the largest one. A good build has a clear shape, visible keys, useful controls, and enough space for players to use it.
Frequently Asked Questions
Can you make a real working piano in Minecraft?
You can make a playable piano-like instrument with note blocks and redstone. It will not work like a full digital piano because note blocks have a limited pitch range and simple controls.
How do you make a piano sound better?
Change the block beneath each note block and test several instrument sounds. Keep the note blocks spaced apart so each sound is clear. You can also use a resource pack with different sounds if it is supported by your world or server.
Can a Minecraft piano play full songs automatically?
Yes. A redstone machine can trigger note blocks in sequence. Large automated songs require careful timing, many note blocks, and a complex redstone layout.
Do note blocks work in both Java Edition and Bedrock Edition?
Note blocks are available in both editions, but small behavior and redstone details may vary. Test the design in the edition and version you plan to use before building a large automated piano.
What is the smallest Minecraft piano design?
A tiny decorative piano can use a few stairs, slabs, and buttons. A tiny playable piano needs at least one note block, but a useful melody usually needs several tuned note blocks.
Conclusion
To make a Minecraft piano, first choose between a decorative build and a playable instrument. Use stairs, slabs, trapdoors, and contrasting blocks for the shape. Add note blocks, buttons, and redstone when you want the piano to create music.
Start with a small upright piano. Tune five to eight note blocks, test each key, and add detail after the sound works. Once the basic design is reliable, expand it into a grand piano, stage prop, or automated music machine.