

For most U.S. gigs, the best way to mic a violin live is to use a small condenser microphone on a stable clip or stand, aim it at the violin’s bridge from a short distance, and keep the microphone out of the monitor’s loudest path. Start with the mic slightly below the bridge, check the sound through the PA, then adjust placement before adding much EQ.
A violin is loud near the bridge but can sound thin, harsh, or nasal when amplified. The room, monitor position, microphone type, playing style, and PA all affect the result. A good setup gives the instrument a clear, natural tone without making feedback the main event.
This guide focuses on live performance in the United States, including clubs, churches, theaters, school stages, bluegrass shows, country gigs, and acoustic concerts.

Choose the right live violin microphone
The microphone type affects both tone and feedback risk. A clip-on condenser, a dynamic microphone, and a stand-mounted condenser can all work, but they suit different stages.
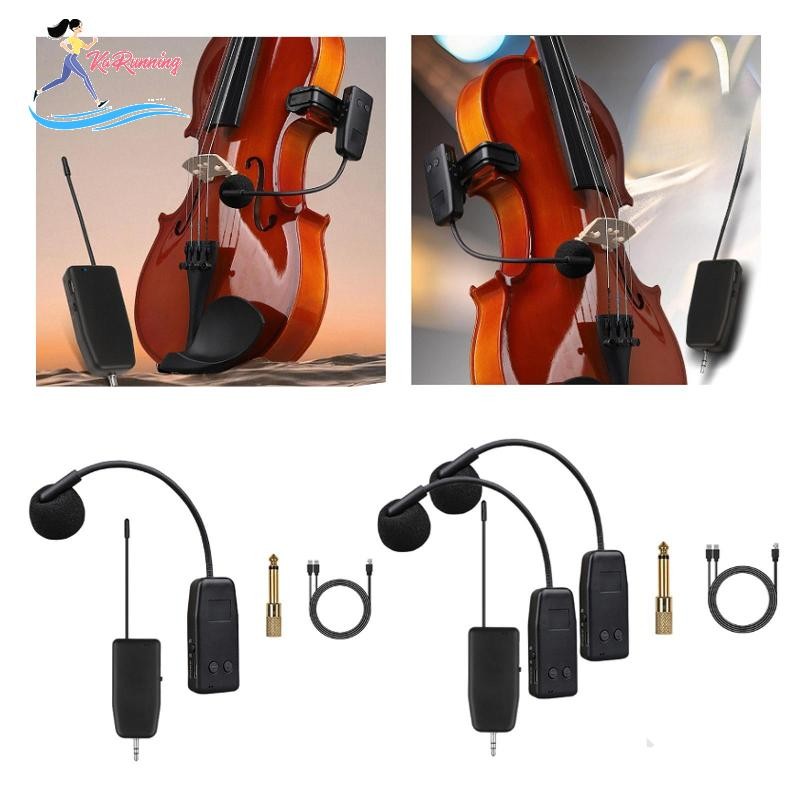
Clip-on condenser microphone
A clip-on condenser is often the most practical choice for a busy live show. It stays close to the violin, so it captures a strong signal before the PA has to add much gain.
Benefits include:
- Consistent distance while you move
- Less spill from drums and guitar amps
- A smaller stage footprint
- Easier setup for standing performances
- Better isolation than a microphone several feet away
The main trade-off is tone. A clip-on mic can sound bright because it sits close to the strings and bridge. Use a gentle high-frequency cut if the violin becomes sharp.
Check the microphone’s phantom-power needs before the show. Many small condenser microphones need 48-volt phantom power from the mixer or preamp. Some use a special belt pack, battery box, or instrument transmitter instead.
Dynamic microphone
A dynamic microphone can work well on loud stages. It is usually less sensitive than a condenser and may reject some stage spill. It can also tolerate rough handling.
The trade-off is reduced detail. A dynamic mic may not capture the violin’s quiet bow changes as clearly as a good condenser. You may need to place it closer and use more preamp gain.
A cardioid dynamic microphone can be useful when:
- The band is loud
- The violinist stays near one position
- The stage has strong monitor spill
- You want a simple setup with no phantom power
Stand-mounted condenser microphone
A small-diaphragm condenser on a boom stand can give a natural, open sound. It is often a good choice for a quiet acoustic set, string section, theater pit, or seated performance.
The microphone must stay in the right place. If the violinist moves, the tone and volume will change. The stand can also become a trip hazard, so place it outside the player’s bow path and secure the cable.
A stand-mounted mic is usually less suitable when:
- The performer moves around
- The stage is crowded
- The band is loud
- The monitor points toward the microphone
- Fast setup matters
Pickup or internal microphone system
A violin pickup is not the same as a microphone. A pickup senses vibration from the instrument. It often gives strong feedback resistance, but the sound may be less natural.
Some systems combine a pickup with a small microphone. These can offer a useful balance between gain before feedback and acoustic detail. They also may require a preamp, battery, belt pack, or dedicated input.
A pickup is worth considering when the violin must compete with loud drums, electric guitars, or large stage monitors. It may need an equalizer or preamp to sound less nasal.
| Stage condition | Good starting choice | Main reason |
|---|---|---|
| Quiet acoustic set | Stand-mounted small condenser | Natural room and instrument detail |
| Moving performer | Clip-on condenser | Stable distance |
| Loud band | Clip-on condenser or pickup | Better gain before feedback |
| Theater pit | Clip-on or close stand mic | Less stage spill |
| Bluegrass front line | Clip-on or pickup | Movement and high stage volume |
| Simple rental setup | Dynamic microphone | No phantom power required |
No microphone is automatically the best choice for every violin. The right choice depends on how loud the stage is and how much the player moves.

Prepare the violin, stage, and PA
Good microphone technique starts before the soundcheck. A loose cable, weak battery, poor monitor angle, or badly placed stand can cause more trouble than the microphone itself.
Before connecting anything, check these items:
- Tune the violin and confirm that the bridge is upright and secure.
- Make sure the endpin, chin rest, tailpiece, and fine tuners are not loose.
- Check the microphone clip for a firm fit.
- Inspect the cable for damage.
- Confirm phantom power or battery requirements.
- Place the main speakers in front of the microphones.
- Keep stage monitors aimed toward the performer’s ears, not directly at the violin microphone.
- Set the mixer channel gain low before the first test.
The bridge should remain properly fitted. Do not force a clip onto the bridge or tailpiece. If a mounting system feels unstable, use a stand or have a qualified instrument technician check it.
Set the PA gain correctly
Ask the violinist to play at the loudest level expected during the show. This may include strong bowing, double stops, fast passages, and the highest notes.
Raise the channel gain until the mixer receives a healthy signal. Do not use the channel fader to fix a weak preamp setting. Keep enough headroom so loud playing does not clip the input.
On a digital mixer, watch the input meter while the player performs. The exact target depends on the mixer, but the signal should remain comfortably below clipping. If the preamp gain is near its limit, move the microphone closer or use a more sensitive microphone rather than forcing the gain higher.
Use a high-pass filter when the stage is noisy
A high-pass filter removes very low frequencies that are rarely useful for a violin. It can reduce rumble from footsteps, handling noise, HVAC systems, and stage vibration.
Start with the filter engaged at a low setting, then raise it only as needed. A violin’s useful body resonance extends well above the very low bass range, but an aggressive filter can make the instrument sound small.
The goal is not to remove the violin’s warmth. The goal is to remove low-frequency noise that steals headroom.

Place the microphone for a natural violin tone
Microphone position changes the sound more than small EQ moves. Move the mic first. Equalize second.
For a close microphone, begin about 4 to 8 inches from the violin. Aim toward the area between the bridge and the fingerboard, but start slightly toward the bridge if the sound is too soft.
This distance is a starting range, not a fixed rule. A very sensitive clip-on microphone may need more space. A dynamic microphone may need to be closer.
Start near the bridge, but do not point directly at it
The bridge area produces strong attack and presence. Pointing straight at the bridge can create too much scratch, bow noise, or upper-mid bite.
Try these positions during soundcheck:
- Toward the bridge: More attack, edge, and clarity
- Between the bridge and fingerboard: Balanced starting point
- Toward the fingerboard: Softer and warmer sound
- Toward the f-hole: More body and resonance, but potentially more room sound
- Above the top plate: Often smoother than aiming directly at the strings
The best position depends on the microphone. A bright condenser may sound better aimed toward the fingerboard. A dark dynamic microphone may need more bridge focus.
Keep the mic away from the bow
The bow must move freely. A microphone or cable that touches the bow can create loud thumps and distract the player.
For a clip-on system, place the microphone head where it can “see” the violin without sitting in the bow’s path. For a stand-mounted microphone, position the boom from the player’s side or below the instrument. Ask the violinist to play the widest bow strokes during the check.
Match the microphone to the player’s movement
If the violinist moves several inches away from a stand-mounted mic, the volume can drop. The tone can also become more reflective as the microphone hears more room.
A clip-on microphone solves much of this problem. It keeps the mic and violin at a stable distance, which helps the mix stay consistent.
The trade-off is that the microphone hears less of the instrument’s natural air and room. That can be a benefit on a loud stage, but it may sound less open in a quiet hall.
Reduce feedback before using EQ
Feedback happens when the sound from the PA returns to the microphone and is amplified again. The loop grows at a frequency where the system has too much gain.
The safest fix is usually physical placement. Do not begin by cutting many EQ bands.
Use this order:
- Lower the channel or monitor level slightly.
- Move the microphone farther from the monitor.
- Turn the microphone’s rear rejection toward the loudest monitor.
- Move the monitor to the side or behind the microphone’s rejection area.
- Reduce unnecessary room reflections.
- Apply a narrow EQ cut only after the physical changes.
A cardioid microphone rejects sound best from its rear, but the exact rejection pattern changes with frequency. Do not assume every frequency is rejected equally.
Identify the feedback sound
Feedback often sounds like one note or a narrow ringing tone. The pitch can change when the microphone or monitor moves.
Common causes include:
- A monitor aimed at the microphone
- Excessive channel gain
- Too much low-mid body
- A bright upper-mid peak
- A reflective wall close to the stage
- A clip-on mic placed too close to the strings
- A resonant violin or pickup system
If the sound is a low boom, check stage vibration, the high-pass filter, and monitor placement. If it is a sharp whistle, check the microphone’s angle and upper-mid EQ.
Never hold the microphone directly in front of a loud speaker while searching for feedback. Sudden feedback can harm hearing and damage speakers. Keep a hand near the mixer’s mute or fader during soundcheck.
Use a feedback suppressor carefully
Automatic feedback systems can help in some live rigs, but they should not replace good placement. They may reduce tone or create unusual narrow cuts.
If you use one, let it identify problem frequencies during a controlled soundcheck. Do not keep adding deep cuts until the violin sounds hollow. A stable stage layout and sensible monitor level usually provide a better result.

Shape the violin sound with light EQ
Use EQ to correct a known problem, not to create a tone from scratch. Microphone position and playing technique usually have more effect.
A practical starting approach is:
- Engage a gentle high-pass filter to remove rumble.
- Cut low-mid muddiness only if the violin sounds thick or cloudy.
- Reduce harsh upper mids if the bow attack hurts.
- Add a small amount of high-frequency presence only if the sound lacks detail.
The exact frequency depends on the microphone, violin, room, and PA. Avoid treating a frequency chart as a universal recipe.
If the violin sounds harsh
Try these changes:
- Aim the mic slightly toward the fingerboard.
- Move it a little farther away.
- Reduce upper-mid or high-frequency EQ.
- Lower the monitor level.
- Ask the player to check bow pressure and contact point.
A harsh sound may come from the instrument or playing style, not just the microphone. Heavy bow pressure near the bridge can create a strong scratch component.
If the violin sounds thin
Try:
- Moving the mic closer, within safe bow clearance.
- Aiming more toward the body or f-hole.
- Reducing an overly high high-pass setting.
- Checking whether the monitor or PA is missing low-mid content.
- Using a warmer microphone or pickup preamp setting.
Do not add large amounts of bass first. Excess bass can increase feedback without restoring the natural body of the violin.
If the violin sounds nasal
A nasal tone often comes from a narrow midrange emphasis, a pickup system, or a microphone aimed at a strong resonant area. Move the microphone slightly before applying EQ.
A small, narrow cut may help, but broad cuts can make the violin weak. Compare the amplified sound with the acoustic instrument from the audience position.

Monitor the violin from the audience position
The performer may hear a very different sound from the audience. The violinist hears the instrument directly through the jaw, shoulder, and room. The audience hears the PA, reflected sound, and the rest of the band.
During soundcheck, walk into the audience area if possible. Listen for:
- Clear pitch
- Even volume across the range
- Natural bow attack
- Too much room noise
- Harsh high notes
- Feedback that is not obvious on stage
- The violin disappearing when the full band plays
Ask the violinist what they need in the monitor. They may need less violin than expected if the instrument is already loud acoustically. Too much violin in the monitor increases feedback risk.
If the violinist needs strong monitoring, consider:
- In-ear monitors
- A side-fill speaker placed away from the mic
- A clip-on microphone
- A pickup system
- Lower monitor volume with better monitor placement
For in-ear monitors, set safe levels and avoid sudden feedback or loud signal jumps. Use a soundcheck that includes muting and unmuting every channel.

Fix common live violin problems
Use the symptom first, then test the most likely cause.
| Symptom | Likely cause | First correction |
|---|---|---|
| Loud ringing note | Feedback loop | Lower monitor level and change its angle |
| Thin sound | Mic too far away or high-pass too strong | Move mic closer or ease the filter |
| Scratchy sound | Mic aimed at bridge or strings | Aim slightly toward fingerboard |
| Muddy sound | Low-mid buildup or room reflections | Reduce low mids and check speaker position |
| Uneven volume | Player moves away from stand mic | Use a clip-on or stay closer to the mic |
| Cable thumps | Cable touches stand or instrument | Secure cable with slack and soft loops |
| Violin disappears in band | Too little mid presence or too much masking | Adjust placement and band arrangement |
| Pickup sounds nasal | Pickup resonance or preamp voicing | Use the pickup EQ or a suitable preamp |
If the violin suddenly becomes quiet, check the cable, phantom power, battery, transmitter, and mixer mute before changing EQ. If the sound is distorted, lower the input gain first.
If a clip-on microphone creates handling noise, check the clip and cable route. Do not tape the cable tightly against the instrument’s varnish. Adhesive can damage the finish.

A practical live soundcheck sequence
A repeatable soundcheck saves time and reduces guesswork.
1. Start with a flat channel
Set the channel EQ near flat. Engage a low high-pass filter if the stage has rumble. Keep reverb off at first.
2. Check the loudest playing
Have the violinist play the loudest part of the set. Include low notes, high notes, long sustained notes, and strong bow strokes.
3. Set the microphone position
Move the mic in small steps. Listen for the balance of body, bow noise, and detail. Mark the stand position with tape if the setup will be used again.
4. Set the monitor
Add only enough violin to help the player. Keep the monitor out of the microphone’s most sensitive path.
5. Check feedback margin
Raise the monitor or channel level slightly, then return to the working level. If feedback begins quickly, fix the stage layout rather than relying on heavy EQ cuts.
6. Add small EQ changes
Make one change at a time. Bypass the EQ often so you can hear whether the change helped.
7. Add effects last
A short room reverb can make a close microphone sound more natural. Too much reverb reduces clarity and can make feedback harder to control.
8. Recheck with the full band
The violin may sound perfect alone but disappear beside cymbals, electric guitars, or a dense keyboard part. Make only the changes needed for the complete mix.
When to use a pickup instead of a microphone
Choose a pickup when stage volume and movement make a microphone unreliable. This is common in rock, amplified country, loud bluegrass, and large worship stages.
A pickup can provide more gain before feedback because it is less exposed to the PA. However, its sound depends heavily on the pickup design, installation, preamp, and EQ.
Choose a microphone when:
- Natural acoustic tone is the top priority
- The stage is quiet
- The violinist stays near the mic
- The room has controlled acoustics
- You can place monitors carefully
Choose a pickup when:
- The band is loud
- The player moves often
- Strong monitor volume is required
- Feedback has already limited the microphone setup
- The violin must remain consistent across a large stage
A hybrid system can be useful. Blend a pickup for stable body and volume with a microphone for acoustic detail. Keep the microphone level modest, because the pickup should carry most of the loud-stage signal.

Common mistakes to avoid
Placing the mic too close to the bridge
This can produce excessive bow noise and a sharp attack. Start near the bridge, but listen to the full tone rather than assuming closer is better.
Pointing the monitor at the microphone
This is one of the fastest ways to create feedback. Move the monitor first.
Using heavy EQ before moving the mic
A large EQ cut may hide the problem while making the violin weak. Physical placement is usually the cleaner fix.
Ignoring movement
A stand microphone works only when the player stays in its pickup area. If the performer moves, use a clip-on or pickup.
Adding too much reverb
Reverb can make a violin sound spacious, but it can also reduce pitch clarity and increase the sense of wash on a small stage.
Forgetting phantom power or batteries
A condenser microphone may produce no signal without its required power. Test the full signal path before the audience arrives.
Letting the cable pull on the instrument
Leave a small service loop and secure the cable to the player’s clothing or strap system when appropriate. Keep tension away from the clip and instrument.
Ignoring hearing safety
Keep soundcheck levels controlled. Avoid sudden feedback. Performers and crew should use hearing protection during loud setup work, especially near drums and guitar cabinets.

Key takeaways
- Start with a close clip-on condenser for most mobile live violin performances.
- Use a stand-mounted condenser for quiet stages and controlled movement.
- Aim near the bridge for clarity, then move toward the fingerboard for a softer tone.
- Keep monitors away from the microphone’s sensitive path.
- Solve placement and gain problems before making large EQ cuts.
- Use a pickup when stage volume, movement, or feedback makes a microphone unreliable.
- Check the sound from the audience area, not only from the performer’s position.
FAQs
Should a violin microphone point at the bridge or the f-hole?
Start between the bridge and fingerboard. Pointing toward the bridge adds attack and clarity, while aiming toward the f-hole or body can add warmth. The best position depends on the microphone and the violin.
How far should a microphone be from a violin?
A close microphone often starts about 4 to 8 inches away. Adjust the distance for tone, bow clearance, feedback margin, and the microphone’s sensitivity. Do not let the mic or cable interfere with the bow.
Do I need phantom power for a violin microphone?
Many condenser microphones need 48-volt phantom power. Dynamic microphones usually do not. Some clip-on systems use a dedicated power module or battery. Confirm the microphone’s manual before the show.
Is a violin pickup better than a microphone for live performance?
A pickup is often better for loud stages because it resists feedback and stays consistent while the player moves. A microphone often sounds more natural on a quiet stage. Neither option is best in every venue.
How do I stop a violin mic from feeding back?
Lower the monitor level, move the monitor away from the microphone, aim the microphone’s rear rejection toward the monitor, and reduce excess gain. Use a narrow EQ cut only after these changes.
Can I use a vocal microphone for violin?
Yes, a vocal microphone can work in a simple setup, especially on a quiet stage. A small condenser or clip-on microphone usually captures more bow detail and gives more consistent results, but it may also need more careful feedback control.
Conclusion
To mic a violin live, begin with the simplest stable setup: a suitable microphone, careful placement, moderate gain, and monitors aimed away from the mic. Listen for the natural balance of body, bow detail, and pitch before touching the EQ.
If the stage is quiet, a stand-mounted condenser can sound open and natural. If the player moves or the band is loud, a clip-on condenser or pickup is usually easier to control. Soundcheck from the audience position, make one change at a time, and treat feedback as a placement problem before treating it as an EQ problem.
