

An audio interface connects your microphone or instrument to your computer for cleaner, better-controlled sound.
Learning how to use audio interface equipment is easier than it first appears. With the right cables, driver settings, gain levels, and monitoring setup, you can record vocals, instruments, podcasts, and online calls with clear sound. This guide explains each step in plain English, including common mistakes, practical recording tips, and ways to get better results from your setup.
What Is an Audio Interface?
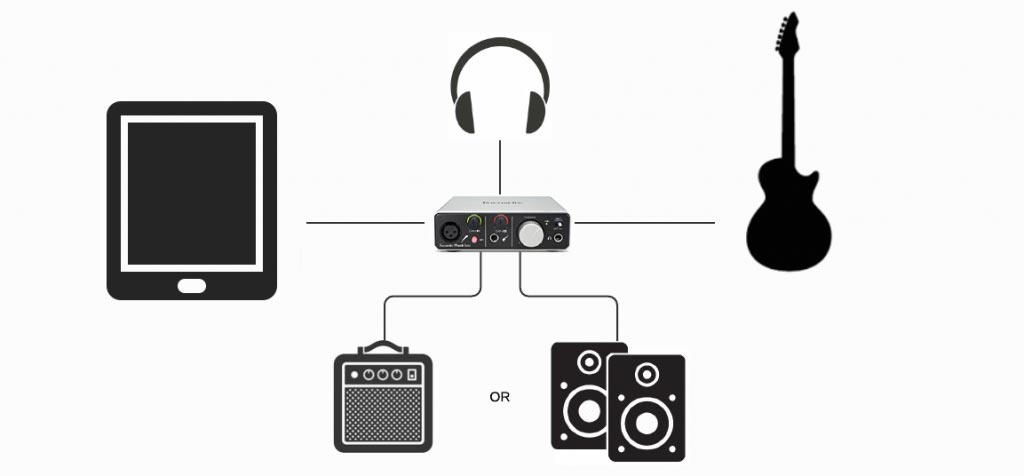
An audio interface is a device that connects microphones, instruments, headphones, and studio monitors to a computer. It changes analog sound into digital audio that recording software can understand. It also changes digital audio from your computer back into analog sound for your headphones or speakers.
Think of an audio interface as a traffic controller for sound. It sends audio in the right direction while helping you control volume, noise, and monitoring.
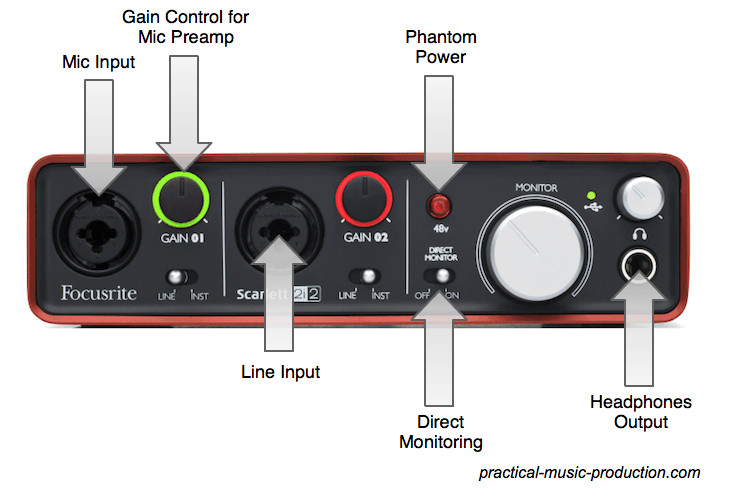
Most audio interfaces include:
• Microphone preamps for boosting quiet microphone signals
• XLR inputs for microphones
• Instrument inputs for guitar or bass
• Line outputs for studio monitors
• A headphone output
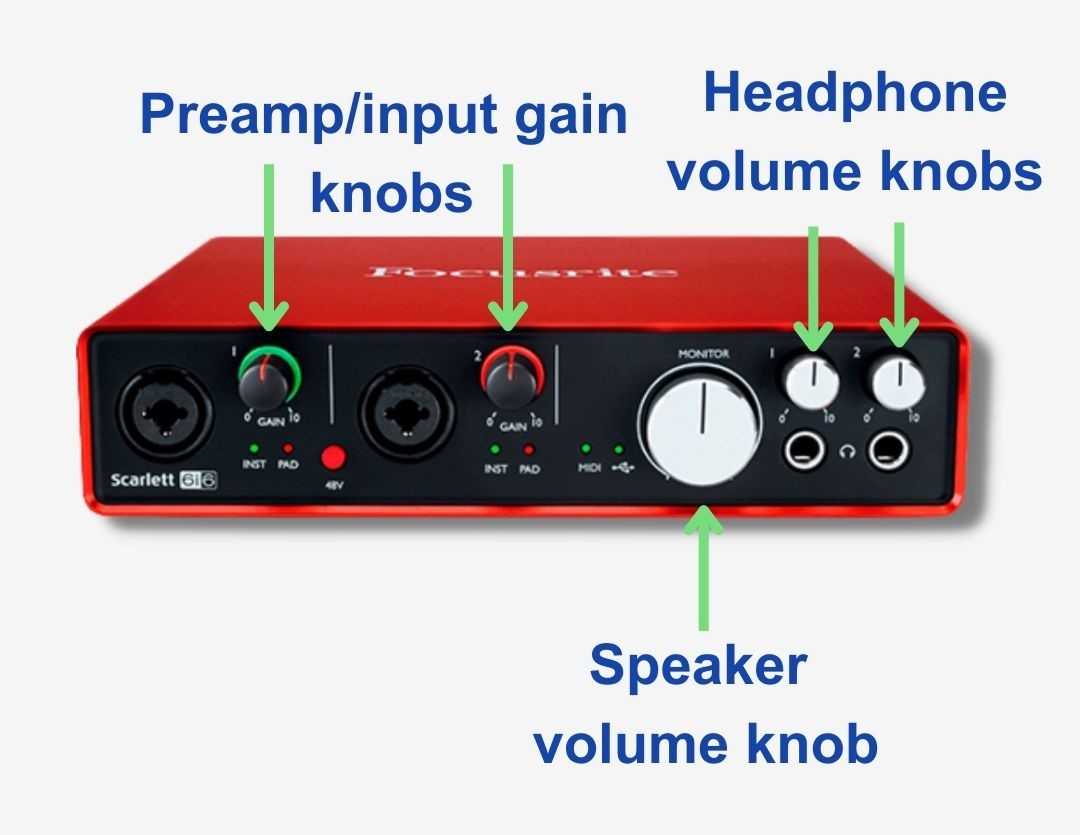
• Gain knobs for input volume
• A monitor or headphone volume knob
• USB, USB-C, Thunderbolt, or another computer connection
Some interfaces provide phantom power, often marked as 48V. This power is needed by most condenser microphones. It is not usually needed for dynamic microphones, and you should check your microphone manual before turning it on.
Audio interfaces also differ in sound quality, input count, connection type, and features. A simple two-input model can work well for a singer-songwriter, while a band may need eight or more inputs.
What You Need Before Using an Audio Interface
Before learning how to use audio interface hardware, gather the basic equipment. A complete setup does not need to be expensive, but each part must be compatible.
You may need:
• An audio interface
• A computer with recording software
• A USB, USB-C, or Thunderbolt cable
• A microphone and XLR cable
• Headphones or powered studio monitors
• An instrument cable for guitar, bass, or keyboards
• A microphone stand and pop filter for vocal recording
• The correct power adapter, if your interface needs one
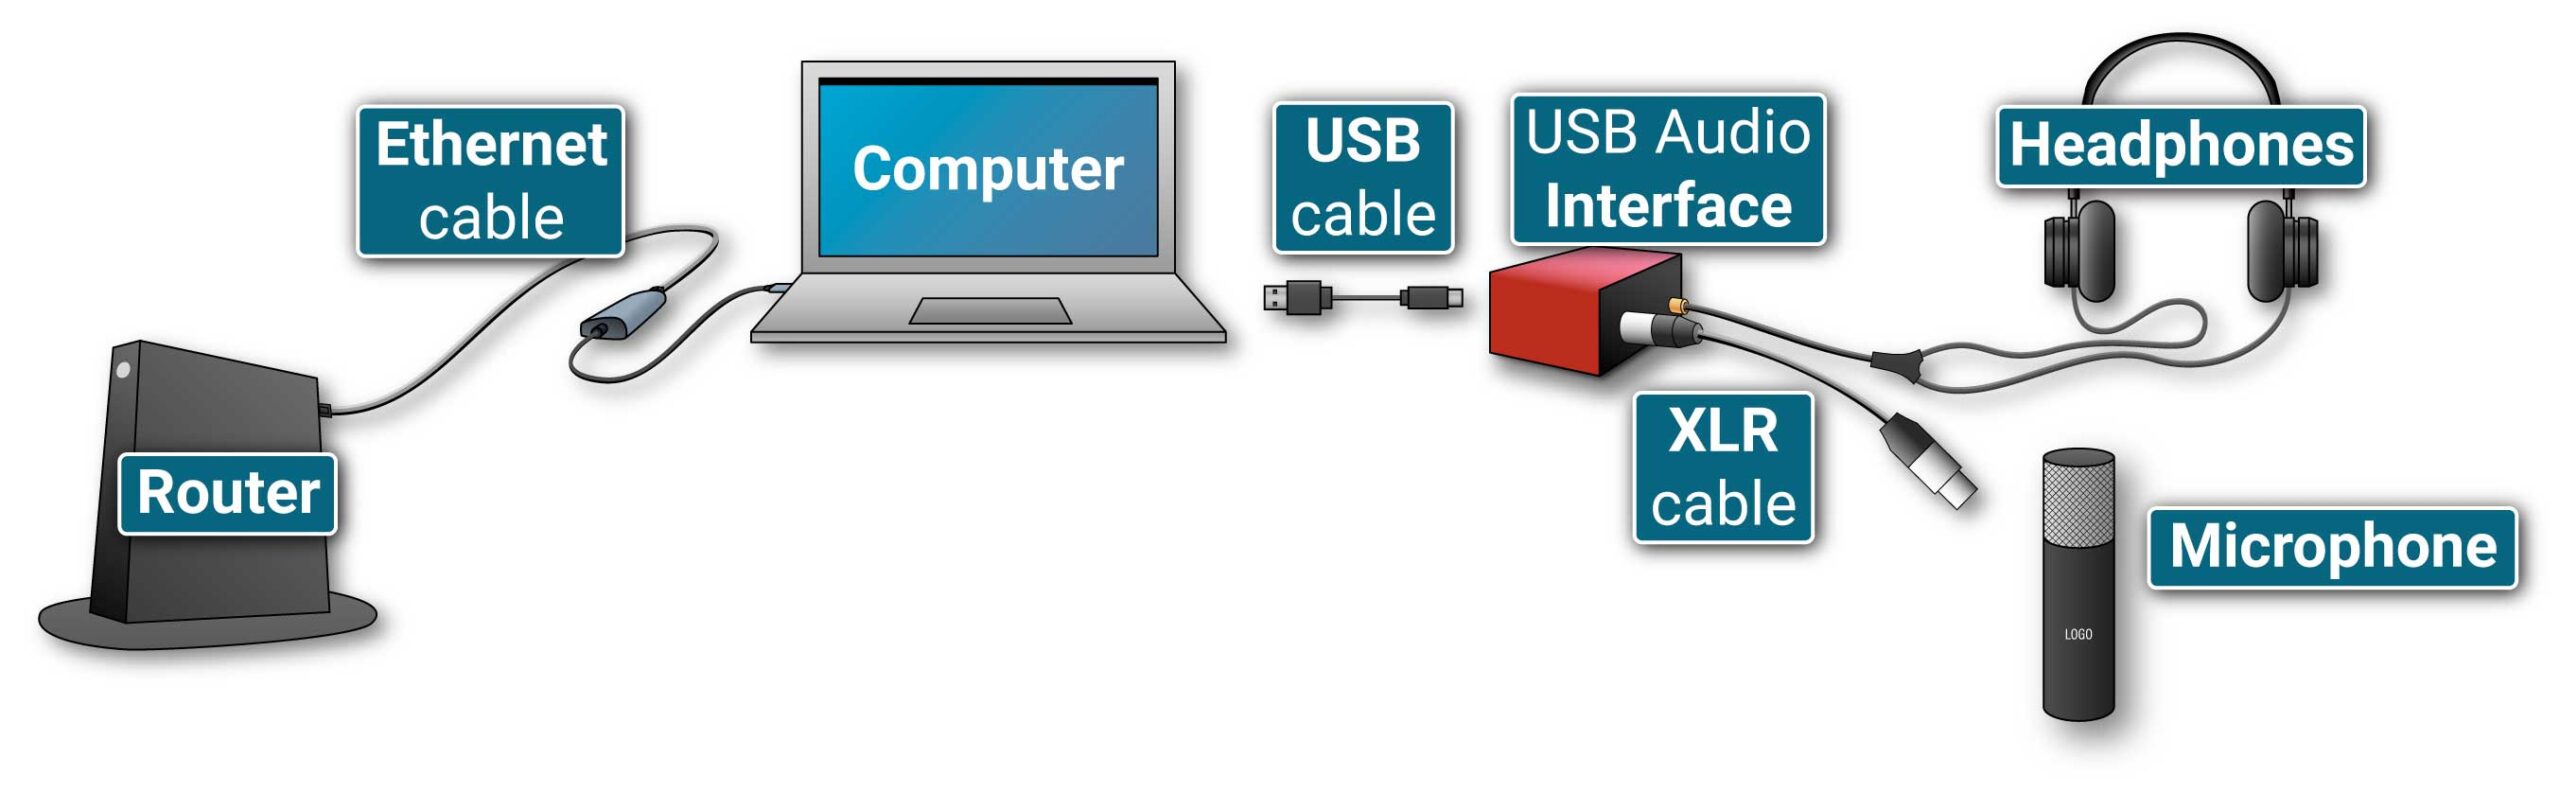
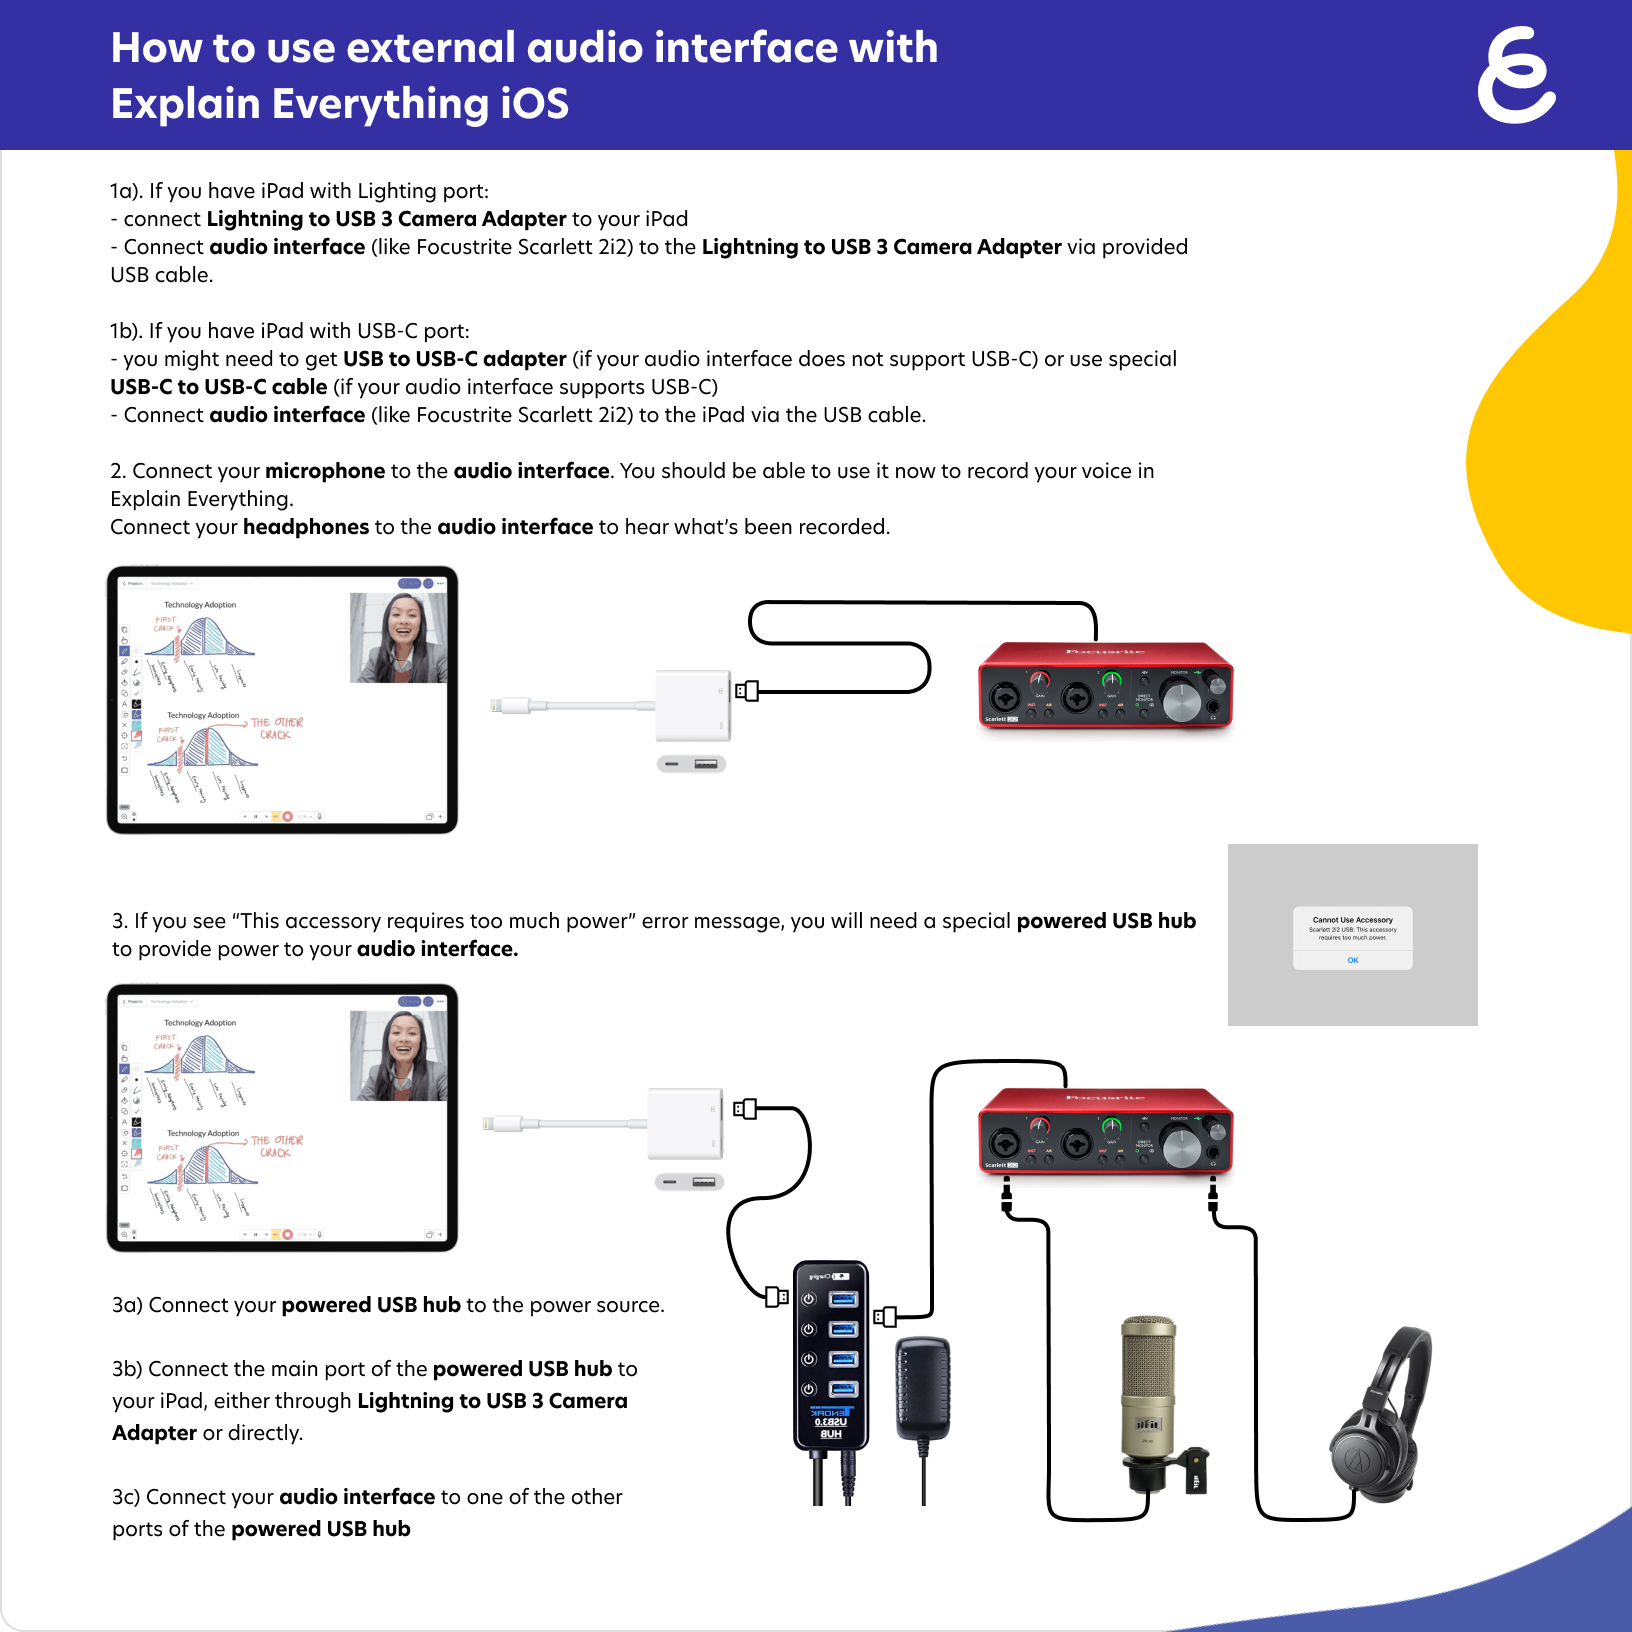
Most modern interfaces connect through USB and receive power from the computer. Larger models may use an external power supply. Never force a cable into a port, even if the connector looks similar.
Your recording software may be called a digital audio workstation, or DAW. Popular choices include GarageBand, Logic Pro, Pro Tools, Ableton Live, Cubase, FL Studio, Reaper, and Studio One. The exact menus differ, but the main setup steps are similar.
Place the interface where you can reach the gain and volume controls. Keep it away from power adapters, Wi-Fi routers, and unbalanced cables when possible. Good cable placement can reduce hum and other unwanted noise.
How to Connect an Audio Interface
Correct connections are the foundation of a clean recording. Turn down the headphone and monitor volume before you begin. This protects your ears and prevents loud pops.
Follow these steps:
Connect the interface to your computer with the correct cable.
Connect the power adapter if the unit requires external power.
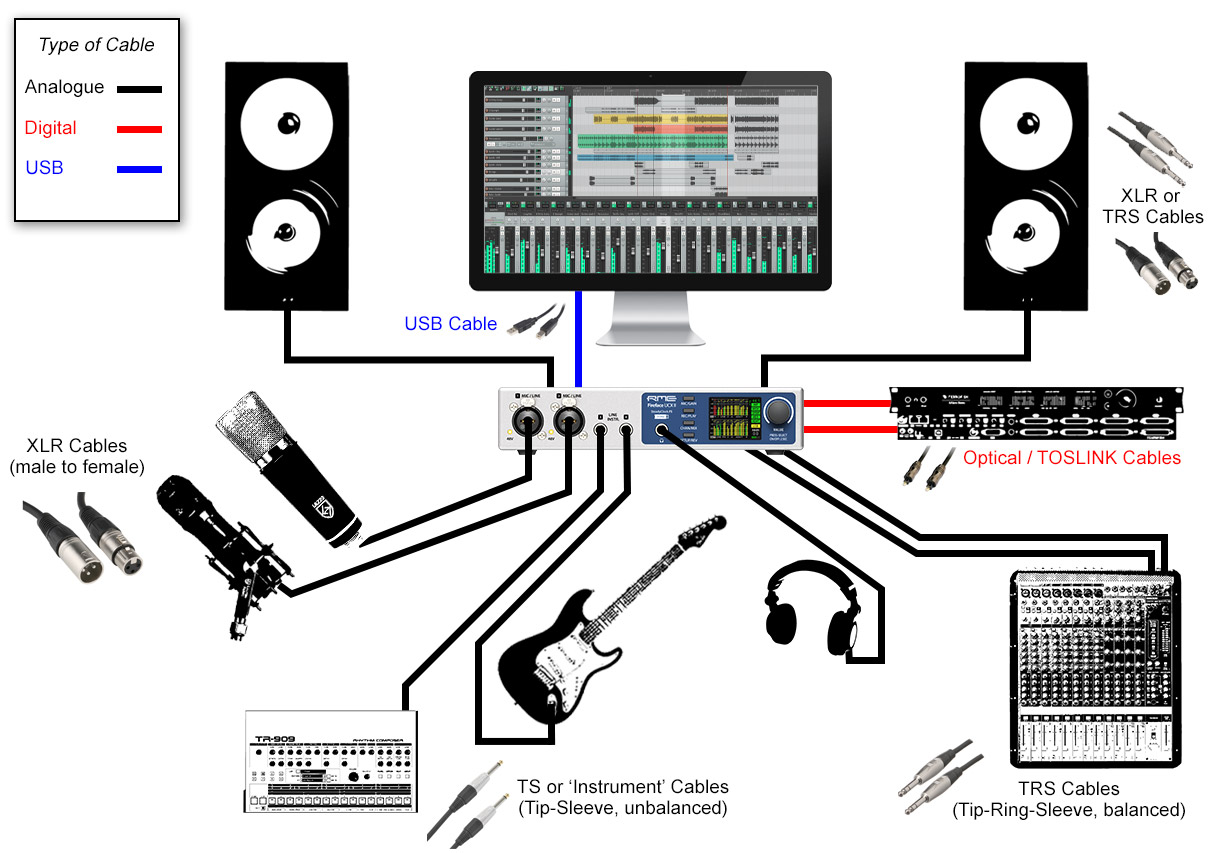
Plug headphones into the headphone output or connect powered monitors to the main outputs.
Connect your microphone with an XLR cable.
Connect a guitar or bass to an instrument input using a standard 1/4-inch cable.
Turn on the interface.
Open your recording software and select the interface as the input and output device.
Use an XLR cable for a microphone. A guitar normally uses a 1/4-inch instrument cable. Do not connect a microphone to an input labeled “instrument” unless the manual says it is suitable.
If you use studio monitors, connect the left and right outputs from the interface to the matching monitor inputs. Keep the monitor volume low while testing. Many speakers have their own volume knobs, so you may need to balance both the interface and speaker levels.
This basic connection process is a key part of learning how to use audio interface equipment safely and correctly.
How to Install Drivers and Select the Interface
Many interfaces work automatically with macOS. Windows users may need to install a dedicated driver from the manufacturer. A driver helps the operating system communicate with the interface and can improve stability and performance.
Download drivers only from the manufacturer’s official website. Check the exact model name before installing. A driver for a similar product may not work correctly.
After installation, choose the interface in your computer’s sound settings. Then select it inside your DAW.
Look for settings such as:
• Input device
• Output device
• Sample rate
• Buffer size
• Input and output channels
A sample rate of 44.1 kHz is common for music. A rate of 48 kHz is common for video work. Higher rates can create larger files and use more computer power, so they are not always better.
The buffer size controls the delay between playing a sound and hearing it through the computer. A low buffer creates less delay but places more demand on your computer. A high buffer reduces computer strain but can create noticeable latency.
For recording, try 64 or 128 samples. For mixing, 256 or 512 samples may work better. If you hear clicks or dropouts, increase the buffer size.
When learning how to use audio interface settings, change one setting at a time. This makes it easier to find the cause of a problem.

How to Set Input Gain Correctly
Gain controls how much the interface boosts the incoming signal. It does not work like the volume knob on your speakers. Set gain too low, and your recording may contain hiss when you raise it later. Set gain too high, and the signal may clip.
Clipping happens when the input signal is too loud for the interface to process. It creates harsh distortion that usually cannot be repaired.
To set gain:
Ask the performer to play or sing at the loudest level expected during the recording.
Turn the gain knob up slowly.
Watch the input meter in your DAW or on the interface.
Aim for average peaks around minus 18 dBFS, with louder peaks around minus 12 to minus 6 dBFS.
Reduce the gain if the meter reaches 0 dBFS or the interface shows a red light.
Digital recording does not need to run close to 0 dBFS. Leaving space below the maximum level gives you more safety and reduces the risk of clipping.
A useful rule is simple: record a little lower than you think you need. You can increase volume later, but clipped audio is difficult to fix.
One of the most common mistakes I see during recording is setting gain by turning the knob until the signal “looks loud.” The better method is to perform the loudest part first, then set a safe level.
How to Record a Microphone
A microphone setup depends on the microphone type and the sound source. Place the microphone on a stable stand and connect it to the interface with an XLR cable.
For a condenser microphone:
• Connect the microphone before turning on phantom power.
• Set the gain low at first.
• Turn on 48V phantom power if the microphone requires it.
• Wait a few seconds before raising the gain.
• Turn off phantom power before disconnecting the microphone.
Dynamic microphones usually do not need phantom power. Many ribbon microphones also require special care, especially older passive models. Read the microphone instructions before using 48V.
Position the microphone about 6 to 12 inches from the singer’s mouth as a starting point. A pop filter can reduce sharp bursts from sounds such as “p” and “b.” Ask the singer to stay a similar distance from the microphone during the take.
Room sound matters as much as microphone quality. A bare room can create reflections that make vocals sound distant or harsh. Curtains, rugs, bookshelves, and soft furniture can reduce reflections. Avoid placing the microphone directly against a wall or in the exact center of a square room.
Monitoring through headphones helps the performer hear the track without causing feedback. Keep headphone volume comfortable. Loud monitoring can cause hearing damage over time.
How to Connect and Record a Guitar or Bass
To record an electric guitar or bass directly, connect the instrument to an input with an instrument or Hi-Z setting. Hi-Z means high impedance. This setting is designed for passive guitar and bass pickups.
Use these steps:
Turn down the interface gain.
Connect the instrument cable.
Press the input’s instrument or Hi-Z button if available.
Play at your normal performance level.
Raise the gain until the signal is strong but does not clip.
Create an audio track in your DAW.
Select the correct input and enable recording.
Some interfaces have a combo input that accepts both XLR and 1/4-inch cables. Use the correct input mode. A line-level signal from a keyboard or mixer may not need the instrument setting.
You can record a guitar through an amplifier with a microphone, through a direct box, or directly into amp simulation software. Each method sounds different.
Direct recording is convenient and quiet. A microphone in front of a real amplifier can capture more natural room and speaker character. There is no single best choice, so test both when possible.
Learning how to use audio interface inputs for instruments also means understanding signal level. A line-level keyboard output is stronger than a passive guitar signal. Avoid sending a loud line signal into an instrument input unless the manufacturer allows it.
How to Monitor Without Delay
Latency is the short delay between making a sound and hearing it. It can make singing or playing feel uncomfortable, especially when monitoring through software.
There are two main ways to monitor:
• Direct monitoring sends the input signal straight to your headphones.
• Software monitoring sends the signal through the DAW before you hear it.
Direct monitoring usually has almost no delay. It is useful for vocals, guitar, and spoken-word recording. However, it may not include software effects such as reverb.
Software monitoring lets you hear plug-ins while recording, but it can create latency. Lowering the buffer size can reduce that delay.
Many interfaces have a direct-monitor mix knob. This blends the live input with playback from the computer. Turn it toward the input side when you need to hear yourself clearly. Turn it toward playback when you need to focus on the existing track.
If you hear an echo, turn off software monitoring or lower the buffer size. Do not keep raising the volume to solve a delay problem. Loud monitoring can harm your hearing without fixing latency.
In my own recording workflow, a small amount of reverb in the headphone mix often helps a singer perform with confidence. I record the vocal dry, then add the effect later. This gives the performer comfort without permanently changing the recorded sound.

How to Set Up an Audio Interface in a DAW
Once the interface is connected, create a track and assign the correct input. The track type must match the source.
Use:
• A mono audio track for one microphone or one guitar
• A stereo audio track for a stereo keyboard or stereo output
• Multiple mono tracks for several microphones
Choose the input number that matches the interface port. For example, a microphone connected to input one should use input one in the DAW.
Enable record arm on the track. If you want to hear the signal through the DAW, enable input monitoring. If you use direct monitoring, leave software monitoring off to avoid hearing the signal twice.
Before recording, test a short section. Listen for:
• Hum
• Crackle
• Distortion
• Low volume
• Delay
• Missing channels
• Unwanted background noise
Record a few seconds, stop, and play it back. This simple test can prevent the frustration of discovering a bad cable or wrong input after a full performance.
Save the project in a clear folder. Keep audio files and session files together unless you have a specific backup system. A reliable file structure makes future editing much easier.

Common Audio Interface Problems and Fixes
Even a simple setup can create problems. Most issues come from cables, settings, gain, or device selection.
No sound from the headphones
Check that the interface is selected as the output device. Confirm that the headphone knob is raised and the DAW track is routed to the main output. Also check whether the headphone cable is fully inserted.
The microphone is too quiet
Raise the input gain, check the cable, and confirm that the microphone type is compatible. A condenser microphone may need phantom power. A dynamic microphone may simply need more preamp gain.
The recording is distorted
Lower the gain on the interface. Check the DAW meter as well as the interface light. If the signal clips before it reaches the computer, lowering the track fader will not fix it.
There is a loud hum
Try a different cable, move the interface away from power supplies, and connect all studio equipment to the same power source. If the hum comes from monitors, disconnect devices one at a time to identify the source. Do not remove the ground pin from a power plug.
The computer does not detect the interface
Restart the computer and reconnect the interface. Try another USB port and cable. On Windows, reinstall the official driver. On macOS, check the Audio MIDI Setup utility and the system sound settings.
The audio clicks or drops out
Increase the buffer size, close unused programs, and use the manufacturer’s recommended driver mode. A computer running many background tasks may struggle with real-time audio.
Troubleshooting becomes easier when you test one change at a time. Randomly changing several settings can hide the real cause.
Tips for Better Recordings
An interface improves the connection between your equipment and computer, but it cannot correct every recording problem. Microphone placement, room sound, performance, and gain structure still matter.
Use these habits:
• Record in the quietest room available.
• Keep microphones away from fans and air conditioners.
• Use headphones to prevent track bleed.
• Leave headroom instead of recording too loudly.
• Label tracks as soon as you create them.
• Save new versions of important projects.
• Back up sessions to another drive or cloud service.
• Clean noisy cables and replace damaged ones.
• Keep firmware and drivers updated when the manufacturer recommends it.
• Protect your hearing by taking breaks and avoiding high monitor levels.
A good recording chain is like a clean glass of water. If the source is muddy, the container cannot make it clear. Start with a good performance and a suitable recording space, then use the interface to preserve that sound accurately.
The best way to learn how to use audio interface gear is to record short tests. Try different microphone distances, gain levels, and monitoring choices. Listen back the next day. Fresh ears often reveal details you missed during the session.
Audio Interface Safety and Maintenance
Treat the interface as precision audio equipment. Keep liquids away from it and provide airflow around the unit. Do not cover vents or place it on top of equipment that produces heat.
Turn down monitor and headphone levels before connecting or disconnecting equipment. Sudden pops can damage speakers and may hurt your ears.
Store cables without tight bends. Label cables if you work with many inputs. Dust the interface with a dry or lightly damp cloth, and follow the manufacturer’s care instructions.
Phantom power deserves special attention. Turn it off before unplugging microphones unless the equipment manual says otherwise. It is generally safe for many balanced dynamic microphones, but caution is wise with ribbon microphones and unusual wiring.
Back up your work often. Hardware can be replaced more easily than an important recording or creative project.
Frequently Asked Questions About How to Use Audio Interface
Do I need an audio interface to record music?
You can record with a computer’s built-in microphone, but an audio interface usually offers better sound, lower noise, and more control. It is especially useful for XLR microphones, guitars, basses, studio monitors, and multiple inputs.
How do I connect a microphone to an audio interface?
Connect the microphone to an XLR input, lower the gain, and raise it while the performer speaks or sings. Turn on 48V phantom power only when the microphone requires it.
Why is my audio interface not working?
Check the cable, power, computer sound settings, DAW device settings, and input selection. If the problem continues, restart the computer and install the current driver from the manufacturer.
What gain level should I use on an audio interface?
Set the gain so normal peaks remain below 0 dBFS, with louder peaks often landing around minus 12 to minus 6 dBFS. Leaving headroom helps prevent digital clipping.
Should I use headphones or studio monitors?
Headphones are useful for recording because they prevent microphone bleed. Studio monitors are often better for mixing because they can provide a more natural stereo image, but room acoustics affect their accuracy.
Do I need phantom power for a dynamic microphone?
Most dynamic microphones do not need phantom power. Check the microphone manual, especially if you are using a ribbon microphone or a nonstandard cable.
Conclusion
An audio interface becomes simple once you understand the signal path: connect the source, choose the correct input, set safe gain, select the interface in your DAW, and monitor at a comfortable level. Good cables, proper drivers, sensible buffer settings, and careful microphone placement will solve many common problems.
Start with one microphone or instrument and make a short test recording today. Practice these steps until they feel natural, then explore advanced tools such as direct monitoring, amp simulation, and multi-track recording. Share your setup or explore more recording guides to keep improving your sound.
