

To get a mic, choose the right type, check device compatibility, set a budget, and test sound before buying.
Learning how to get a mic is easier when you first match the microphone to your real use. A mic for Zoom calls is not the same as one for singing, gaming, podcasting, or live shows. This guide explains the key types, features, prices, setup steps, and common mistakes so you can buy with confidence.

Decide What You Need the Mic For
The best way to understand how to get a mic is to start with your goal. Your use case affects the microphone type, connection, pickup pattern, and price.
Think about where and how you will use it:
• Video calls and online classes
• Gaming and live streaming
• Podcasting and interviews
• Singing and music recording
• Voice-over work
• Public speaking and live events
• Outdoor recording
A simple USB microphone may be perfect for a desk setup. A dynamic XLR microphone may be better for a noisy room or professional recording. A small lavalier mic can work well when you need to move around.
Many buyers focus on brand names first. That is often a mistake. A $100 microphone in the right room can sound better than a $300 microphone in a loud, echo-filled space.
Match the mic to your environment
Your room matters almost as much as the microphone. Hard walls, bare floors, fans, air conditioners, and computer noise can all affect your recording.
If your room is noisy, choose a mic that focuses on sound close to the capsule. Dynamic microphones often work well in this setting. If your room is quiet and treated, a condenser microphone can capture more detail.
Choose the Right Microphone Type
Understanding microphone types is a major part of learning how to get a mic. Each type has strengths and limits.
Dynamic microphones
Dynamic microphones are durable and usually less sensitive than condenser models. They work well for:
• Streaming
• Podcasting
• Live vocals
• Loud instruments
• Noisy home offices
A dynamic mic often needs to be close to your mouth. This close position helps it capture your voice clearly and reject some background noise.
Condenser microphones
Condenser microphones are sensitive and detailed. They are common in studios and quiet recording spaces.
They can be useful for:
• Singing
• Voice-over work
• Acoustic instruments
• Podcasting in a treated room
• Detailed vocal recording
The trade-off is that condensers may capture more room noise. Many XLR condenser microphones also need phantom power, usually supplied by an audio interface or mixer.
Lavalier microphones
A lavalier mic is a small clip-on microphone. It is useful for presentations, interviews, videos, and mobile recording.
Lavalier microphones are discreet and easy to carry. However, clothing movement and cable noise can affect the sound. Wireless versions offer more freedom but cost more and need batteries.
Shotgun microphones
Shotgun microphones capture sound from a narrow area. They are often used for video production.
A shotgun mic can be useful when the microphone must stay outside the camera frame. It still needs careful placement. A long microphone does not automatically sound good if it is far from the speaker or pointed incorrectly.
USB microphones
USB microphones connect directly to a computer, tablet, or compatible phone. They are often the simplest answer for how to get a mic for home use.
Benefits include:
• No separate audio interface
• Low entry cost
• Useful controls on some models
The main limitation is flexibility. USB microphones are convenient, but they may offer fewer upgrade options than an XLR setup.
XLR microphones
XLR microphones use a professional audio connection. They usually connect to an audio interface, mixer, or recorder.
XLR systems can provide:
• Better control over gain
• Easier equipment upgrades
• Multiple microphone inputs
• More options for studio recording
The full cost is higher because you may also need an interface, XLR cable, stand, and headphones.

USB or XLR: Which Connection Should You Choose?
The connection is one of the most important parts of how to get a mic. Your choice should depend on your budget, skill level, and plans for future upgrades.
Choose USB if you want simple setup
USB is often best for beginners. You connect the mic, select it in your device settings, and start recording.
Choose USB when:
• You use one microphone
• You want a fast setup
• You record on a computer
• You have a limited budget
• You do not want to learn audio routing
A USB microphone can deliver clear sound for meetings, streams, and basic content. It is not a lesser choice. It is simply designed for convenience.
Choose XLR if you want more control
XLR is a better fit if you plan to build a recording setup. You can change microphones without replacing the entire system.
Choose XLR when:
• You want studio-style control
• You plan to use multiple microphones
• You record music
• You need an interface or mixer
• You expect your setup to grow
Remember that XLR does not guarantee better sound. Mic placement, room noise, speaking technique, and gain settings still matter.
Consider hybrid microphones
Some microphones offer both USB and XLR connections. These models can be useful if you want simple USB recording now and an interface-based setup later.
They may cost more than basic USB microphones. Still, the extra flexibility can be helpful for creators who are unsure how far they will take their audio work.
Set a Realistic Microphone Budget
Budget is another key part of how to get a mic. You do not need to spend a fortune, but extremely cheap models may create more problems than they solve.
Here is a general guide:
• Under $50: Basic USB, lavalier, and headset options
• $50 to $150: Strong beginner choices for calls, gaming, and content
• $150 to $300: Better build quality and more detailed sound
• $300 and above: Advanced microphones for serious recording
If you choose an XLR microphone, add the cost of supporting equipment:
• Audio interface
• XLR cable
• Mic stand or boom arm
• Pop filter or windscreen
• Closed-back headphones
• Shock mount, if needed
A complete $150 setup may be more useful than a $250 microphone without a stand or interface. Think of the purchase as a system, not a single item.
Do not pay for features you will not use
Some microphones include RGB lighting, onboard effects, multiple pickup patterns, or wireless controls. These features can be fun, but they do not always improve vocal clarity.
Spend first on:
• A suitable microphone type
• Good placement
• A stable stand
• Monitoring headphones
• Basic room control
These factors usually offer more practical value than extra lights or software effects.
Check Compatibility Before You Buy
A common mistake when learning how to get a mic is buying a microphone that does not work with the intended device.
Check these details before ordering:
• Does your computer have the correct USB port?
• Does your phone need a USB adapter?
• Does the microphone require phantom power?
• Does your camera accept the microphone output?
• Is the cable included?
• Does your operating system support the microphone?
• Can your recording app select the microphone?
USB-C, USB-A, 3.5-millimeter, XLR, and Lightning connections are not interchangeable without the right adapter or interface.
Some phones may also limit external microphone access. If you plan to record on a phone, confirm compatibility with the phone model and recording app. Read the manufacturer’s technical details rather than relying only on product photos.
Check software support
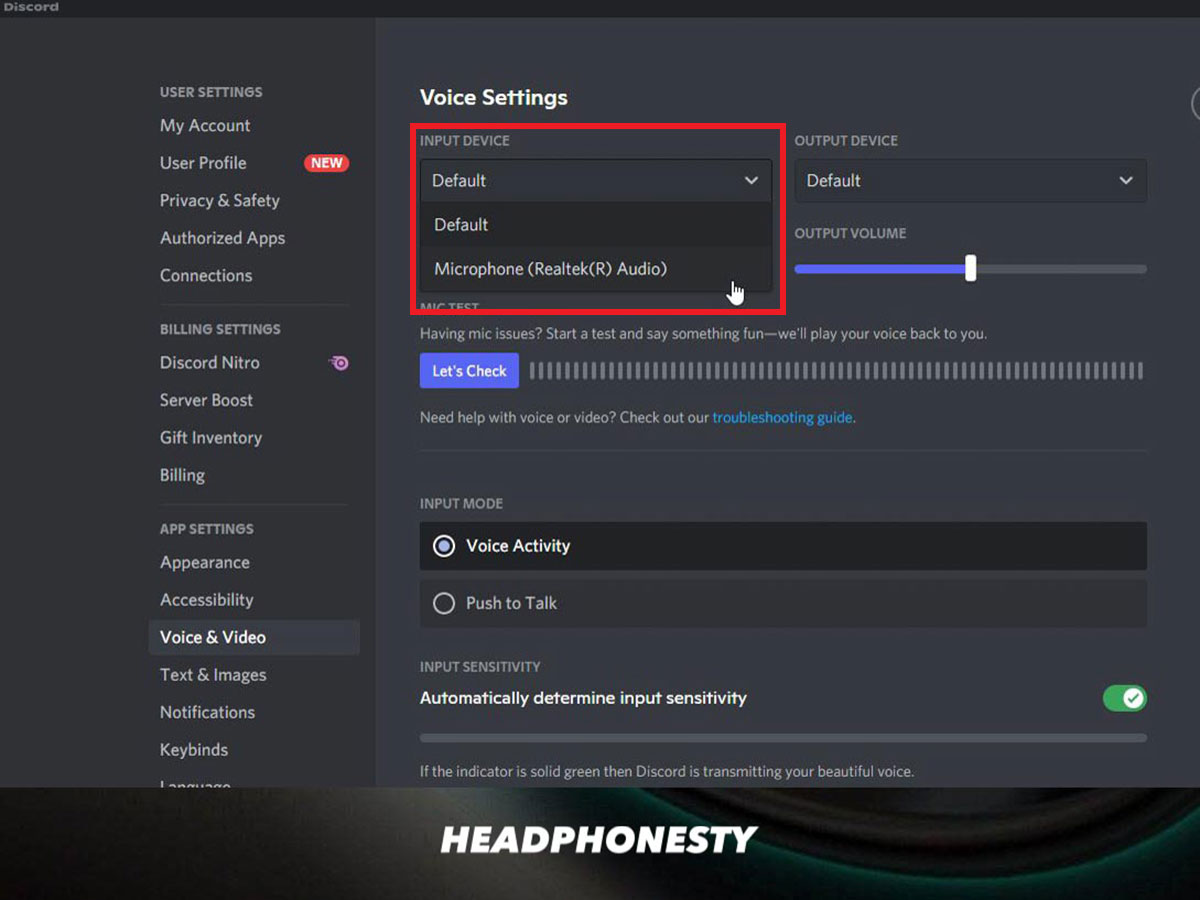
Most modern USB microphones work with common recording, streaming, and video call apps. Still, you may need to select the mic manually in the app’s audio settings.
Look for input settings such as:
• Microphone
• Audio input
• Recording device
• Voice input
• Sample rate
If the mic works in one app but not another, the problem may be software selection rather than faulty hardware.

Understand Pickup Patterns
Pickup patterns describe the directions from which a microphone captures sound. Knowing them makes how to get a mic much easier.
Cardioid
Cardioid microphones capture sound mainly from the front. They reduce sound from the back and are common for streaming, podcasting, and voice recording.
This is usually the best starting pattern for one person speaking into a microphone.
Omnidirectional
Omnidirectional microphones capture sound from all directions. They can work well for some meetings, field recordings, and small devices.
They are less useful when you need to reject noise from a fan or nearby conversation.
Bidirectional
Bidirectional microphones capture sound from the front and rear while rejecting sound from the sides. They can work for two-person interviews with one microphone.
Placement is important. Both speakers must sit at the correct sides of the microphone.
Figure-eight and multiple patterns
Some condenser microphones offer several patterns. This can help with interviews, group recording, and creative work.
However, multiple patterns may add cost and complexity. If you only record one person, a simple cardioid microphone may be all you need.

Learn the Features That Actually Matter
Microphone specifications can look confusing. Focus on features that affect your real recording experience.
Sensitivity
Sensitivity shows how strongly a microphone responds to sound. A highly sensitive microphone may capture quiet details, but it can also pick up more room noise.
Frequency response
Frequency response describes the range of sounds the microphone can capture. A wider range does not always mean better sound. The shape of the response matters more than the largest number.
Self-noise
Self-noise is the sound produced by the microphone’s own electronics. Lower self-noise is helpful for quiet voice-over work and soft recordings.
Maximum sound pressure level
Maximum sound pressure level shows how loud a sound the microphone can handle before distortion. This matters more for loud singing, drums, guitar amplifiers, and live sound.
Gain control
A gain knob lets you control the input level. It is useful, but it does not replace good mic distance.
Keep your voice loud enough for a clear signal without letting the level peak into distortion. Distorted audio is difficult to repair.
Headphone monitoring
A headphone output lets you hear your voice while recording. This can reveal buzzing, echo, clipping, and background noise before you finish a session.

How to Get a Mic by Comparing Products
When comparing microphones, do not rely on marketing words such as “professional” or “studio quality.” Use a practical checklist instead.
Compare:
• Connection type
• Pickup pattern
• Room suitability
• Included accessories
• Warranty
• Return policy
• User controls
• Compatibility
• Replacement parts
• Independent audio tests
Listen to several recordings made in similar conditions. A product demo recorded in a treated studio may not represent how the mic sounds in your bedroom or office.
Reviews are useful, but they are not perfect. Some reviewers receive products for free, and personal taste differs. Look for repeated comments about background noise, durability, harshness, setup difficulty, and customer service.
A good return policy matters. Your voice, room, and device may produce different results from a reviewer’s setup.
Set Up the Mic Correctly
Buying the right mic is only half the process. Setup has a large effect on audio quality.
Follow these steps:
Place the microphone on a stable stand.
Position it close enough for a strong voice signal.
Aim the correct side toward your mouth.
Keep the microphone slightly to the side if you have strong breath sounds.
Use a pop filter or windscreen when needed.
Set the input gain while speaking at your normal volume.
Wear headphones to check for noise and echo.
Record a short test before starting the full session.
For many spoken-word setups, placing the mic about 4 to 8 inches from your mouth is a useful starting point. The ideal distance depends on the microphone and your voice.
Speak toward the microphone’s intended pickup area. Some microphones pick up sound from the front, while others require you to speak into the top.
Control the room
You do not need an expensive studio to improve sound. Try these simple changes:
• Close windows and doors
• Turn off loud fans
• Move away from bare walls
• Add curtains, rugs, or soft furniture
• Keep the mic away from the computer fan
• Record at a consistent distance
Soft materials absorb reflections. They help prevent the hollow sound caused by your voice bouncing around the room.

Test the Mic Before Keeping It
Testing is an important step in how to get a mic. Do not judge a microphone only by how it sounds for five seconds in a store video.
Make several recordings:
• Speak in a normal voice
• Speak softly
• Speak loudly
• Read a passage
• Say words with strong P and B sounds
• Pause and listen for background noise
• Move slightly to test consistency
Listen with headphones. Check for hiss, echo, harsh high sounds, muffled bass, and sudden volume changes.
A practical lesson from many home recording setups is that mic technique often beats expensive gear. A basic microphone placed close to the speaker can sound clean, while a premium microphone placed across the room may sound weak and distant.
Save the test files before changing settings. This lets you compare microphones and adjustments fairly.
Avoid Common Microphone Buying Mistakes
Knowing how to get a mic also means knowing what to avoid.
Buying based only on price
A higher price can bring better components and build quality, but it does not guarantee a good match for your voice or room.
Ignoring the stand
A microphone without a stable stand can create desk bumps and handling noise. A basic boom arm or desktop stand may improve your recordings immediately.
Choosing a condenser for a noisy room
A condenser can capture detail, but that detail may include traffic, keyboards, pets, and air conditioning.
Using the wrong side
Some microphones have a front address. Others require you to speak into the top. Check the manual before assuming the correct position.
Setting gain too high
High gain can make your voice louder, but it also raises background noise. Move the mic closer before turning the gain up too far.
Forgetting monitoring
Without headphones, you may not hear buzzing, crackling, echo, or software problems until after the recording.
Trusting automatic noise removal
Noise reduction can help, but heavy processing may make voices sound thin or unnatural. Clean recording technique should come first.
A Simple Buying Process for Beginners
If you still feel unsure about how to get a mic, use this short process.
Define your main use.
Identify whether your room is quiet or noisy.
Choose USB for simplicity or XLR for expansion.
Select a dynamic, condenser, lavalier, or shotgun design.
Confirm device and software compatibility.
Set a total budget for the complete setup.
Compare independent reviews and sample recordings.
Buy from a seller with a clear return policy.
Test the microphone in your actual room.
Keep it only if it sounds clear and works reliably.
This process removes much of the guesswork. It also protects you from buying features that look impressive but do not solve your actual problem.
Frequently Asked Questions About How to Get a Mic
How do I get a mic for a laptop?
A USB microphone is usually the simplest choice for a laptop. Connect it to an available port, select it as the input device in your computer and app settings, and record a short test.
What is the best mic for beginners?
The best beginner mic is one that matches your room, device, and main use. A USB cardioid microphone is often a practical starting point for calls, gaming, streaming, and basic voice recording.
Should I get a USB or XLR mic?
Choose USB if you want a simple setup with one microphone. Choose XLR if you want an audio interface, more control, or the ability to expand your recording system later.
Do I need a mic stand?
A stand is not always required, but it is strongly recommended. It keeps the microphone stable, maintains a consistent distance, and reduces noise caused by touching or moving it.
How close should I be to the microphone?
Start about 4 to 8 inches away for spoken audio, then adjust while listening with headphones. Staying close usually improves voice clarity, but speaking too close can increase breath sounds and bass.
Why does my microphone sound muffled?
A muffled sound may come from speaking into the wrong side, placing the mic too far away, using a blocked windscreen, or applying too much software processing. Check placement and record a clean test before changing advanced settings.
Do expensive microphones sound better?
Expensive microphones can offer better construction, lower noise, or more refined sound, but price alone does not ensure better results. Room acoustics, placement, gain, and speaking technique often have a greater effect.
Conclusion
The best way to get a mic is to match the microphone to your purpose, room, device, and budget. USB models are simple and practical, while XLR systems offer greater control and room to grow. Dynamic microphones suit many noisy spaces, and condenser microphones can capture rich detail in quiet rooms.
Check compatibility, compare the full setup cost, test the mic in your real environment, and invest in placement before chasing expensive features. Use these steps to choose with confidence, then explore more audio guides or share your microphone setup and experience in the comments.
