

Connect the transmitter and receiver, match their channel, then run the receiver output into your speaker, mixer, or audio interface.
Learning how to hook up a wireless microphone is easier when you treat the system as two parts: the microphone transmitter and the receiver. I have set up wireless mics for meetings, live shows, classrooms, and home recording, and most problems came from a missed cable, a muted channel, or a poor frequency choice. This guide walks you through each step, explains common connection types, and helps you get clear sound without noise or feedback.

How a wireless microphone system works
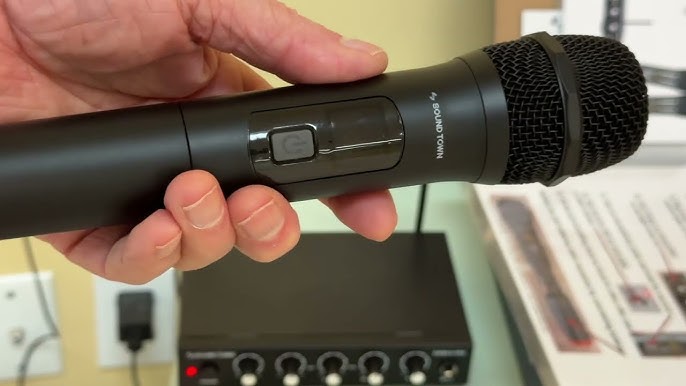
A wireless microphone changes your voice into a radio signal. The transmitter sits in the handheld microphone, headset pack, or belt pack. It sends the signal through the air to a receiver.
The receiver then changes that radio signal back into audio. You connect the receiver to a mixer, powered speaker, amplifier, recorder, or audio interface.
Think of the system like a two-part bridge:
- The transmitter sends your voice.
- The receiver catches your voice.
- The audio cable carries your voice to the sound system.
- The speaker or headphones let you hear the result.
Most wireless microphones use either a handheld transmitter or a bodypack transmitter. A bodypack model often works with a lavalier or headset microphone.
Before learning how to hook up a wireless microphone, check that the transmitter and receiver belong to the same system. A random transmitter usually will not work with a receiver from another brand or series.
What you need before you start
Gather the correct parts before turning anything on. This makes the setup faster and helps you find problems in the right order.
You usually need:
- A wireless microphone transmitter
- A wireless receiver
- Fresh batteries or charged battery packs
- An audio cable
- A mixer, speaker, amplifier, recorder, or audio interface
- Power cables for the receiver and sound equipment
- Headphones for testing, if available
The audio cable depends on your equipment. A receiver may have an XLR output, a 1/4-inch output, or both.
Use an XLR cable when connecting the receiver to a mixer or professional speaker input. Use a 1/4-inch cable when connecting to a compatible line input on a powered speaker or small mixer.
Do not assume every 1/4-inch input is the same. Some accept a balanced signal, while others accept an unbalanced signal. Your equipment manual will show which input is correct.
When learning how to hook up a wireless microphone, also check the operating frequency. Wireless microphones must use legal and compatible frequency ranges in your area. In the United States, frequency rules can change, so professional users should check current Federal Communications Commission guidance.

How to hook up a wireless microphone step by step
Follow these steps in order. Keeping the sound system muted at the start prevents loud pops and feedback.
1. Turn down the volume
Turn the master volume on your mixer or powered speaker all the way down. Set the microphone channel gain low as well.
This simple step protects your ears and your speakers. A wireless receiver can produce a sudden burst of sound when it connects.
2. Install fresh batteries
Put fresh batteries in the transmitter. If your system uses rechargeable packs, charge them fully before the event.
Weak batteries can cause dropouts, low volume, distortion, or sudden shutdowns. I once tested a microphone that sounded broken for several minutes. The real problem was an old battery that still showed some power but could not hold a steady load.
3. Connect the receiver to power
Plug the receiver into a stable power source. Keep its power adapter away from audio cables when possible.
Turn on the receiver first. Most receivers show a display, signal meter, frequency number, or power light.
4. Connect the receiver to your sound system
Plug one end of the audio cable into the receiver output. Plug the other end into the correct microphone or line input.
Use this general guide:
- Receiver XLR output to a mixer XLR input
- Receiver 1/4-inch output to a compatible line input
- Receiver output to a powered speaker input
- Receiver output to an audio interface input for recording
If your receiver has both XLR and 1/4-inch outputs, the XLR output often works best with a mixer. It usually provides a balanced connection, which can reduce hum over longer cable runs.
5. Match the transmitter and receiver
Turn on the transmitter. Set the transmitter and receiver to the same channel or frequency.
Some systems pair automatically. Others require you to select the same channel on both units. Digital systems may use a sync button or infrared connection to copy settings from the receiver to the transmitter.
A transmitter and receiver can look powered and ready but still produce no sound if their channels do not match.
6. Unmute the system
Check the mute switch on the transmitter. Then check the receiver output, mixer channel, and powered speaker.
Speak into the microphone from a short distance. Raise the channel gain slowly, then raise the main volume.
7. Set the microphone level
Aim for a strong signal that does not clip. On a mixer, loud speech should reach a healthy level without constantly hitting the red meter.
If the sound is too quiet, raise the input gain slightly. If it sounds harsh or distorted, lower the gain on the mixer or the receiver output.
This process is the basic answer to how to hook up a wireless microphone. The exact buttons may differ, but the signal path stays the same: microphone, transmitter, receiver, cable, mixer or speaker.

How to connect a wireless microphone to a powered speaker
A powered speaker has a built-in amplifier. This means you can connect the wireless receiver directly to the speaker without using a separate power amplifier.
First, connect the receiver output to the speaker input. Use XLR if the speaker has a microphone input with a suitable level. Some powered speakers have separate microphone and line inputs, so choose the input that matches the receiver output.
Set the speaker volume low. Turn on the receiver, then the speaker, and slowly raise the input volume while speaking.
Many powered speakers have two input channels. If one channel is set for a microphone and another is set for line level, use the correct setting. A line-level receiver output may sound too loud or distorted in a microphone-level input.
Keep the receiver within a reasonable range of the transmitter. Walls, metal objects, crowded rooms, and other radio systems can reduce signal quality.

How to connect a wireless microphone to a mixer
A mixer gives you more control over volume, equalization, effects, and multiple microphones. It is the most flexible option for events, churches, bands, classrooms, and presentations.
Connect the receiver to an available mixer channel. XLR is often the best choice because it supports a balanced connection.
Set the channel fader near the marked unity position, often shown as “0.” Then raise the gain knob while the speaker talks at a normal level.
Keep phantom power off unless you know your equipment supports it. Many wireless receivers do not need phantom power, and some output designs may not be suitable for it. Check the receiver manual before enabling phantom power on that channel.
A practical mixer setup looks like this:
- Wireless receiver to mixer channel input
- Mixer main output to powered speaker input
- Mixer monitor output to headphones or stage monitors
- Mixer recording output to an audio interface or recorder
If you hear feedback, lower the microphone channel or move the speaker farther from the microphone. Feedback is a loop: the microphone hears the speaker, the speaker makes that sound louder, and the cycle repeats.

How to connect a wireless microphone to an audio interface
To record with a wireless microphone, connect the receiver to an audio interface input. Choose an input that accepts the receiver’s output level.
Many interfaces have combo inputs that accept XLR and 1/4-inch plugs. If you use a 1/4-inch connection, check whether the input is set to instrument, line, or microphone mode.
Line mode is often suitable for a receiver with a strong output. A microphone input may add too much gain and cause clipping. Start with the interface gain low, then raise it while watching the recording meter.
Use headphones to monitor the sound. Listen for hiss, delay, dropouts, and distortion before recording a full session.
Wireless systems can add a small amount of noise compared with a direct wired microphone. A good system, correct gain, fresh batteries, and a clear frequency usually keep that noise low.

How to pair a digital wireless microphone
Digital wireless microphones may use a pairing or sync process instead of a simple channel dial. The receiver and transmitter must share the same digital link.
A typical pairing process works like this:
- Turn on the receiver.
- Open the receiver’s pairing or sync menu.
- Turn on the transmitter.
- Hold the transmitter near the receiver.
- Press the sync button or follow the display instructions.
- Confirm that the receiver shows a signal from the transmitter.
- Connect the receiver to your mixer or speaker.
- Test the audio at low volume.
Some digital systems use 2.4 GHz technology. These systems can be convenient, but they may compete with Wi-Fi devices, Bluetooth products, and other wireless equipment.
Professional systems may use digital UHF technology. These models often provide better frequency coordination for large events, but they need more planning.

Common wireless microphone problems and fixes
The microphone has no sound
Check the signal path from the transmitter to the speaker.
- Confirm that both units are powered on.
- Replace the transmitter batteries.
- Match the transmitter and receiver channel.
- Turn off the transmitter mute switch.
- Check the receiver output cable.
- Select the correct mixer or speaker input.
- Raise the channel gain slowly.
- Check that the speaker is not muted.
If the receiver shows no radio signal, the problem is likely pairing, channel selection, range, or power. If it shows a radio signal but no audio, check the audio cable and mixer settings.
The sound is distorted
Distortion often comes from too much gain. Lower the transmitter sensitivity if it has that control. Then lower the receiver output or mixer input gain.
Do not solve distortion by turning down only the master volume. The overload may happen earlier in the signal chain.
The sound cuts out
Dropouts can come from weak batteries, distance, obstacles, radio interference, or an overloaded frequency band.
Keep the transmitter visible to the receiver when possible. Do not place the receiver inside a metal rack or behind large equipment. For important events, test the full walking area before the audience arrives.
There is a loud hum
Use balanced XLR connections when available. Keep power cables separate from audio cables, and avoid cheap or damaged adapters.
If the hum continues, disconnect other equipment one piece at a time. This can reveal a ground loop or a noisy device.
The microphone feeds back
Move the speaker in front of the person using the microphone, not behind them. Lower the microphone channel, reduce excessive high frequencies, and keep the microphone close to the speaker’s mouth.
A headset or handheld microphone often works best when used close to the mouth. Speaking from several feet away forces you to add gain, which makes feedback more likely.

Wireless microphone setup mistakes to avoid
The most common mistake is turning everything on at full volume. Always start low and increase the level in small steps.
Another mistake is placing the receiver too far away. Wireless does not mean unlimited range. The rated range is often measured in ideal conditions, not in a crowded hall with walls and people between the devices.
Avoid taping the transmitter antenna against metal or covering it tightly with clothing. Bodypack transmitters can lose range when blocked by the body, especially if the antenna is folded or damaged.
Do not mix frequency groups without checking compatibility. Two microphones may work alone but interfere when used together.
I also recommend labeling each transmitter and receiver. At busy events, this small habit saves time and prevents someone from pairing the wrong unit.
How to improve wireless microphone sound quality
Good sound starts with microphone placement. Hold a handheld microphone a few inches from your mouth, but do not cover the grille. Speak across the microphone slightly if you need to reduce harsh breath sounds.
For a lavalier microphone, place it near the upper chest. Keep it away from necklaces, loose fabric, and rubbing clothing.
For a headset microphone, place the capsule near the corner of the mouth rather than directly in front of it. This placement helps reduce breath noise and popping sounds.
Use equalization with care. A small cut in muddy low-mid frequencies can improve clarity, while a modest high-frequency adjustment may add detail. Large boosts often increase feedback and hiss.
Test the microphone with the same voice, distance, and movement expected during the event. A sound check that only tests a quiet speaker does not reveal how the system will react to loud speech.
Safety and frequency planning
Wireless microphones transmit radio signals, so frequency planning matters. In the United States, some frequency ranges are restricted or shared with other services. A system that works in one city may need a different setting in another.
For small events, use the manufacturer’s recommended channel group. For several microphones, use channels designed to work together instead of choosing random frequencies.
Keep these points in mind:
- Check local frequency rules.
- Use compatible channels from the same system family.
- Keep spare batteries ready.
- Test the full operating area.
- Avoid placing receivers near strong radio or Wi-Fi equipment.
- Do not use damaged antennas or power supplies.
- Keep cables secured so people cannot trip over them.
Large productions often use professional frequency coordination tools. This planning reduces interference and helps several wireless systems work together.
Frequently asked questions about how to hook up a wireless microphone
Can I connect a wireless microphone directly to a speaker?
Yes, if the speaker has a compatible microphone or line input. Connect the receiver to the speaker with the correct XLR or 1/4-inch cable, then raise the volume slowly.
Why is my wireless microphone connected but not producing sound?
The transmitter and receiver may use different channels, or one device may be muted. Also check the audio cable, mixer input, channel gain, and speaker volume.
Do wireless microphones need Wi-Fi?
Most wireless microphones do not need Wi-Fi. Some 2.4 GHz models share the same general radio space as Wi-Fi devices, but they still usually create their own connection.
Can I use two wireless microphones at the same time?
Yes, but both systems need compatible frequencies. Use the manufacturer’s channel group or a frequency coordination plan to reduce interference.
Should phantom power be on for a wireless microphone?
Usually, no. A wireless receiver normally provides its own output and does not need phantom power, but always follow the receiver manufacturer’s instructions.
How far can a wireless microphone work from its receiver?
The range depends on the system, antenna design, frequency, obstacles, and interference. Keep a clear path between the transmitter and receiver, and test the real space before use.
Why does my wireless microphone sound quiet?
The transmitter may have low sensitivity, the receiver output may be turned down, or the mixer input may have insufficient gain. Raise each stage carefully while watching for clipping.
Conclusion
Knowing how to hook up a wireless microphone comes down to following the signal path in order. Install charged batteries, match the transmitter and receiver, connect the receiver to the right input, check gain levels, and test the system before people arrive.
Keep the receiver in a clear location, use compatible frequencies, and solve problems one stage at a time. With a short sound check and a few good habits, you can get clear, reliable wireless audio for presentations, performances, recordings, and events. Try these steps with your own system, then share your setup or questions in the comments.