

Use a few well-placed microphones, careful gain, and smart speaker placement to capture a choir clearly.
Learning how to mic a choir is less about using many microphones and more about balance, distance, room sound, and feedback control. A choir can sound rich and wide in the room but thin or muddy through a sound system. This guide explains the methods, placement choices, mixing steps, and common mistakes that help you produce a clear, natural choir sound.

What makes miking a choir different?
A choir is a large sound source. Each singer adds a small part to one wide musical image. The microphone must capture that group without making one person louder than the others.
Choir miking also depends on the room. A small church, school hall, concert stage, and outdoor venue each behave in different ways. Hard walls add reflections, while curtains and people absorb sound.
The main goals are to:
• Capture an even blend of voices
• Keep the natural character of the choir
• Reduce feedback and unwanted room noise
• Give the choir enough level in the main speakers
• Avoid making the mix sound too close or artificial
When learning how to mic a choir, remember this simple idea: the microphone should hear the choir as a group, not as a collection of individual singers.

Choose the right choir microphone setup
There is no single best microphone setup for every choir. The best choice depends on the choir’s size, stage width, room, music style, and sound system.
One microphone for a small choir
One microphone can work well for a small choir of about 8 to 15 singers. Place it in front of the group and ask singers to form a shallow arc around it.
This approach is simple and natural. It also creates fewer phase problems and uses less equipment. However, the choir must stay close together and maintain a steady distance from the microphone.
A cardioid condenser microphone is often a good choice. It captures detail and rejects some sound from behind the microphone. Use a microphone stand that can reach above the front row without blocking the singers.
Two microphones for a medium choir
Two microphones are a common choice for medium choirs. Place them across the front of the group, with each microphone covering half of the singers.
Keep the microphones at least several feet apart. Aim each microphone toward the center of its assigned section. The capsules should sit at a similar height and distance from the choir.
Two microphones can provide a wider stereo image and better control. They can also create phase problems if the spacing and angles are poor. Listen in mono before the performance to check that the choir does not lose volume or sound hollow.
Three or more microphones for a large choir
A large choir may need three or more microphones. Divide the choir into equal sections, such as soprano, alto, tenor, and bass, or into left, center, and right groups.
Avoid placing one microphone directly in front of every small group unless the arrangement truly requires it. Too many microphones can make the sound phasey, noisy, and difficult to mix.
Use the fewest microphones that provide enough level and coverage. This is one of the most useful rules when learning how to mic a choir.
Boundary and hanging microphones
Boundary microphones can sit on a stage floor, platform, or choir riser. They can be useful when microphone stands would block sight lines or create a trip hazard.
Hanging microphones can work well in churches and concert halls. They keep the stage clear and can provide a clean visual appearance. They require careful height adjustment, secure rigging, and approval from the venue.
Hanging microphones are often farther from the choir than stand-mounted microphones. This means they may capture more room sound and need more gain. That can increase feedback risk.

How to mic a choir step by step
The following process works for many live sound and recording situations.
1. Arrange the choir evenly
Ask the singers to stand in balanced rows. Keep the group width reasonable and avoid deep gaps between sections.
The front row should not sit much closer to the microphone than the back row. Risers can help place each row at a similar acoustic distance from the microphone.
If the choir is very wide, use more microphones or reduce the group width. A single microphone cannot cover an extremely wide choir evenly from a short distance.
2. Raise the microphones above the front row
Place each microphone slightly above the singers’ head height. Aim it downward toward the center of the group.
This position helps the microphone hear the rear rows and reduces the chance that the front row will dominate. It also keeps the microphone out of the singers’ direct line of sight.
Do not raise the microphone too high. Excessive height increases the distance to the choir and causes you to add more gain. More gain often means more feedback.
3. Start with a moderate distance
A practical starting point is 2 to 4 feet in front of the first row. The correct distance depends on the microphone, choir depth, room, and required volume.
Move the microphone farther away when you want more blend and room sound. Move it closer when you need more direct sound and feedback control.
Every room has a limit. If the choir becomes too quiet before the system reaches the needed volume, move the microphones closer or reduce the stage volume.
4. Aim the microphone carefully
Point the front of a cardioid microphone toward the center of the choir. Keep the rear of the microphone pointed toward the main speakers whenever possible.
This arrangement uses the microphone’s rejection pattern to reduce feedback. It also helps reduce sound from monitors, drums, and other stage sources.
Do not aim the microphone at only the strongest section. For example, pointing it directly at the sopranos may make the altos, tenors, and basses sound weak.
5. Set gain with the loudest singing
Ask the choir to sing the loudest passage in the program. Raise the preamp gain until the signal is healthy but does not clip.
Leave some headroom for unexpected peaks. Digital systems should not run near 0 dBFS during normal operation. A strong signal with room below the maximum level is safer and easier to mix.
6. Test the system in mono
Pan the choir microphones to the center and listen. If the sound becomes thin, hollow, or quiet, adjust the microphone spacing, height, or polarity.
Phase issues often appear when two microphones capture the same choir from different distances. The sound may seem wide in stereo but lose power in mono.
Mono testing matters in churches, schools, and outdoor events because many listeners may hear a blend of both speaker sides or use a system with limited stereo separation.
7. Build the mix slowly
Start with the choir microphones muted. Bring them up while the choir sings with the full band or accompaniment.
Add only as much level as the room needs. The choir should sound like part of the performance, not like a separate sound source placed on top of it.

Microphone placement techniques that improve clarity
Placement usually matters more than expensive equipment. A modest microphone in the right position can outperform a costly microphone placed too far away.
Use the 3:1 spacing rule with care
The 3:1 rule suggests that the distance between microphones should be about three times the distance from each microphone to the sound source. This can help reduce phase interference.
For example, if a microphone is 2 feet from the nearest singers, try to keep the next microphone about 6 feet away. This is a starting point, not a strict law.
Choirs are wide and complex sound sources, so you still need to listen. Room reflections, microphone patterns, and riser depth can change the result.
Avoid placing microphones too close
A close microphone hears individual voices more than the group blend. This can make the choir sound uneven as singers move or turn their heads.
Close placement also exaggerates small differences in vocal strength. One confident singer may become much louder than the rest of the section.
For a natural choir sound, place the microphone far enough away for the voices to blend. Then move it closer only when feedback or low volume becomes a problem.
Watch the microphone pickup pattern
Cardioid microphones reject sound from the rear. Supercardioid and hypercardioid microphones can provide tighter control but have rear pickup areas that require careful monitor placement.
Omnidirectional microphones sound natural and are less sensitive to proximity effect. However, they usually offer less feedback protection in a live venue.
For most live choir work, a cardioid condenser microphone is a practical starting point. In a quiet recording room, a large diaphragm condenser, small diaphragm condenser, or matched stereo pair may work well.
Keep the choir within the coverage area
A microphone’s pickup pattern is not equally wide at every frequency. Some microphones become more directional in the high range.
If the choir spreads too far to the sides, singers near the edges may sound dull or weak. Bring the group closer together, use a wider pattern, or add another microphone.
Consider the room before adding microphones
A reflective room can make the choir sound distant and blurred. Before changing microphones, try reducing room reflections with curtains, soft panels, or a different choir position.
In a lively church, lowering the microphone and moving it closer may improve clarity. In a well-treated recording room, a greater distance may capture a pleasing natural blend.

Mixing choir microphones for a natural sound
Once placement is correct, mixing becomes much easier. The goal is not to reshape every voice. The goal is to support the choir’s natural tone.
Set the high-pass filter
A high-pass filter can remove low rumble from footsteps, HVAC systems, stage vibration, and handling noise. A starting point between 70 and 120 Hz often works, but use your ears.
Do not set the filter too high. Deep voices and lower choir parts need body. If the basses sound thin, lower the filter frequency.
Use gentle equalization
A small cut in the low-mid range can reduce mud. Many rooms become cloudy around 200 to 400 Hz, especially when several microphones are open.
A modest boost in the upper-mid or high range may add clarity, but too much can make consonants sharp and increase feedback. Make small changes and compare the processed sound with the original.
Apply light compression
Choir microphones often need little compression. A gentle ratio, such as 2:1 or 3:1, can control peaks and keep the group steady.
Use a medium attack so the beginning of each phrase remains natural. Use a release time that follows the music without causing the level to pump.
Heavy compression can raise room noise and feedback. It can also remove the natural rise and fall that makes a choir expressive.
Use reverb with restraint
A choir in a dry room may benefit from a small amount of reverb. A choir in a large church may already have more than enough natural reverberation.
Too much reverb reduces lyric clarity. Start with a short, moderate setting and increase it only if the sound feels unnaturally dry.
Pan microphones carefully
For live sound, keep the choir mostly centered unless the speaker system and room support a wide stereo image. Extreme panning can make the choir disappear for listeners on one side.
In a recording, gentle left and right placement can create width. Check the mix in mono to ensure the center image remains strong.
Manage open microphones
Every open microphone adds more room sound and more feedback risk. Mute unused microphones during breaks, announcements, and quiet passages.
If the choir has separate sections, use group control or a choir bus. This lets you adjust the entire choir without changing every channel.

Feedback control when miking a choir
Feedback happens when sound from a speaker enters a microphone, is amplified, and returns to the speaker in a loop. It often begins as a ringing tone and can quickly become loud and unpleasant.
Use these steps to reduce the risk:
• Place the main speakers in front of the choir microphones
• Keep monitor speakers behind the microphone rejection area
• Use the lowest useful microphone gain
• Move microphones closer instead of simply raising volume
• Reduce unnecessary low and low-mid energy
• Ring out the system with a trained engineer
• Keep singers and speakers in fixed positions during the show
Do not solve feedback by cutting large parts of the equalizer blindly. A deep cut may remove the problem while also damaging the choir’s tone.
A safer method is to identify the ringing frequency, reduce it with a narrow filter, and then retest the system. Only make small cuts. If the system still feeds back, change the physical setup.

Common mistakes to avoid
Using one microphone for a very wide choir
A single microphone may not cover a large choir evenly. The edge singers can sound distant, while the center singers sound loud.
Use a narrower group arrangement or add another microphone. Keep the microphones at similar distances from the singers.
Placing microphones behind the speakers
This creates an easy feedback path. Always place the main speakers in front of the microphones from the choir’s perspective.
Adding too much gain
More gain does not always create a better choir sound. It often brings up room noise, stage noise, and feedback.
Improve placement first. Then adjust gain.
Putting microphones at mouth level
Mouth-level microphones often favor the front row and create an uneven blend. Raising them slightly and aiming down usually gives better coverage.
Using too many microphones
More microphones can create more phase problems. They also make the mix harder to control.
Begin with one microphone per practical coverage zone. Add microphones only when testing shows a real need.
Ignoring the accompaniment
A choir may sound clear alone but disappear when the piano, organ, guitar, or orchestra starts. Balance the accompaniment and choir together, not one at a time.
The choir does not always need more volume. It may need space in the accompaniment, better microphone placement, or a small reduction in competing frequencies.
Skipping a full rehearsal
A soundcheck with speaking voices is not enough. Choirs often sing louder, use more low energy, and move differently during the performance.
Test the loudest song, the quietest song, and any section with soloists.
A practical setup example
Imagine a 32-person choir on three riser rows in a medium church. The choir is 18 feet wide, and the room has reflective walls.
Start with two cardioid condenser microphones. Place them about 6 feet apart, 3 feet in front of the first row, and slightly above head height. Aim each microphone toward the center of its half of the choir.
Place the main speakers in front of the microphones and keep the monitors low. Set a high-pass filter near 90 Hz, then listen for low-mid buildup around 250 Hz.
During rehearsal, check the choir in mono. If the center sounds hollow, move the microphones closer together or adjust their angles. If the edge singers are weak, narrow the choir formation before adding more microphones.
This example shows how to mic a choir with a small, controlled setup rather than a large collection of microphones.

Recording a choir versus live sound
Recording allows you to place microphones farther away and capture more room sound. You can also record several takes, adjust levels later, and use acoustic treatment.
For a live performance, feedback and speaker placement become major limits. You usually need a more direct microphone position and less room sound.
A recording setup may use:
• A spaced pair for a wide room sound
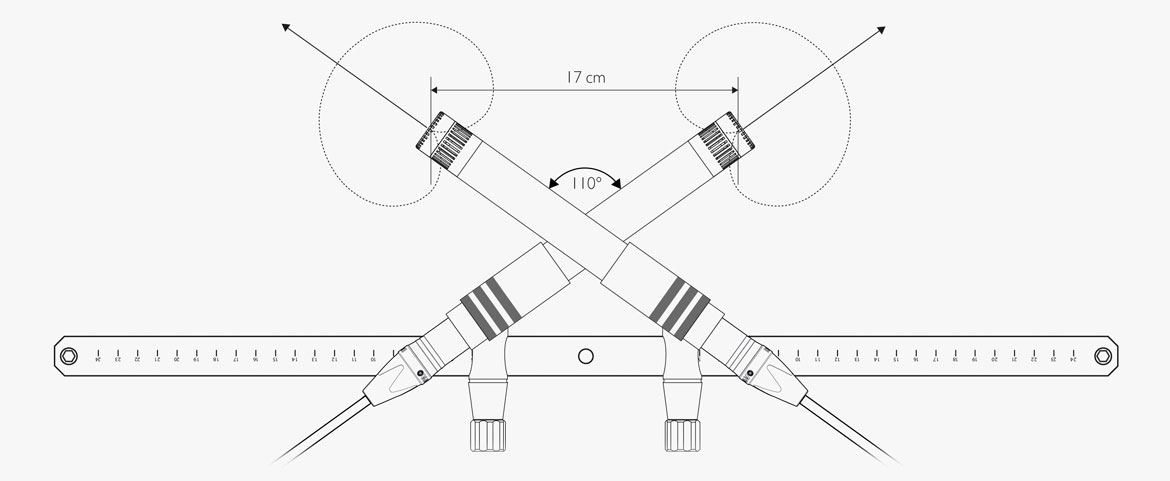
• An XY pair for a stable stereo image
• An ORTF pair for natural width and localization
• Spot microphones for soloists or sections
Use spot microphones with care. They should support the main choir image, not replace it. If spot microphones become too loud, the recording may lose its unified choir character.
Safety and equipment tips
Condenser microphones often need phantom power. Turn phantom power on only when the microphone and connected equipment support it. Follow the manufacturer’s instructions, especially when using older ribbon microphones.
Use stable stands, sandbags, and proper cable runs. Choir areas can become crowded, and a fallen stand can injure a singer or damage equipment.
Check local venue rules before using hanging microphones or overhead rigging. Any suspended equipment should use approved hardware and trained personnel.
Protect hearing during soundcheck. Avoid standing directly in front of loud speakers while testing feedback. Make changes at a moderate level whenever possible.
Frequently asked questions about how to mic a choir
How many microphones do I need for a choir?
A small choir may work with one microphone, while a medium or large choir may need two to four. Start with the fewest microphones that cover the group evenly, then add more only when placement cannot solve the problem.
What is the best microphone for a choir?
A cardioid condenser microphone is a strong starting choice for many live choirs because it offers detail and useful feedback rejection. The best microphone still depends on the room, choir size, sound system, and available budget.
How high should choir microphones be?
Place choir microphones slightly above the singers’ head height and aim them toward the center of the group. The exact height depends on the risers and microphone pattern, so test each row during rehearsal.
Should choir microphones be panned left and right?
For live sound, keep choir microphones near the center unless the system has good stereo coverage. In recording, gentle panning can add width, but always check the result in mono.
Why does my choir sound muddy through the speakers?
Mud often comes from room reflections, too much low-mid energy, excessive microphone distance, or too many open microphones. Improve placement first, then try a small cut in the 200 to 400 Hz range.
How can I stop choir microphones from feeding back?
Place the speakers in front of the microphones, keep monitors out of the microphone’s pickup area, and use only the gain you need. Moving the microphones closer can improve direct sound and reduce the gain required.
Conclusion
Learning how to mic a choir starts with good placement, not expensive equipment. Arrange the singers evenly, raise the microphones slightly, keep speakers in front of the microphones, and use the fewest microphones that provide full coverage.
Test the loudest passages, listen in mono, control low-mid buildup, and make small mix changes. With careful setup and rehearsal, your choir can sound clear, warm, and natural in almost any venue.
Try these steps at your next rehearsal, record a short test, and compare the result from different seats in the room. Explore more live sound resources, and share your own choir-miking lessons with other audio professionals.
