

To relic a guitar, carefully add realistic wear while protecting its playability, finish, hardware, and long-term value.
Learning how to relic a guitar is part craft, part patience, and part restraint. A convincing relic job copies years of contact from a player’s arm, belt, hand, and sweat—not random damage from sandpaper. This guide explains safe methods, finish types, tool choices, common mistakes, and ways to make a new guitar look naturally road-worn.

What Does It Mean to Relic a Guitar?
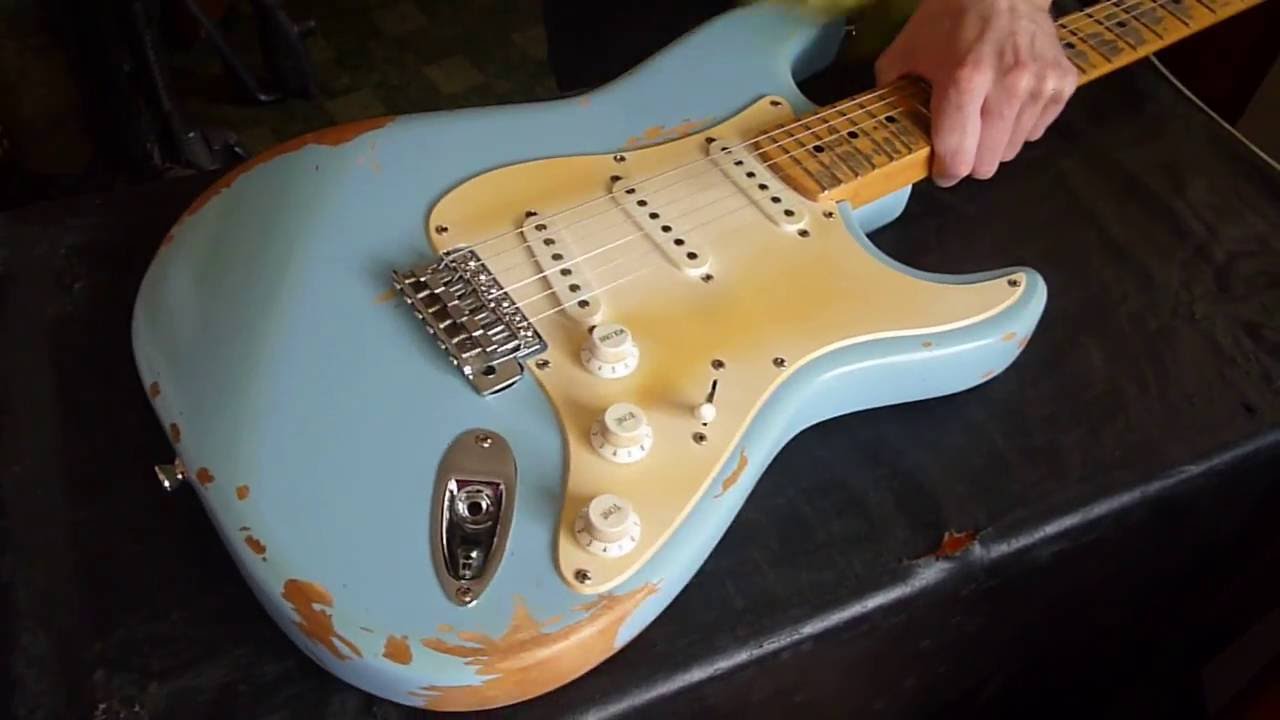
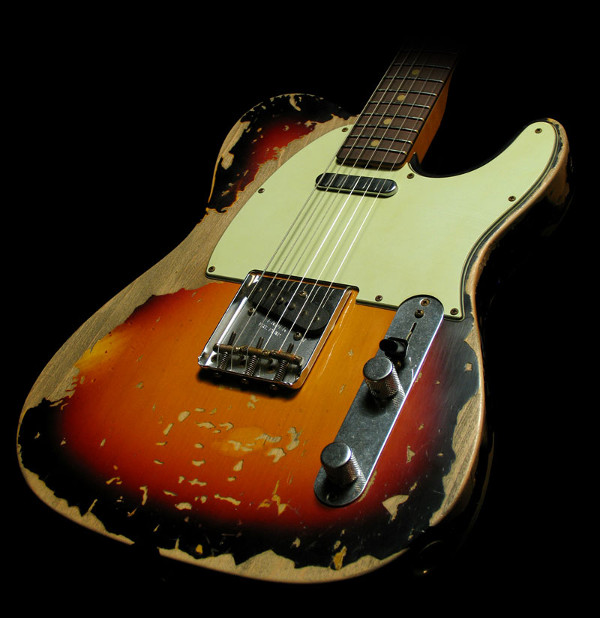
To relic a guitar means to give it the look of an older, heavily played instrument. This may include worn finish, dull hardware, small scratches, faded color, and natural-looking marks around the areas that players touch most.
A good relic job should tell a story. The wear should suggest years of gigs, practice, storage, and handling. It should not look like someone attacked the guitar with a screwdriver for ten minutes.
Most relic work focuses on these areas:
• The back of the neck, where the thumb and palm rub the finish
• The forearm contour, where the picking arm rests
• The lower bout, where the body touches clothing
• The edges and corners, which receive more bumps
• The pickguard near the picking area
• The bridge, tuners, knobs, and screws
• The finish near the control plate and output jack
Relicing is cosmetic, but it can affect structure and playability. Removing too much finish may expose wood to moisture. Filing hardware can weaken it. Poor sanding can leave deep marks that are hard to repair.

Decide Whether Relicing Is Right for Your Guitar
Before learning how to relic a guitar, think about the guitar’s value and condition. A low-cost, modern guitar is usually a safer project than a vintage instrument, rare model, or family heirloom.
Avoid relicing a valuable original guitar unless you fully understand its finish, construction, and market value. Artificial wear can reduce collector value. It may also remove evidence that helps prove the guitar’s age and originality.
A good test is to ask yourself:
• Would I still enjoy this guitar if the project went wrong?
• Can I replace the damaged parts?
• Is the finish safe to sand?
• Do I want a subtle worn look or heavy road wear?
• Can I work in a clean, well-ventilated space?
I once saw a player sand through a guitar’s finish near the neck pocket because he wanted a “broken-in” look. The exposed wood absorbed sweat and began to darken unevenly. The lesson was simple: natural wear is often shallow, and more damage does not always create more realism.
Identify the Guitar’s Finish
The finish type controls nearly every part of the process. Two guitars can look similar but react very differently to sanding, polishing, and temperature changes.
Polyurethane and Polyester Finishes
Many modern guitars use polyurethane or polyester finishes. These coatings are hard and often thick. They do not usually wear as softly as old lacquer finishes.
Polyester can chip or flake when stressed. Polyurethane may become dull under abrasion but resist gradual thinning. For these finishes, subtle edge wear and controlled dulling often look better than large, bare patches.
nitrocellulose Lacquer
Nitrocellulose lacquer is common on some vintage-style and high-end guitars. It is thinner and can show checking, fading, and wear more easily than many modern finishes.
Nitrocellulose lacquer can also contain harmful solvents during application and repair. Do not spray or strip it indoors. Wear proper respiratory protection, use strong ventilation, and follow local safety rules.
Oil and Wax Finishes
Some necks and bodies use oil or wax instead of a thick clear coat. These surfaces can become smooth and dark with use. They usually need less sanding and more careful cleaning.
If you are unsure about the finish, test a hidden area with a cotton swab and a small amount of suitable polish. Do not use strong solvents on an unknown finish. When in doubt, ask the manufacturer or a qualified guitar technician.

Gather the Right Tools and Safety Gear
You do not need a large workshop to learn how to relic a guitar. You do need the right tools and a calm work area.
Basic tools include:
• Small Phillips and flathead screwdrivers
• Hex keys for the bridge and tuners
• Painter’s tape
• Clean cotton cloths
• Sandpaper from about 400 to 2,000 grit
• Scotch-Brite-style abrasive pads
• A plastic scraper
• Small files for hardware
• A soft toothbrush
• Guitar-safe polish
• A digital camera or phone for reference photos
Safety gear matters just as much:
• Safety glasses
• Nitrile gloves
• A well-fitted respirator rated for the material you are sanding
• Hearing protection when using powered tools
• A clean workbench with good lighting
• Dust control and fresh airflow
Never sand old paint without considering the risk of lead or other harmful materials. Vintage guitars and old replacement parts may contain hazardous coatings. If the finish is unknown, have it tested or avoid disturbing it.
Do not use an oven, open flame, heat gun, dry ice, or freezer to force finish checking. Rapid temperature changes can damage glue joints, wood, binding, electronics, and the finish beneath the top layer. A cosmetic project is not worth a structural repair.

Photograph and Disassemble the Guitar
Take clear photos before removing anything. Photograph the wiring, pickup height, bridge position, spring layout, and screw locations. These images can save hours during reassembly.
Remove the strings first. Then take off the pickguard, control plate, knobs, bridge, tuners, strap buttons, and other parts you plan to age.
Place every screw in a labeled container. Many guitar screws look alike but have different lengths. A long screw in the wrong hole can damage the wood or emerge inside a cavity.
Protect the neck and fingerboard with a soft cloth. If you remove the neck, support it well and avoid forcing the screws. On a bolt-on guitar, mark the orientation of parts without making visible marks on the finish.
This is also the best time to check the instrument’s basic condition. Look for loose braces, lifted bridges, cracked solder joints, sharp fret ends, and neck problems. Relicing will not solve setup issues.
Plan Natural Wear Before You Start
The most important rule in how to relic a guitar is to plan the wear pattern. Study photos of well-used guitars, especially the same body shape and finish style.
Players do not wear every area equally. A right-handed player may create forearm wear on the front lower bout and pick scratches below the strings. The back of the neck may become smooth from the thumb. Belt buckle marks often appear on the rear of the body.
Make a light pencil map on removable masking tape, not directly on the guitar. Mark:
• High-contact areas
• Small edge chips
• Places for finish dulling
• Hardware that should look older
• Areas that should remain mostly clean
Use asymmetry. Real guitars rarely wear in perfect pairs. One corner may show more damage than the other. One screw may be dull while its neighbor remains bright.
Think of the finish as a city map. High-traffic roads become smooth first. Quiet side streets remain cleaner. Your relic work should follow the same pattern.

How to Relic a Guitar Body
Start with the least aggressive method. You can always remove more material, but you cannot easily put it back.
Step 1: Dull the Gloss
Use a fine abrasive pad or high-grit sandpaper to reduce the shine. Move with long, light strokes rather than scrubbing one small spot.
A glossy guitar often looks more realistic after the clear coat becomes slightly satin. This simple step can create an aged appearance without exposing wood.
Check your progress under different lights. A surface may look dull in one direction and glossy in another. Stop when the reflection becomes softer but the finish still looks intact.
Step 2: Add Forearm and Belly Wear
Use a soft abrasive pad on the forearm contour and the back where the player’s body rests. Keep the edges irregular but gentle.
Do not create a large oval by sanding in a perfect shape. Blend the center into the surrounding finish. The transition should be gradual, like a stone polished by water.
Step 3: Create Edge Wear
Use fine sandpaper on corners, body edges, and cutaway points. Work in short sections and change the pressure often.
Real edge wear exposes slightly different layers over time. You may see clear coat, color coat, primer, and wood. Do not force all layers to appear. A few small spots are more believable than a bright outline around the entire guitar.
Step 4: Add Small Contact Marks
Use a plastic tool or a blunt wooden object for tiny impressions. Avoid sharp screwdrivers because they make deep, artificial cuts.
Place marks near the jack, strap buttons, bridge, and control area. Keep most marks shallow. A guitar that has been played for years may have many fine scratches but only a few deep dents.
Step 5: Blend the Damage
After each detail, step back and view the whole guitar. Blend harsh edges with a fine abrasive pad. If one area attracts your eye too much, reduce the contrast around it.
The goal is controlled inconsistency. The finish should look used, not decorated.

How to Relic a Guitar Neck
Many players focus on the body and forget the neck. Yet the neck often provides the most convincing sign of use.
Start by removing the strings and masking the fingerboard. If the neck has a glossy finish, use a fine abrasive pad to create a smooth satin feel. Work along the back of the neck in the same direction as the grain.
Pay special attention to:
• The area behind the first seven frets
• The thumb position behind the neck
• The heel and shoulder of the neck
• The edges near the headstock
• The area below the first fret
Avoid removing too much material near the truss rod, nut, fret slots, and headstock logo. Do not sand fret crowns or fingerboard inlays.
A worn neck should feel comfortable, not rough. After sanding, remove all dust and run a clean cloth over the surface. If the cloth catches on fibers or sharp edges, smooth the area further.
On a maple fingerboard, be cautious. Sanding can remove the finish between frets and create uneven color. Rosewood and ebony boards may need cleaning and conditioning, but they should not be soaked with oil.

How to Age Guitar Hardware
Relicing guitar hardware can make or break the result. Bright, new hardware beside a worn body often looks out of place. Still, hardware should be aged with care because corrosion can cause real failures.
Safer Hardware Aging Methods
Start with cleaning and dulling. Remove fingerprints, polish marks, and bright reflections with a mild abrasive pad. Focus on contact areas instead of treating every part equally.
For chrome or nickel parts, light scuffing can reduce the factory shine. Use a fine pad and check often. Do not grind through plating unless you understand the base metal beneath it.
For screws, replaceable pickup covers, and inexpensive plates, buying aged replacement parts may be safer than using chemicals. This also lets you return the guitar to its original condition.
Avoid Aggressive Chemical Corrosion
Strong acids, bleach, and untested rust solutions can damage plating and release harmful fumes. They may also stain the guitar, weaken screws, or create rust that spreads into wood.
Never put electronic parts in liquid. Keep corrosion away from switch contacts, pickup magnets, circuit boards, and solder joints.
Tuners need special care. If the gears become gritty, stiff, or loose, replace or service them. A relic job should never make tuning less stable.
How to Age a Pickguard and Plastic Parts
Plastic parts often change color over time, but artificial yellowing can look obvious. The safest approach is usually to buy a replacement part with the desired color.
If you choose to age the original part, clean it first with mild soap and water. Then dull the surface lightly with a fine abrasive pad. Concentrate on the picking area and edges.
Avoid direct sun, strong solvents, and heat. Ultraviolet exposure can make some plastics brittle. Heat may warp a pickguard or alter the spacing around screws.
Knobs and pickup covers can receive light wear on raised areas. Keep recessed areas darker and less touched. This contrast gives the part depth without making it look painted.
How to Create Realistic Finish Checking
Finish checking means fine cracks that form as a finish expands and contracts. It is often linked with age, temperature changes, and the different movement of wood and finish.
Forced checking is risky. Freezing or heating a guitar can crack glue joints, loosen binding, split wood, or damage the finish beneath the surface. It can also create cracks that look too uniform.
If you want a checked appearance, consider a professional refinisher who understands the specific finish. On a valuable guitar, do not attempt forced checking as a home experiment.
A safer option is to create the impression of age through dulling, small edge wear, and faded hardware. These details can look convincing without putting the instrument under thermal stress.
Reassemble, Set Up, and Inspect the Guitar
Clean all dust before reassembly. Dust inside a switch, potentiometer, or pickup cavity can cause problems later.
Reinstall each part in its original location. Use the photos you took earlier. Do not overtighten screws, especially in soft wood or old screw holes.
After restringing, check the guitar from top to bottom:
• Does the neck still feel smooth?
• Are the frets clear of abrasive dust?
• Do the controls work without crackle?
• Is the bridge level and secure?
• Do the tuners turn smoothly?
• Is the output jack tight?
• Does the guitar stay in tune?
• Are there exposed wood areas that need sealing?
Finish with a professional setup if needed. Check neck relief, action, intonation, pickup height, and fret condition. A guitar can look decades old and still play like a modern instrument.
This is where many first projects fail. The owner spends hours on scratches but skips the setup. The best relic is one that feels better in the hands and still performs on stage.
Common Relicing Mistakes to Avoid
Learning how to relic a guitar takes restraint. These mistakes are common because they seem fast at first.
• Sanding too deeply: Bare wood can absorb moisture and become difficult to repair.
• Using random damage: Wear should match player contact and guitar design.
• Aging every part equally: Real instruments have uneven wear.
• Using harsh chemicals: They can harm plating, plastic, wood, and your health.
• Forcing finish checking: Temperature shock can cause structural damage.
• Ignoring the neck: A worn body with a brand-new glossy neck often looks unbalanced.
• Working without photos: You may forget wiring routes or part positions.
• Removing logos or serial numbers: This can reduce value and create authenticity concerns.
• Relicing a valuable vintage guitar: Cosmetic changes may permanently reduce collector interest.
• Leaving rough edges: A relic guitar should feel smooth and safe to play.
• Forgetting dust removal: Abrasive dust can damage electronics and fret surfaces.
Work slowly. Check the guitar after every small change. A careful project may take several short sessions, but that is better than one rushed afternoon.
Should You Relic the Guitar Yourself or Hire a Professional?
A DIY relic project can be rewarding if you use an affordable guitar and want a learning experience. It is a poor choice for a rare, expensive, or historically important instrument.
Choose a professional if:
• The guitar has a valuable original finish
• You want authentic lacquer checking
• The body needs stripping or refinishing
• You are unsure about lead or chemical safety
• The neck needs finish removal near the truss rod
• The guitar has structural damage
• You need the result to look historically accurate
Ask the repairer about finish type, safety methods, expected wear level, and reversibility. Request photos of past work. A good technician should explain both the benefits and the risks.
A professional job costs more, but it can protect the guitar’s structure and playability. For many musicians, that peace of mind is worth more than saving money on sandpaper.
How Much Does It Cost to Relic a Guitar?
The cost depends on the project’s depth and the guitar’s finish.
A basic DIY project may cost about $20 to $80 for sandpaper, pads, tape, cleaning supplies, and replacement screws. Replacement hardware can raise the cost quickly.
A professional cosmetic relic may cost several hundred dollars. Full refinishing, lacquer work, finish checking, aging, and setup can cost much more.
Consider the total value of the guitar before spending money. A budget instrument may not justify a costly finish job. On the other hand, a favorite guitar may be worth improving because of its emotional and playing value.
The cheapest path is not always the best path. Mistakes can lead to refinishing, replacement parts, or structural repairs.
A Simple Relic Workflow for Beginners
If you are new to the process, follow this lower-risk order:
Photograph the guitar and inspect its condition.
Identify the finish and remove the strings.
Disassemble only the parts you need to remove.
Clean the body, neck, and hardware.
Dull the gloss with a fine abrasive pad.
Add light wear to high-contact areas.
Age replaceable hardware instead of original hardware when possible.
Smooth every transition and remove all dust.
Reassemble the guitar carefully.
Install fresh strings and complete a full setup.
Play the guitar for several days before adding more wear.
That last step is valuable. Once the guitar is back in your hands, you may find that the wear already feels complete. Real playing will also create marks in places that make sense.
Frequently Asked Questions About How to Relic a Guitar
Is relicing a guitar permanent?
Yes, sanding, chipping, and chemical aging can permanently change the finish and hardware. Use replaceable parts and begin with light wear if you want to keep the project reversible.
Can I relic a polyurethane-finished guitar?
Yes, but polyurethane may not wear like thin lacquer. Use fine abrasives and focus on satin dulling, edge wear, and realistic contact marks instead of trying to copy lacquer checking.
Is it safe to use a freezer to relic a guitar?
No, freezing can damage wood, glue joints, binding, electronics, and the finish. Rapid temperature changes are risky and should not be used as a casual relicing method.
How do I relic a guitar neck without damaging it?
Mask the fingerboard, use a fine abrasive pad, and work slowly along the back of the neck. Stop when the surface feels smooth and comfortable, and avoid the truss rod, nut, frets, and logos.
Should I relic a valuable vintage guitar?
Usually not without advice from a qualified guitar conservator or repair technician. Artificial wear can reduce originality, collector value, and historical credibility.
Can relicing change how a guitar sounds?
Light cosmetic relicing usually has little effect on sound. Deep sanding, body damage, loose hardware, or changes to the bridge and neck can affect sustain, tuning stability, and playability.
Conclusion
Learning how to relic a guitar is less about making damage and more about copying believable use. Identify the finish, plan the wear, use light pressure, protect the wood, and avoid unsafe heat or chemicals. Keep the neck smooth, age hardware carefully, and finish with a complete setup.
Start with a guitar that you can afford to change. Make one small improvement at a time, then stop before the work looks forced. With patience, your instrument can gain a worn-in look while staying comfortable, reliable, and fun to play. Explore more guitar repair techniques, share your results, and keep learning from every project.