

A typical condenser microphone requires phantom power, a clean preamp, careful placement, and a quiet recording space.
A typical condenser microphone requires more setup than a basic dynamic mic, but the reward is clear, detailed sound. Understanding power, cables, gain, room noise, and microphone technique will help you avoid common mistakes and get professional results at home or in a studio.
What a Typical Condenser Microphone Requires
A typical condenser microphone requires an electrical power source to operate its capsule and internal electronics. In most cases, that power comes from 48-volt phantom power supplied by an audio interface, mixing console, or microphone preamp.
A typical condenser microphone requires more than simply plugging it into a computer. You also need a balanced XLR cable, a suitable preamp, a stable stand, and a room that does not add too much echo or background noise.
The exact setup depends on the microphone type:
• Large-diaphragm studio microphones often need 48V phantom power.
• Small-diaphragm condenser microphones usually need phantom power as well.
• USB condenser microphones receive power through the USB connection.
• Tube condenser microphones may require a separate power supply and special cable.
This difference matters. A USB microphone is usually ready for direct computer use, while an XLR condenser microphone needs external audio equipment.
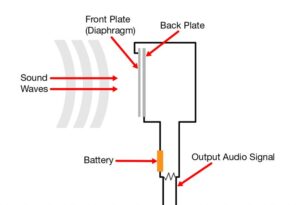
Phantom Power: The Main Requirement
For most XLR condenser microphones, phantom power is the key requirement. Phantom power sends a low-voltage DC current through the same balanced XLR cable that carries the audio signal.
The standard voltage is 48 volts, although many devices provide a slightly lower voltage. Most modern condenser microphones work safely with common phantom-power systems.
A typical condenser microphone requires phantom power because its capsule and preamp need electrical energy. A dynamic microphone creates a signal through movement in a magnetic field, so it usually does not need external power.
Turn on phantom power only after connecting the microphone. When disconnecting the microphone, turn phantom power off first and wait a few seconds. This habit can reduce loud pops and protect speakers, headphones, and other equipment.
Some microphones have special rules. Ribbon microphones, especially passive vintage models, can be damaged by incorrect connections or faulty cables. Always check the microphone manual before activating phantom power.
A typical condenser microphone requires 48V phantom power in many cases, but do not assume every condenser model uses the same system.

The Audio Interface and Preamp
A typical condenser microphone requires a clean preamp to raise its quiet output to a usable recording level. An audio interface usually combines a microphone preamp, analog-to-digital converter, headphone output, and computer connection in one box.
Look for an interface with:
• A balanced XLR microphone input
• Switchable 48V phantom power
• Enough gain for your microphone
• Low self-noise
• Direct headphone monitoring
• Drivers that work with your computer
Most condenser microphones produce a stronger signal than many dynamic microphones. Still, the preamp must provide clean gain without hiss, clipping, or harsh distortion.
Set the input gain while the performer speaks or sings at the loudest expected level. Aim for peaks around minus 12 to minus 6 decibels full scale in your recording software. This leaves headroom and lowers the risk of digital clipping.
A common mistake is turning the gain too high because the waveform looks small. Digital recordings do not need to reach 0 dB to sound strong. Modern 24-bit recording gives you plenty of room for safe levels.
A typical condenser microphone requires a stable preamp signal, not simply a loud one. Clean headroom is more useful than maximum volume.

Cables, Stands, and Basic Accessories
A typical condenser microphone requires a balanced XLR cable when it uses an XLR output. Balanced cables help reject electrical noise over normal studio distances.
Choose a cable with secure connectors and solid strain relief. A very expensive cable will not automatically improve sound, but a damaged or poorly wired cable can create hum, crackle, or signal loss.
You will also need a firm microphone stand. A heavy floor stand or stable desk arm helps prevent vibration and accidental movement. A loose stand can turn small bumps into loud low-frequency thuds.
Useful accessories include:
• Pop filter for reducing plosive sounds such as “P” and “B”
• Shock mount for reducing stand and desk vibration
• Windscreen for light breath noise and outdoor use
• Headphones for monitoring during recording
• Cable clips for keeping the setup safe and tidy
Do not hold a sensitive studio condenser in your hand unless it is designed for that purpose. Handling noise travels through the body of the microphone and can overwhelm the recording.
A typical condenser microphone requires physical support that keeps it still, isolated, and correctly aimed at the sound source.

Room Acoustics and Background Noise
A typical condenser microphone requires a reasonably quiet room because it captures detail from the room as well as the performer. Its sensitivity is one of its strengths, but it can also reveal fans, traffic, computer noise, and hard reflections.
You do not need an expensive professional studio. Start with simple changes:
• Turn off fans and noisy air conditioners when possible.
• Close windows and doors.
• Move away from refrigerators and computer fans.
• Use curtains, rugs, bookshelves, and soft furniture to reduce reflections.
• Avoid placing the microphone in the center of a bare room.
Hard walls can make speech sound sharp and distant. Soft furnishings absorb some reflected sound, while bookshelves and uneven surfaces help break up strong echoes.
Do not place a blanket directly over your head and microphone as a long-term solution. It may reduce reflections, but it can also sound dull and uncomfortable. A better approach is to control the nearby reflection points while keeping the performer comfortable.
A typical condenser microphone requires a controlled recording environment if you want its detail to sound polished rather than harsh.

Correct Microphone Placement
A typical condenser microphone requires careful placement because distance changes both volume and tone. For spoken voice, start about 6 to 12 inches from the capsule. Use a pop filter between the mouth and microphone.
Speak toward the front of the microphone, not the back or side. Many studio condenser microphones use a side-address design, while some pencil condensers use a front-address design. Check the markings and user manual.
Try these basic positions:
• Place the microphone slightly above mouth level for a natural vocal tone.
• Aim it slightly to the side to reduce strong “S” sounds.
• Move farther away for a more open sound with less proximity effect.
• Move closer for a fuller voice, but watch for bass buildup.
The proximity effect increases low frequencies when a directional microphone is used close to the source. This can make a thin voice sound richer, but it can also make a deep voice muddy.
For acoustic guitar, small-diaphragm condensers often work well near the 12th fret. Avoid pointing directly at the sound hole, which can produce too much bass.
In practical recording sessions, moving the microphone a few inches often improves the sound more than adding another plug-in. Placement is the first form of equalization.

Gain Staging and Recording Levels
A typical condenser microphone requires correct gain staging from the capsule to the final recording. Gain staging means keeping the signal at a healthy level through each part of the audio chain.
Follow this simple process:
Connect the microphone with the interface gain turned down.
Turn on phantom power if the microphone needs it.
Ask the performer to use the loudest expected volume.
Raise the preamp gain until the loudest peaks remain below clipping.
Record a short test and listen through headphones.
Clipping happens when the signal exceeds the available digital or analog limit. It creates harsh distortion that cannot be fully repaired later.
Do not confuse microphone sensitivity with quality. A sensitive microphone may produce a strong signal, but it may also capture more room noise. The best microphone is the one that suits the voice, instrument, room, and recording goal.
A typical condenser microphone requires enough gain for a clear signal, but too much gain can expose noise and cause distortion.

USB Condenser Microphones
A typical condenser microphone requires less equipment when it is built with a USB connection. USB microphones contain a microphone capsule, preamp, analog-to-digital converter, and USB interface inside the body.
This makes them useful for:
• Podcasts
• Video calls
• Streaming
• Online lessons
• Home voice recording
Plug the microphone into the computer, select it as the input device, and adjust the recording level in your software. You may still need a stand, pop filter, and headphones.
USB microphones have some limits. They may offer less upgrade flexibility than an XLR system, and connecting several microphones can be difficult. Monitoring options also vary between models.
An XLR microphone is often a better long-term choice for a growing studio. A USB model is often the simplest choice for one person who wants clear sound without buying extra hardware.
A typical condenser microphone requires either USB power or phantom power, depending on its connection type.

Tube Condenser Microphones and Special Models
A typical condenser microphone requires different equipment if it uses a tube circuit. Tube microphones usually include a dedicated power supply, a special multi-pin cable, and an XLR output from the power unit.
Never connect a tube microphone directly to phantom power unless its manual clearly says that you can. The external power supply is designed to provide the correct voltage for the tube and capsule.
Some condenser microphones also include:
• Pad switches to reduce sensitivity
• High-pass filters to reduce low-frequency rumble
• Multiple polar patterns
• Internal shock systems
• Built-in digital outputs
A pad switch is useful for loud sources such as drums, guitar amplifiers, and brass instruments. A high-pass filter can reduce air conditioning noise, desk vibration, and excessive proximity bass.
Read the manual before use. Features that look similar may work in different ways, and incorrect power or cable choices can damage equipment.

Polar Patterns and Their Uses
A typical condenser microphone requires the right polar pattern for the recording task. The polar pattern describes how well the microphone hears sound from different directions.
Common patterns include:
• Cardioid: Captures sound mainly from the front and rejects much of the rear sound.
• Omnidirectional: Captures sound from all directions with a natural low-frequency response.
• Figure-eight: Captures sound from the front and rear while rejecting the sides.
• Multi-pattern: Lets you select between several pickup designs.
Cardioid is the most common choice for solo voice, podcasts, and home recording. It helps reduce sound from behind the microphone, but it does not remove all room noise.
Figure-eight patterns can work well for two-person interviews or mid-side recording. Omnidirectional patterns can sound natural in a good room but may capture more unwanted reflections.
The polar pattern is not a magic shield. A cardioid microphone still hears room sound, especially from nearby walls and reflective surfaces.
Common Mistakes to Avoid
A typical condenser microphone requires careful handling, but many setup problems are easy to prevent.
Avoid these mistakes:
• Forgetting to turn on phantom power for an XLR condenser
• Using an unbalanced adapter instead of a proper XLR connection
• Recording too close without a pop filter
• Setting the gain so high that the signal clips
• Placing the microphone beside a noisy computer
• Pointing a side-address microphone at the wrong surface
• Tapping the microphone to test it
• Leaving phantom power on while changing cables
• Judging sound only through cheap or damaged headphones
One lesson worth remembering is that loud does not mean good. A recording can look impressive on a meter and still contain clipping, room echo, or harsh sibilance.
Make a short test recording before starting the real session. Listen for hum, hiss, pops, distortion, and background noise. This small step can save an entire afternoon.
Maintenance and Safe Storage
A typical condenser microphone requires protection from moisture, dust, and sudden temperature changes. Store it in its case or pouch when you are not using it.
Keep the microphone away from:
• Water and drinks
• Direct sunlight
• Very humid rooms
• Strong heat sources
• Loose dust and smoke
Do not blow into the capsule to test it. Breath contains moisture, and repeated exposure can affect sensitive components. Speak into the microphone or use a gentle sound source instead.
Use a clean, dry cloth on the body. Do not spray cleaner onto the microphone. If the microphone develops crackling, intermittent audio, or unusual noise, test the cable and interface before assuming the capsule has failed.
Good storage extends the life of the microphone and protects its most delicate part: the capsule.
How Much Does a Typical Setup Cost?
A typical condenser microphone requires an investment that can range from a simple USB setup to a full studio chain. You do not need to buy everything at once.
A practical starter setup may include:
• Entry-level USB condenser microphone
• Stable stand or boom arm
• Pop filter
• Closed-back headphones
An XLR setup adds:
• Condenser microphone
• Audio interface
• Balanced XLR cable
• Stand and pop filter
Price does not guarantee a perfect result. A modest microphone in a quiet, well-treated room can outperform an expensive microphone in a noisy, reflective space.
Spend first on the parts that solve your largest problem. If the room is noisy, acoustic control may help more than a new microphone. If the sound is distorted, improve gain settings before replacing equipment.
Frequently Asked Questions About What a Typical Condenser Microphone Requires
Does a typical condenser microphone require phantom power?
Most XLR condenser microphones require 48V phantom power from an audio interface, mixer, or preamp. USB condenser microphones receive power from the USB connection, while tube models usually use a dedicated power supply.
Can I use a condenser microphone without an audio interface?
You can use a USB condenser microphone without a separate audio interface. An XLR condenser microphone normally needs an interface or mixer with a microphone preamp and suitable phantom power.
Does a typical condenser microphone require a pop filter?
A pop filter is not electrically required, but it is highly useful for voice recording. It reduces bursts of air from sounds such as “P” and “B” and also helps protect the capsule from moisture.
How far should I sit from a condenser microphone?
Start about 6 to 12 inches away for speech or singing, with a pop filter between you and the microphone. Adjust the distance based on the room, voice, microphone pattern, and desired bass response.
Can phantom power damage a condenser microphone?
Correct phantom power is safe for most modern XLR condenser microphones. However, tube microphones, vintage equipment, and some special designs may require different power, so always check the manual first.
Is a condenser microphone better than a dynamic microphone?
Neither type is always better. Condenser microphones often capture more detail, while dynamic microphones can handle loud sources and noisy rooms with less sensitivity.
Conclusion
A typical condenser microphone requires the right power, a clean preamp, a balanced connection, stable support, sensible placement, and a controlled room. USB models simplify the process, while XLR and tube microphones offer more flexibility but need additional equipment.
Start with a short test recording. Check the power, gain, room noise, distance, and microphone direction before you record the final take. Apply these steps to your own setup, explore more recording guides, and share your experience with condenser microphones.
