

To use a condenser mic, connect it correctly, turn on phantom power, set gain, position it well, and record in a quiet room.
Learning how to use condenser mic properly can transform thin, noisy audio into a clear, detailed recording. The mic itself is only one part of the process. Room sound, microphone distance, input gain, pop protection, and monitoring all shape the final result. This guide explains the full setup in simple steps, with practical tips that work for vocals, podcasts, music, streaming, and voice-over work.
What Is a Condenser Microphone?
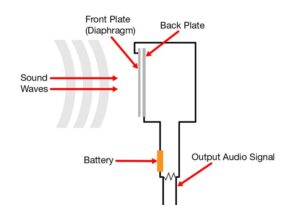
A condenser microphone uses a thin diaphragm and an electrically charged backplate to capture sound. When sound waves move the diaphragm, the microphone changes those movements into an audio signal.
This design makes condenser microphones very sensitive. They can pick up small details in a voice, acoustic guitar, piano, or room. That detail is their main strength, but it also means they can capture unwanted noise.
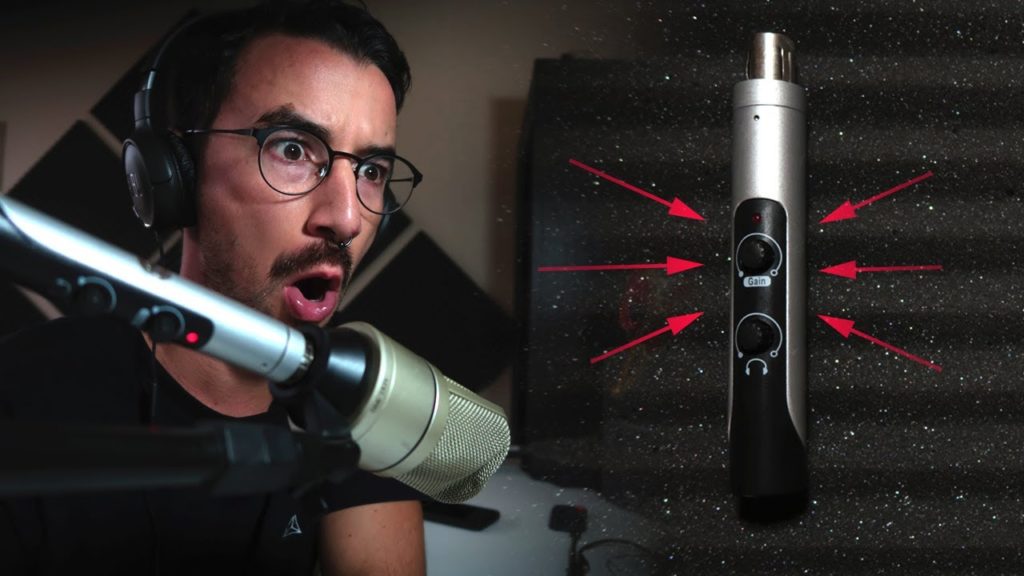
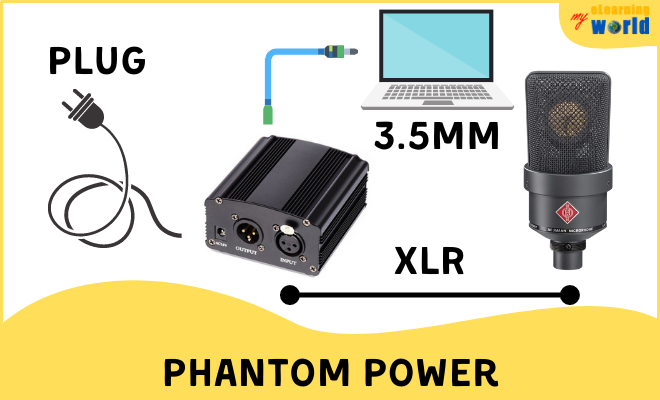
Most condenser microphones need power to work. Studio models usually receive 48-volt phantom power through an XLR cable and an audio interface or mixer. Some USB condenser microphones receive power directly from the USB connection.
Common condenser microphone types include:
• Large-diaphragm condenser microphones for vocals, narration, and studio recording
• Small-diaphragm condenser microphones for acoustic instruments, cymbals, and detailed stereo recording
• USB condenser microphones for podcasts, video calls, streaming, and home recording
• XLR condenser microphones for professional recording systems and flexible studio setups
A condenser mic is like a high-resolution camera. It can show more detail than a basic camera, but it also reveals dust, poor lighting, and a messy background. The same principle applies to sound.
What You Need Before Using a Condenser Mic
Before learning how to use condenser mic step by step, gather the right equipment. The exact setup depends on whether you have a USB or XLR model.
For a USB condenser microphone, you usually need:
• The microphone and its USB cable
• A computer, tablet, or compatible phone
• Recording software such as GarageBand, Audacity, Logic Pro, Pro Tools, or a digital audio workstation of your choice
• A microphone stand or boom arm
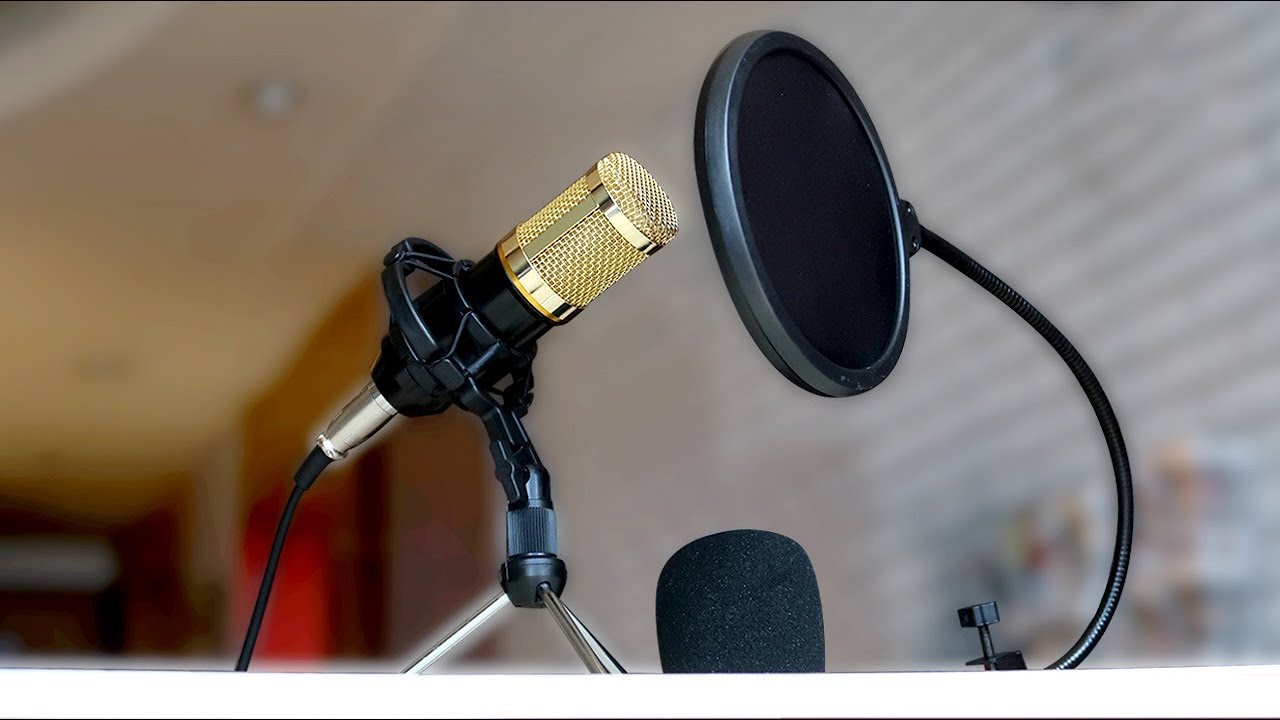
• A pop filter or foam windscreen
For an XLR condenser microphone, you usually need:
• The microphone
• An XLR cable
• An audio interface, mixer, or microphone preamp
• A computer and recording software
• A microphone stand or boom arm
• A pop filter
• Headphones for monitoring
Check the microphone manual before connecting it. Some models have special controls, such as a pad switch, high-pass filter, polar pattern selector, or built-in gain control.
Your room also matters. A costly microphone in a loud, reflective room may sound worse than an affordable microphone in a quiet, treated space. Listen for air conditioners, computer fans, traffic, hard walls, and echo before you begin.

How to Connect a Condenser Mic
The connection process is simple, but the order matters. Correct setup helps prevent loud pops, feedback, and possible equipment damage.
Connecting an XLR condenser mic
Follow these steps:
Turn down the interface or mixer gain.
Lower the monitor and headphone volume.
Turn off phantom power.
Connect the XLR cable to the microphone.
Connect the other end of the cable to the interface or mixer.
Connect the interface to your computer.
Open your recording software.
Select the interface as the input device.
Turn on 48-volt phantom power if the microphone requires it.
Raise the gain slowly while speaking into the microphone.
Most modern microphones and interfaces are designed to work safely with phantom power. Still, it is good practice to connect equipment with phantom power turned off. This reduces the risk of loud electrical pops.
Never assume that every microphone can accept phantom power. Passive ribbon microphones, older equipment, and unusual designs may be damaged by incorrect power. Read the manufacturer’s instructions first.
Connecting a USB condenser mic
USB microphones are easier to set up:
Connect the microphone to the computer with the correct USB cable.
Wait for the computer to recognize the device.
Open your recording software.
Choose the USB microphone as the input device.
Select headphones or the microphone’s headphone output for monitoring.
Set the input level in the software or on the microphone.
If the USB microphone has a headphone jack, use it for direct monitoring. This can reduce delay between your voice and the sound in your headphones.
How to Use Condenser Mic Step by Step
Once the microphone is connected, focus on placement and sound control. These steps form the core of how to use condenser mic for clean recordings.
1. Place the microphone at the right height
Set the microphone capsule near the level of your mouth. For a seated recording, the capsule may sit slightly above or below your mouth, depending on comfort and tone.
Avoid pointing the microphone directly at your chest or ceiling. The front of the microphone should face the sound source. Many microphones have a logo or colored mark that shows the front.
2. Keep a steady distance
Start with a distance of 6 to 12 inches from the microphone. This range works well for many speaking and singing voices.
A closer position gives you more bass and a stronger, more intimate sound. This effect is called the proximity effect. A greater distance usually sounds more natural, but it also allows more room noise into the recording.
Try to keep your mouth at a similar distance throughout the performance. Moving closer and farther away can cause uneven volume.
3. Use a pop filter
Place a pop filter about 2 to 3 inches in front of the microphone. Stand or sit another 4 to 8 inches behind the filter.
A pop filter reduces bursts of air from sounds such as “P,” “B,” and “T.” Without one, these bursts can hit the diaphragm and create a deep popping sound.
A foam windscreen can help with light breath noise, but a fabric or metal pop filter often gives better protection during close vocal recording.
4. Aim slightly off-axis
Do not always point the microphone straight at the center of your mouth. Turning it slightly to the side, often by 10 to 30 degrees, can reduce harsh “S” sounds and strong bursts of air.
This technique is useful for bright voices, speech with strong sibilance, and singers who produce powerful consonants. Test both positions and choose the one that sounds more natural.
5. Set the input gain
Speak or sing at your loudest expected volume while watching the input meter. Adjust the gain so normal peaks reach about minus 18 to minus 12 dBFS, with louder moments staying below 0 dBFS.
Digital clipping happens when the signal goes above the available level. It creates harsh distortion that cannot be fully repaired later. Recording slightly lower is safer than recording too loud.
6. Monitor with headphones
Use closed-back headphones when possible. They reduce the chance that the microphone will capture sound from the headphones.
Listen for:
• Background hum
• Computer fan noise
• Room echo
• Mouth clicks
• Plosive sounds
• Distortion
• Delayed monitoring
If you hear a delay, use direct monitoring on the interface or USB microphone. If direct monitoring is not available, lower the software buffer size if your computer can handle it.
How to Position a Condenser Mic for Different Uses
The best position depends on what you are recording. There is no single placement that works for every voice or instrument.
For vocals
Place the microphone 6 to 10 inches from the singer, with a pop filter between the singer and the capsule. Keep the microphone slightly above mouth level and angle it down a little if the voice sounds too boomy.
For a brighter sound, aim the microphone more directly at the mouth. For a softer sound, move slightly off-axis. Encourage the singer to move their body, not just their head, so the distance stays consistent.
For podcasting and voice-over
A distance of 6 to 8 inches often produces a full, clear sound. Use a pop filter and keep the microphone just above or beside the mouth to reduce breath noise.
A quiet, treated space is more important than an expensive mic. Curtains, rugs, bookshelves, and soft furniture can reduce reflections. Do not place the microphone directly against a bare wall.
For acoustic guitar
Start by pointing the microphone toward the area where the neck meets the body. This often gives a balanced blend of string detail and body tone.
Pointing directly at the sound hole may create too much bass. Move the microphone farther away or aim it toward the bridge if the recording sounds boomy.
For piano
The ideal placement depends on the piano type and the desired tone. A pair of small-diaphragm condenser microphones may capture a detailed stereo image, while one large-diaphragm microphone can provide a focused mono sound.
Keep the microphones secure and away from moving parts. Always check the sound at a safe monitoring volume before changing the placement.
For streaming
Place the microphone close enough to capture your voice clearly, but keep it out of the camera’s main view if needed. A boom arm can reduce desk vibration and make placement easier.
Avoid putting the microphone beside a loud keyboard, desktop fan, or speaker. If you use speakers, headphones are usually safer because they reduce feedback.

How to Set Condenser Mic Gain and Recording Levels
Gain controls how much the microphone signal is amplified before it reaches your recording software. It does not work like a simple volume knob after recording. Setting it correctly is one of the most important parts of how to use condenser mic.
Start with the gain turned low. Speak at your normal volume, then perform the loudest line you expect to record. Raise the gain until the meter shows a healthy signal without touching the red zone.
A practical target is:
• Normal speech around minus 18 to minus 12 dBFS
• Loud peaks around minus 10 to minus 6 dBFS
• No peaks at or above 0 dBFS
You do not need to record as close to 0 dBFS as possible. Modern digital systems have enough resolution for a clean recording at a lower level. Extra headroom gives you room for sudden loud sounds.
If the recording is quiet, do not immediately turn the microphone gain to maximum. First check the cable, input selection, phantom power, microphone distance, and interface settings.
If the meter moves but the recording sounds distorted, lower the gain. Distortion may also come from a pad being off, a damaged cable, a faulty input, or a plugin that is clipping after recording.

Room Setup and Acoustic Treatment
A condenser microphone captures the room as well as the person or instrument. This is why room setup plays a major role in sound quality.
A room with bare walls, glass, tile, and hardwood floors creates strong reflections. These reflections arrive at the microphone shortly after the original sound. Your recording may then sound hollow, boxy, or distant.
You can improve a room with simple changes:
• Record away from corners
• Use rugs on hard floors
• Close windows and doors
• Turn off noisy fans and appliances
• Place curtains over large windows
• Add bookshelves or soft furniture
• Use acoustic panels at reflection points
Do not rely on hanging a blanket over the microphone. That may reduce some high-frequency reflections, but it does not fully treat the room. A better method is to improve the area around the performer and microphone.
Listen to a short test recording before starting the full session. This small step can save hours of editing. In my experience, many “microphone problems” are really room problems.

Common Condenser Mic Problems and Fixes
Even when you understand how to use condenser mic, small issues can appear. Most are easy to solve with a careful check.
No sound
Check these settings:
• Is the microphone connected to the correct input?
• Is phantom power on for an XLR condenser microphone?
• Is the USB microphone selected in the computer settings?
• Is the recording software using the correct input?
• Is the input muted?
• Is the XLR cable fully connected?
Also check whether the microphone has a mute button or a separate volume control.
Humming or buzzing
A low hum may come from a power issue, poor cable, nearby electrical device, or ground loop. Move the microphone cable away from power adapters and computer chargers.
Try another XLR cable and another interface input. If the noise changes when you touch the computer or interface, stop and inspect the power setup.
Echo or room sound
Move closer to the microphone and reduce the room reflections. Turn the microphone away from hard walls and loud surfaces.
Software noise removal can help, but it should not replace good recording technique. Heavy processing may create watery or artificial artifacts.
Harsh or sharp vocals
Move the microphone slightly off-axis. Increase the distance a little, lower the high frequencies with gentle equalization, or use a microphone with a different tonal character.
A de-esser can reduce strong “S” sounds, but use it carefully. Too much de-essing can make speech sound dull or lispy.
Boomy vocals
Move farther away from the microphone or reduce the low frequencies with a high-pass filter. Changing the microphone angle can also help.
Do not automatically cut a large amount of bass. First test the microphone position, because placement usually creates the problem.
Clipping
Lower the input gain and record another test. If clipping still occurs, check whether the microphone has an internal gain control or pad setting.
Clipped audio cannot be fully restored. Always leave headroom for unexpected volume changes.
How to Use Condenser Mic With a Phone or Tablet
Many USB condenser microphones can work with mobile devices, but compatibility depends on the connector, operating system, and available power.
You may need:
• A USB-C cable
• A Lightning adapter for older Apple devices
• A powered USB hub
• A recording app that supports external microphones
Some microphones draw more power than a phone or tablet can provide. If the device disconnects or the microphone does not appear, use a powered adapter or hub.
Test the setup before recording an important interview or video. Confirm that the app is using the external microphone rather than the built-in microphone.
Mobile recording also makes room noise more noticeable. A quiet location, close microphone placement, and headphones can improve the result more than advanced editing.

Condenser Mic Care and Safety
A condenser microphone contains delicate parts. Handle it with care and store it properly after use.
Follow these habits:
• Keep the microphone in its case or a clean storage box
• Avoid touching the diaphragm or grille
• Use a stand instead of holding the microphone during recording
• Keep liquids away from the microphone
• Let a cold microphone warm to room temperature before use
• Disconnect cables by holding the connector, not pulling the cable
• Turn off phantom power before disconnecting an XLR microphone
Moisture can harm the diaphragm, especially in humid rooms. Avoid singing too close without a pop filter, and do not blow into the microphone to test it.
A shock mount can reduce vibration from footsteps, desk movement, and stand bumps. A windscreen or pop filter helps protect the capsule from breath and moisture.
Condenser Mic vs. Dynamic Mic
Condenser and dynamic microphones serve different purposes. A condenser mic is usually more sensitive and captures more high-frequency detail. A dynamic mic is often less sensitive and may handle loud sources and untreated rooms more easily.
Choose a condenser microphone when you want:
• Detailed vocals
• Clear speech
• Acoustic instruments
• Studio narration
• Quiet indoor recording
Choose a dynamic microphone when you need:
• Strong rejection of room noise
• Live performance use
• Recording in a noisy room
• High sound pressure handling
• A simple setup with less sensitivity
Neither type is always better. The right choice depends on your room, voice, instrument, budget, and recording goal.
A condenser mic can sound impressive in a quiet room but may expose every reflection and background noise. A dynamic mic may sound less detailed but produce a more usable recording in a difficult space.
Practical Tips for Better Condenser Mic Recordings
Small changes often make a large difference. Use these habits each time you record:
• Record a 20-second test before the main take
• Keep your mouth distance consistent
• Mark your chair or stand position with tape
• Speak slightly across the microphone instead of directly into it
• Keep your hands away from the stand and desk
• Turn off phone alerts and computer notifications
• Save a clean, unprocessed recording
• Record at a sensible level rather than chasing maximum volume
• Leave a few seconds of room tone for editing
• Name your audio files clearly
One lesson that saves many beginners time is to fix the source before using plugins. Moving the microphone two inches, closing a window, or changing the recording angle can improve the sound more than adding several effects.
Use equalization, compression, and noise reduction only after you have a clean recording. Good processing supports a strong performance; it cannot fully repair severe echo, clipping, or constant background noise.
Frequently Asked Questions About How to Use Condenser Mic
Do condenser microphones need phantom power?
Most XLR condenser microphones need 48-volt phantom power from an audio interface, mixer, or preamp. USB condenser microphones receive power through the USB connection, so they usually do not need separate phantom power.
How far should I sit from a condenser microphone?
Start about 6 to 12 inches away, with a pop filter between you and the microphone. Move closer for a fuller sound and farther away for a more natural sound with less proximity effect.
Why is my condenser microphone not working?
Check the cable, input selection, mute controls, gain, and phantom power. For a USB model, confirm that your computer and recording software have selected the microphone as the active input.
Can I use a condenser microphone without an audio interface?
Yes, if it is a USB condenser microphone. An XLR condenser microphone normally needs an audio interface, mixer, or preamp that provides microphone gain and phantom power.
Should I point the condenser mic directly at my mouth?
You can, but a slight angle often reduces plosive sounds and harsh “S” sounds. Test a straight position and an off-axis position to find the clearest tone.
Why does my condenser mic pick up so much background noise?
Condenser microphones are highly sensitive, so they capture room reflections, fans, traffic, and computer noise. Move closer, lower the room noise, improve acoustic treatment, and use headphones while monitoring.
Is a condenser microphone good for streaming?
Yes. It can provide detailed, professional-sounding speech when used in a quiet room. Keep it close, use a pop filter, reduce keyboard noise, and set the gain so loud speech does not clip.
Conclusion
Using a condenser mic well comes down to five basics: connect it correctly, provide the right power, place it at a steady distance, control the room, and set safe recording levels. A pop filter, closed-back headphones, and a short sound check can prevent many common problems.
Start with your microphone placement before reaching for plugins. Record a test, listen closely, make one change at a time, and practice until the setup feels natural. Explore more recording guides, test your equipment today, and share your own condenser microphone tips in the comments.